Deployments
On top of Kubernetes ReplicaSets, OpenShift gives us even more support for software lifecycle with Deployments. A Deployment creates a ReplicaSet and has the added benefit of controlling how new deployments get triggered and deployed.
Important
Deployments are sufficient for deploying a production service
Deployments manages ReplicaSets which in turn manages a set of Pods
Creating a Deployment
Below is an example Deployment:
apiVersion: apps/v1
kind: Deployment
metadata:
  name: my-app
spec:
  replicas: 5
  selector:
    matchLabels:
      name: my-app
  template: { ... }
  strategy:
    type: RollingUpdate
  revisionHistoryLimit: 2
  minReadySeconds: 0
  paused: false
Let’s look at the individual parts of this definition, under spec.
replicas- the number of replicas to be passed down to the ReplicaSetselector- the selector to determine which pods are managed by the ReplicaSet.template- a pod definition. Note that this pod template must have the selector from above in itsmetadata.labels.strategy- see Deployment StrategiesrevisionHistoryLimit- the number of old revisions of ReplicaSets to keep around. This can be used to have a rollback plan in case of a bad deployment.minReadySeconds- number of seconds after the readiness check succeeds that the pod is considered “available”. By default, this is 0 and may be omitted.paused- set this to “true” to pause a deployment
Creating Deployments
Here is an example completed Deployment.
apiVersion: v1
kind: Deployment
metadata:
  name: recreate-example
spec:
  replicas: 2
  selector:
    matchLabels:
      deployment: recreate-example
  strategy:
    # We set the type of strategy to Recreate, which means that it will be scaled down prior to being scaled up
    type: Recreate
  template:
    metadata:
      labels:
        deployment: recreate-example
    spec:
      containers:
      - image: openshift/deployment-example:v1
        name: deployment-example
        ports:
        - containerPort: 8080
          protocol: TCP
As with other objects in OpenShift, you can create this Deployment with oc create -f {FILE_NAME}.
Once created, you can check the status of the ongoing deployment process with the command
oc rollout status deploy/{NAME}
To get basic information about the available revisions, if you had done any updates to the deployment since, run
oc rollout history deploy/{NAME}
You can view a specific revision with
oc rollout history deploy/{NAME} --revision=1
For more detailed information about a Deployment, use
oc describe deploy {NAME}
To roll back a deployment, run
oc rollout undo deploy/{NAME}
Web Interface
When using the web interface, you can view and edit a Deployment, from the
sidebar, go to Applications, then Deployments.
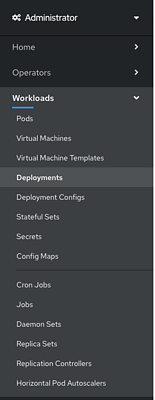
You can get info on any deployment by clicking on it.
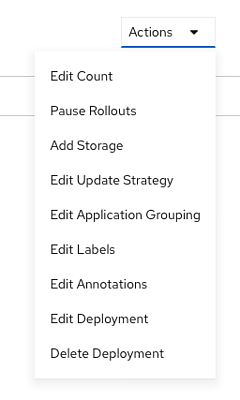
To edit this configuration, click Actions in the upper right hand corner, then Edit on whatever you wish to edit, or Edit Deployment if
you’d rather edit the YAML directly.
Deployment Strategies
A deployment strategy is a method for upgrading an application. The goal of deployment strategies is to make an update with no downtime to the end users.
The two most common values here will be RollingUpdate and Recreate. The default is RollingUpdate.
Since the end user usually will be accessing an application with a route, the deployment strategy can focus on deployment configuration features. Here are a few examples of the deployment configuration based strategies.
Note
All of the below strategies use readiness checks to determine if a new pod is ready for use. If
any readiness check fails, the deployment configuration will continue to try to run the pod until it
times out. The default timeout is 10m. This value can be set in deployment.spec.strategy.params.TimeoutSeconds
The default strategy, if omitted, is RollingUpdate.
Rolling Strategy
A rolling deployment slowly replaces instances of the previous version with instances of the new version. This deployment waits for new pods to become ready before scaling down the old replication controller. This strategy is easily aborted and reverted.
A rolling deployment is best used when you want to take no downtime during an update, but you know your application can support having old and new code running at the same time.
Here is an example Rolling deployment:
strategy:
  type: RollingUpdate
  rollingUpdate:
    maxSurge: "20%"
    maxUnavailable: "10%"
maxSurge and maxUnavailable - maxUnavailable is the maximum number of pods that can be unavailable
during the update. maxSurge is the number of pods that can be scheduled above the original number
of pods. Both values can be set to either a percentage (20%) or a positive integer (2). The default
value for both is 25%.
These values can be used to tune a deployment for speed or availability. If you want to maintain full
capacity, set maxUnavailable to 0. The maxSurge value can be used to speed up the scale up. Note
that you still must stay below your project’s pod quota.
A RollingUpdate strategy follows this sequence:
Scale up the new ReplicaSet based on
maxSurge.Scale down the old ReplicaSet based on
maxUnavailable.Repeat the scaling until the new replication controller has the desired replica count and the old replication controller has 0.
Note
During the scale down, the strategy waits for pods to become “ready” to determine if scaling down more will affect availability. If the new pods don’t become “ready”, the deployment will eventually time out and revert to the old deployment.
Recreate Strategy
A recreate deployment scales the previous deployment down to 0 before starting the new deployment. This is best used when a downtime is acceptable, and your application cannot handle having the old and new versions running at the same time.
Here is an example recreate deployment:
strategy:
  type: Recreate
The recreate strategy follows this sequence:
Scale down the old deployment to 0 replicas.
Scale up the new deployment to the number of desired replicas.
More Advanced Deployment Strategies with Routes
While some strategies leverage features of Deployments, others leverage features of routes. If you haven’t read the docs on Services or Routes, read those first before trying these more advanced strategies.
Since routes are intended for HTTP and HTTPS traffic, these strategies are best used for web applications.
Blue-Green Deployment
Blue-green deployments are defined as running two versions of an application at the same time, then moving traffic from the old production version (the green version) to the new production version (the blue version). You could use a Rolling Deployment Strategy for this, but for the sake of showing how route-based deployments work, we’ll use a route.
Warning
Blue-green deployment requires that your application can handle both old and new versions running at the same time. Be sure to think about your application and if it can handle this. For example, if the new version of the software changes how a certain field in a database is read and written, then the old version of the software won’t be able to read the database changes, and your production instance could break. This is known as “N-1 compatibility” or “backward compatibility”.
Note
The below examples use commands to create everything for demonstration purposes but the general best practice is to use YAML files for for all your deploying and configuration.
Create two copies of your application, one for the old service (green) and one for the new (blue). Note that the image you are using here
my-app:v<n>must have a port exposed with theEXPOSE <portnumber>in its Dockerfile when you built it. Otherwise, make sure you create a service for it after the below commands. The below command creates two DeploymentConfigsmy-app-greenandmy-app-blue.oc new-app my-app:v1 --name=my-app-green oc new-app my-app:v2 --name=my-app-blue
If a service wasn’t created automatically, create a service with the below commands, where the
--portrefers to the port the service exposes to incoming traffic, and the--target-portrefers to the port in the running pod to direct traffic to.oc expose dc/my-app-blue --port=80 --target-port=8080 oc expose dc/my-app-green --port=80 --target-port=8080
Create a route which points to the old service (this is assuming your application)
oc create route edge my-app-route --service=my-app-green --hostname=my-app.apps.<cluster>.ccs.ornl.gov
Browse to your project at my-app.apps.<cluster>.ccs.ornl.gov and verify that the v1 version is displayed.
Edit the route and change the service name to
my-app-blueoc patch route/my-app-route -p '{"spec":{"to":{"name":"my-app-blue"}}}'
Verify the change has taken effect by refreshing your browser until you see the new version.
A/B Deployment
A/B Deployments are a popular way to try a new version of an application with a small subset of users in the production environment. With this strategy, you can specify that the older version gets most of the user requests while a limited fraction of users get sent to the new version. Since you can control the amount of users which get sent to the new version, you can gradually increase the volume of requests to the new version and eventually stop using the old version. Remember that deployment configurations don’t do any autoscaling of pods, so you may have to adjust the number of pod replicas for each version to deal with the increased/decreased load.
Note
As with blue-green deployment, A/B deployments require that your application has N-1 compatibility.
To set up an A/B environment:
Create the two applications and give them different names
oc new-app my-app:v1 --name=my-app-a
oc new-app my-app:v2 --name=my-app-b
Create a route to the
Aservice (assuming themy-appconfiguration contains a service)oc create route edge --service=my-app-a --name=my-app
Browse to the application at
my-app.{PROJECT}.{CLUSTER}.ccs.ornl.govto verify that you see theAversion.Edit the route to include the second service with
alternateBackends(see the Routes for more information)oc edit route my-app ... metadata: name: my-app annotations: haproxy.router.openshift.io/balance: roundrobin spec: host: my-app.{PROJECT}.{CLUSTER}.ccs.ornl.gov to: kind: Service name: my-app-a weight: 10 alternateBackends: - kind: Service name: my-app-b weight: 15 In the above example, ``my-app-a`` will get 10/25, or 2/5 of the requests, and ``my-app-b`` will get 15/25, or 3/5
More information
For more information, checkout the upstream kubernetes doc on Deployments and the Openshift doc on Route based deployment strategies.