Debugging
Linaro Forge DDT
Client Setup and Usage
The Linaro Forge remote client allows debugging (via DDT) or profiling (via MAP) of remote jobs, while running the GUI on your local machine. This is faster than X11 (particularly for slow connections), and provides a native GUI.
In addition, the client can be used as a viewer for collected MAP profiles. See the Linaro Forge page for more information.
Remote clients are available for Windows, Mac, and Linux, and can be used without an additional license.
The section below demonstrates configuration of the remote client and Reverse Connect setup.
Download
Andes
You can download the remote client (version 25.0) from the Linaro Forge page.
Frontier
You can download the remote client (version 25.1) from the Linaro Forge page.
Installation
Windows: Execute the .exe installer downloaded from the Linaro Forge website.
Mac: Open the DMG file with finder. From here you can drag the application to your “Applications” folder. (For older versions, you can launch the installer.)
Linux: Extract the tarball; run the installer for a GUI installer, or textinstall.sh for a command line text-based installer.
Configuration
The following section will outline how to configure the Linaro Forge client for Andes.
Note
Andes has linaro_forge/25.0.1 installed (see module spider forge for older versions). So make sure to download the corresponding remote client version from Linaro Forge page.
Reverse Connect Setup Instructions
Prior to launching the reverse connect you will need to set a couple of environment variables so the connection request gets routed correctly. The following export vars will need to be sourced in your batch script prior to srun or you can just source them prior to obtaining your node allocation.
export ALLINEA_CONFIG_DIR=<Somewhere on the Filesystem that can be accessed by the compute nodes i.e. /lustre/orion/<project>>
export ALLINEA_REVERSE_CONNECT_DIR=<Somewhere on the Filesystem that can be accessed by the compute nodes i.e. /lustre/orion/<project>>
Also, if you plan on running the Forge client from your local machine (i.e., laptop), you will need to create a bash file containing the above environment vars. The file can be saved in /ccs/home/<user>. Once created and saved, you will enter the path to the file in the Forge Remote Launch setup window next to Remote Script as shown below.
Make sure you set actual paths for the above environment variables.
Local client setup
Once installed, launch the Forge DDT client on your local machine.
You can ignore any information about the lack of license, as the license on the remote machine will be used.
When you reach the welcome screen, you should see a “Remote Launch” combo box (with “Off” selected). Click on it and select the “Configure” option.
Click the “Add” button.
In the Forge Remote Launch setup window:
In the
Remote Scriptbox, Enter the path to the file you created earlier/ccs/home/<user>/forge_connect_vars.sh.(Optionally) In the
Connection Namebox, enter a name for your remote connection (otherwise the host name will be used)In the
Host Namebox, enter your username and hostname (e.g.,username@andes.olcf.ornl.gov)If the host you wish to connect to requires connecting through a gateway machine, you can enter
user@hostname1user@hostname2(wherehostname1is the gateway andhostname2is the final destination).
In the
Remote Installation Directorybox, enter the remote path to the Linaro Forge installation (To find the path for a version of Forge, load the linaro_forge/25.0.1 module file in a terminal and runecho $DDT_HOME)For the remaining fields, the default values will work for the vast majority of setups. See the Linaro Forge documentation for more information on these fields.
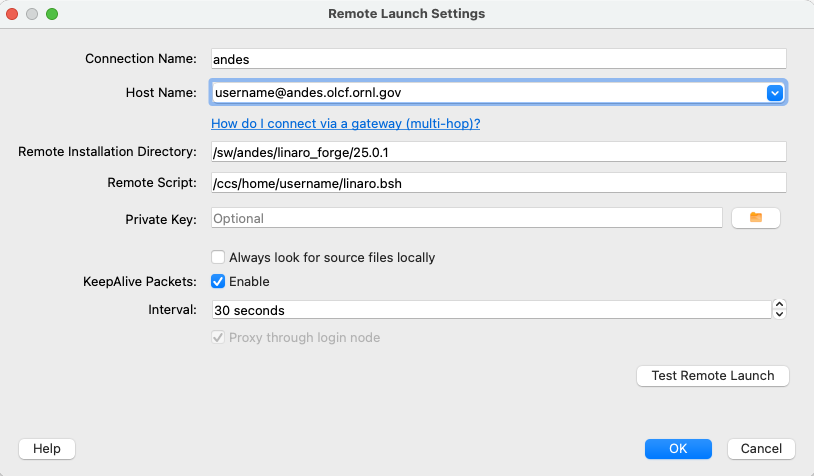
You may click the “Test Remote Launch” button to test your configuration, or click “OK” to save your configuration.
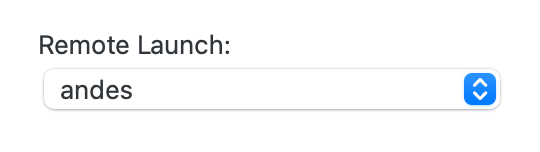
Return to the welcome screen, and select the name of your remote connection from the “Remote Launch” combo box. (You will be asked for your OLCF PASSCODE).
Once connected to a remote host, “Reverse Connect” allows launching of jobs to be launched with DDT and MAP from your usual launch environment, with a minor modification to your existing launch command.
Reverse Connect
In a separate terminal where you are logged into Andes, load the
linaro_forge/25.0.1module, and run addt --connectcommand via the batch system (e.g., by editing and running a job script, or running with an interactive shell).module load linaro_forge/25.0.1 ddt --connect srun -n 8 ./mpi_openmp_hello
The remote client will notify you of a new connection.
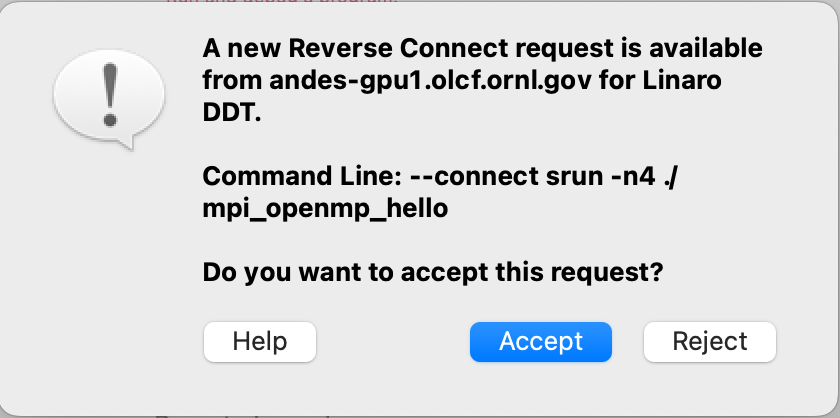
Once accepted, you can configure some final debugging options before launching the program.
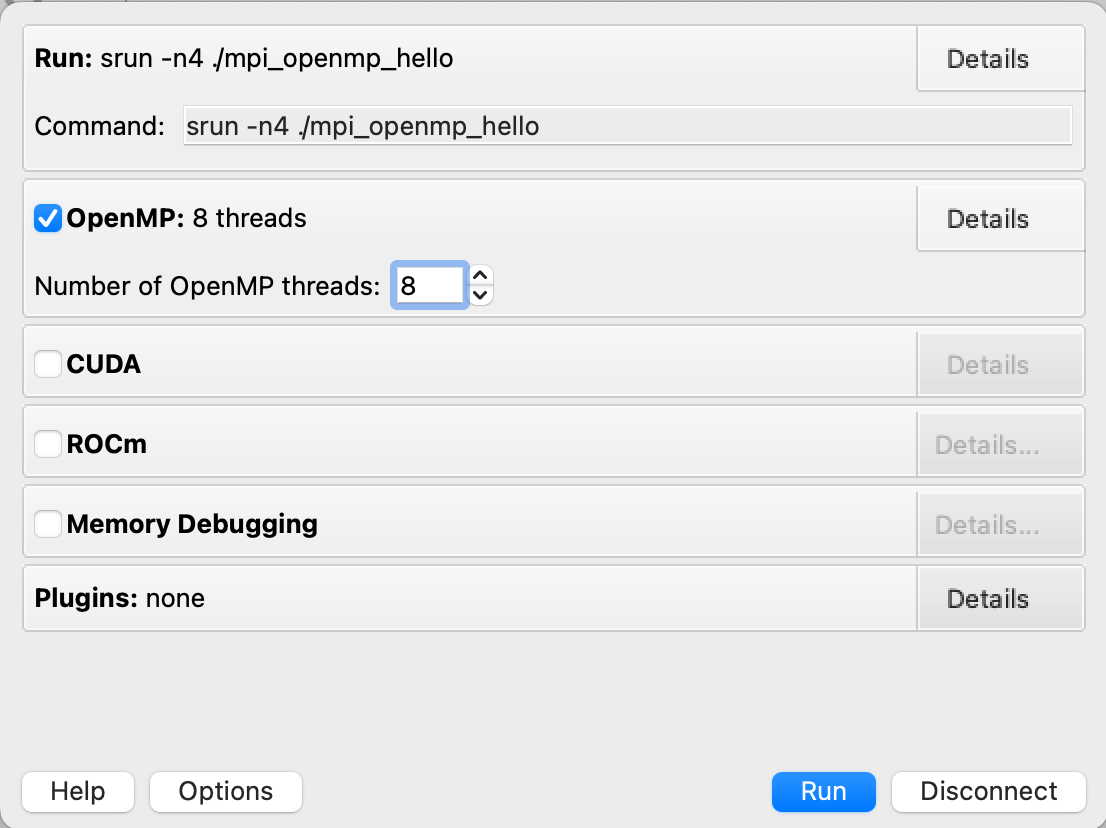
Click “Run”, and DDT will start your session.
When your job is executed, the ddt --connect command will establish a connection with your already-running remote client (must be running before launching the job). This provides a convenient way for the remote client to access a job within the batch system, and more importantly, avoids the need to explicitly tell DDT or MAP about any program parameters, environment variables, or module files required.
The following section will outline how to configure the Linaro Forge client for Frontier.
Note
Frontier has linaro-forge/25.1 installed (see module spider forge or module spider linaro-forge for older versions). So make sure to download the corresponding remote client version from Linaro Forge page.
Reverse Connect Setup Instructions
Prior to launching the reverse connect you will need to set a couple of environment variables so the connection request gets routed correctly. The following export vars will need to be sourced in your batch script prior to srun or you can just source them prior to obtaining your node allocation.
export ALLINEA_CONFIG_DIR=<Somewhere on the Filesystem that can be accessed by the compute nodes i.e. /lustre/orion/<project>>
export ALLINEA_REVERSE_CONNECT_DIR=<Somewhere on the Filesystem that can be accessed by the compute nodes i.e. /lustre/orion/<project>>
Also, if you plan on running the Forge client from your local machine (i.e., laptop), you will need to create a bash file containing the above environment vars. The file can be saved in /ccs/home/<user>. Once created and saved, you will enter the path to the file in the Forge Remote Launch setup window next to Remote Script as shown below.
Make sure you set actual paths for the above environment variables.
Local client setup
Once installed, launch the Forge DDT client on your local machine.
You can ignore any information about the lack of license, as the license on the remote machine will be used.
When you reach the welcome screen, you should see a “Remote Launch” combo box (with “Off” selected). Click on it and select the “Configure” option.
Click the “Add” button.
In the Forge Remote Launch setup window:
In the
Remote Scriptbox, Enter the path to the file you created earlier/ccs/home/<user>/linaro.bsh.(Optionally) In the
Connection Namebox, enter a name for your remote connection (otherwise the host name will be used)In the
Host Namebox, enter your username and hostname (e.g.,username@frontier.olcf.ornl.gov)If the host you wish to connect to requires connecting through a gateway machine, you can enter
user@hostname1user@hostname2(wherehostname1is the gateway andhostname2is the final destination).
In the
Remote Installation Directorybox, enter the remote path to the Linaro Forge installation (To find the path for a version of Forge, load the linaro-forge/25.1 module file in a terminal and runecho $OLCF_LINARO_FORGE_ROOT)For the remaining fields, the default values will work for the vast majority of setups. See the Linaro Forge documentation for more information on these fields.
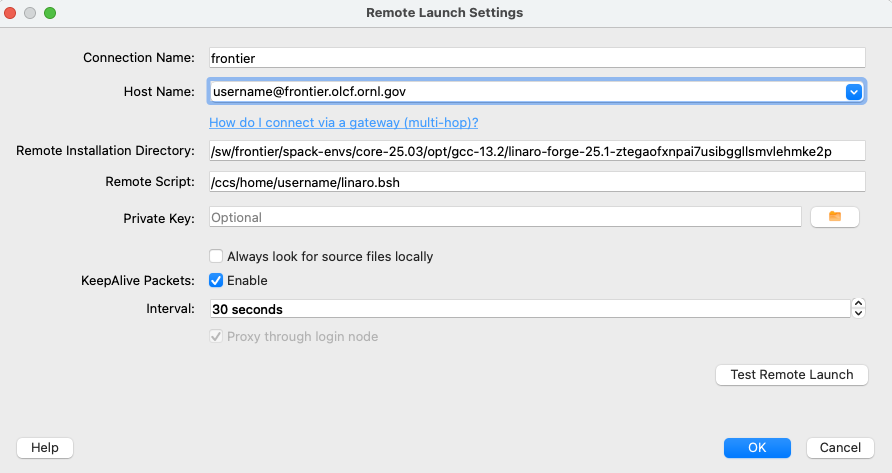
You may click the “Test Remote Launch” button to test your configuration, or click “OK” to save your configuration.
Return to the welcome screen, and select the name of your remote connection from the “Remote Launch” combo box. (You will be asked for your OLCF PASSCODE).

Once connected to a remote host, “Reverse Connect” allows launching of jobs to be launched with DDT and MAP from your usual launch environment, with a minor modification to your existing launch command.
Reverse Connect
In a separate terminal where you are logged into Frontier, load the
linaro-forge/25.1module, and run addt --connectcommand via the batch system (e.g., by editing and running a job script, or running with an interactive shell).module load linaro-forge/25.1 ddt --connect srun -n 8 ./hello_mpi_omp
The remote client will notify you of a new connection.
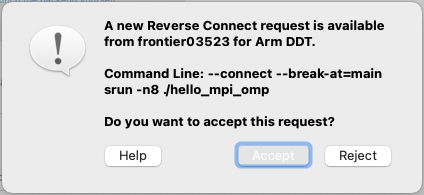
Once accepted, you can configure some final debugging options before launching the program.
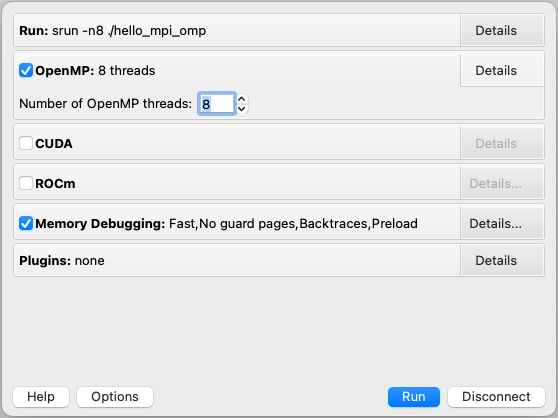
Click “Run”, and DDT will start your session.
When your job is executed, the ddt --connect command will establish a connection with your already-running remote client (must be running before launching the job). This provides a convenient way for the remote client to access a job within the batch system, and more importantly, avoids the need to explicitly tell DDT or MAP about any program parameters, environment variables, or module files required.
Warning
If you’re needing to debug an MPI+HIP code that you compile with the Cray compiler wrapper, you may want to unload the darshan-runtime module and then recompile your code. If you don’t do this, Forge will error out when you start a debugging session with the ROCm option selected.
Note
Setting a breakpoint inside a GPU kernel is only supported for the rocm/5.6.0 at this time. Loading other rocm modules will lead to GPU driver mismatch errors. Documentation on GPU debugging with DDT can be found here .
GNU GDB
GDB, the GNU Project Debugger, is a command-line debugger useful for traditional debugging and investigating code crashes. GDB lets you debug programs written in Ada, C, C++, Objective-C, Pascal (and many other languages).
More information on its use on OLCF systems can be found below.
GDB is available on Andes via the gdb module:
module load gdb
To use GDB to debug your application run:
gdb ./path_to_executable
Additional information about GDB usage can befound on the GDB Documentation Page.
GDB is available on Frontier under all compiler families:
module load gdb
To use GDB to debug your application run:
gdb ./path_to_executable
Additional information about GDB usage can befound on the GDB Documentation Page.
Valgrind
Valgrind is an instrumentation framework for building dynamic analysis tools. There are Valgrind tools that can automatically detect many memory management and threading bugs, and profile your programs in detail. You can also use Valgrind to build new tools.
The Valgrind distribution currently includes five production-quality tools: a memory error detector, a thread error detector, a cache and branch-prediction profiler, a call-graph generating cache profiler, and a heap profiler. It also includes two experimental tools: a data race detector, and an instant memory leak detector.
The Valgrind tool suite provides a number of debugging and profiling tools. The most popular is Memcheck, a memory checking tool which can detect many common memory errors such as:
Touching memory you shouldn’t (e.g., overrunning heap block boundaries, or reading/writing freed memory).
Using values before they have been initialized.
Incorrect freeing of memory, such as double-freeing heap blocks.
Memory leaks.
Valgrind is available on Andes via the valgrind module:
module load valgrind
Valgrind4hpc is a Valgrind-based debugging tool to aid in the detection of memory leaks
and errors in parallel applications. Valgrind4hpc aggregates any duplicate
messages across ranks to help provide an understandable picture of
program behavior. Valgrind4hpc manages starting and redirecting output from many
copies of Valgrind, as well as deduplicating and filtering Valgrind messages.
If your program can be debugged with Valgrind, it can be debugged with Valgrind4hpc.
Valgrind4hpc is available on Frontier under all compiler families:
module load valgrind4hpc
Additional information about Valgrind4hpc usage can be found on the HPE Cray Programming Environment User Guide Page.