Data Storage and Transfers
OLCF users have many options for data storage. Each user has multiple user-affiliated storage spaces, and each project has multiple project-affiliated storage spaces where data can be shared for collaboration. Below we give an overview and explain where each storage area is mounted.
Summary of Storage Areas
The storage area to use in any given situation depends upon the activity you wish to carry out. Storage areas are either user-centric or project-centric, and are further divided by the underlying storage type (e.g., Network File System (NFS), IBM Spectrum Scale, Nearline). Each storage type has a different intended use as described below.
Each user has a User Home area on NFS. Each project has a Project Home area on NFS, and multiple Work areas on Spectrum Scale/Lustre. Moderate projects each have an archival storage area on Kronos with project-shared, world-shared, and users directories (each of these 3 areas share a 200TB total Archival quota). The different storage areas are summarized in the list and table below.
User Home: Long-term data for routine access that is unrelated to a project. It is mounted as read/write on the Frontier compute nodes, but we strongly recommend that users launch and run jobs from the Orion parallel filesystem due to its larger storage capacity and superior performance.
Project Home: Long-term project data for routine access that’s shared with other project members. It is mounted as read/write on the Frontier compute nodes, but we strongly recommend that users launch and run jobs from the Orion parallel filesystem due to its larger storage capacity and superior performance.
Member Work: Short-term user data for fast, batch-job access that is not shared with other project members.
Project Work: Short-term project data for fast, batch-job access that’s shared with other project members.
World Work: Short-term project data for fast, batch-job access that’s shared with users outside your project.
Member Archive: Long-term project data for archival access that is not shared with other project members.
Project Archive: Long-term project data for archival access that’s shared with other project members.
World Archive: Long-term project data for archival access that’s shared with users outside your project.
Warning
Proprietary/Sensitive/Controlled Information Notice
Portions of data and/or software used in your project may require extra protections due to requirements for proprietary, sensitive, or controlled information. It is imperative that filenames, application names, job names, environment variables, batch job scripts, or any other unencrypted text must never contain sensitive or controlled information.
If you have HIPAA or ITAR data, you will need to use our SPI resources. More information about SPI can be found here.
If you have security related questions, contact us via email at: security-admins@ccs.ornl.gov. Other questions can be sent to help@olcf.ornl.gov.
Area |
Path |
Enclave |
Type |
Permissions |
Quota |
Backups |
Purged |
Retention |
On Compute Nodes |
|---|---|---|---|---|---|---|---|---|---|
User Home |
|
M1, M2 |
NFS |
User set |
50 GB |
Yes |
No |
90 days |
Frontier: Read/Write |
User Archive |
|
M1 |
Nearline |
User set |
200 TB* |
Yes |
No |
90 days |
No |
Project Home |
|
M1, M2 |
NFS |
770 |
50 GB |
Yes |
No |
90 days |
Frontier: Read/Write |
Orion Member Work |
|
M1, M2 |
Lustre HPE ClusterStor |
700 |
50 TB |
No |
90 days |
N/A [2] |
Read/Write |
Orion Project Work |
|
M1, M2 |
Lustre HPE ClusterStor |
770 |
50 TB |
No |
90 days |
N/A [2] |
Read/Write |
Orion World Work |
|
M1 |
Lustre HPE ClusterStor |
775 |
50 TB |
No |
90 days |
N/A [2] |
Read/Write |
Alpine2 Member Work |
|
M1, M2 |
Spectrum Scale |
700 [1] |
50 TB |
No |
90 days |
N/A [2] |
Read/Write |
Alpine2 Project Work |
|
M1, M2 |
Spectrum Scale |
770 |
50 TB |
No |
90 days |
N/A [2] |
Read/Write |
Alpine2 World Work |
|
M1 |
Spectrum Scale |
775 |
50 TB |
No |
90 days |
N/A [2] |
Read/Write |
Project Archive |
|
M1 |
Nearline |
770 |
200 TB* |
No |
No |
90 days |
No |
World Archive |
|
M1 |
Nearline |
775 |
200 TB* |
No |
No |
90 days |
No |
Moderate Enhanced User Home |
|
ME |
Spectrum Scale |
700 |
50 TB |
No |
90 days |
N/A [2] |
Read/Write |
Moderate Enhanced Member Work |
|
ME |
Spectrum Scale |
700 |
50 TB |
No |
90 days |
N/A [2] |
Read/Write |
Moderate Enhanced Project Work |
|
ME |
Spectrum Scale. |
770 |
50 TB |
No |
90 days |
N/A [2] |
Read/Write |
Open User Home |
|
O |
NFS |
User set |
50 GB |
Yes |
No |
90 days |
Read-only |
Open Project Home |
|
O |
NFS |
770 |
50 GB |
Yes |
No |
90 days |
Read-only |
Open Member Work |
|
O |
Spectrum Scale |
700 [1] |
50 TB |
No |
90 days |
N/A [2] |
Read/Write |
Open Project Work |
|
O |
Spectrum Scale |
770 |
50 TB |
No |
90 days |
N/A [2] |
Read/Write |
Open World Work |
|
O |
Spectrum Scale |
775 |
50 TB |
No |
90 days |
N/A [2] |
Read/Write |
Note
The three archival storage areas share a single project-centric 200TB quota.
Important
Files within “Work” directories (i.e., Member Work, Project Work, World Work) are not backed up and are purged on a regular basis according to the timeframes listed above.
Tip
If your home directory reaches its quota, your batch jobs might fail with the error cat: write error: Disk quota exceeded. This error may not be intuitive, especially if your job exclusively uses work areas that are well under quota. The error is actually related to your home directory quota. Sometimes, batch systems write temporary files to the home directory, so if the home directory is over quota and that file creation fails, the job will fail with the quota error.
You can check your home directory quota with the quota command. If it is over quota, you need to bring usage under the quota and then your jobs should run without encountering the Disk quota exceeded error.
Footnotes
On Frontier additional paths to the various project-centric work areas are available via the following symbolic links and/or environment variables:
Member Work Orion Directory:
/lustre/orion/scratch/[userid]/[projid]or$MEMBERWORK/[projid]Project Work Orion Directory:
/lustre/orion/proj-shared/[projid]or$PROJWORK/[projid]World Work Orion Directory:
/lustre/orion/world-shared/[projid]or$WORLDWORK/[projid]
Notes on User-Centric Data Storage
User Home Directories (NFS)
The environment variable $HOME will always point to your current home directory. It is recommended, where possible, that you use this variable to reference your home directory. In cases in which using $HOME is not feasible, it is recommended that you use /ccs/home/$USER (or /ccsopen/home/$USER for home directories in the open enclave).
Users should note that since this is an NFS-mounted filesystem, its performance will not be as high as other filesystems.
User Home Quotas
Quotas are enforced on user home directories. To request an increased quota, contact the OLCF User Assistance Center. To view your current quota and usage, use the quota command:
$ quota -Qs
Disk quotas for user usrid (uid 12345):
     Filesystem  blocks   quota   limit   grace   files   quota   limit   grace
nccsfiler1a.ccs.ornl.gov:/vol/home
                  4858M   5000M   5000M           29379   4295m   4295m
Note
Moderate enhanced projects home directores are located in GPFS. There is no enforced quota, but it is recommended that users not exceed 50 TB. These directories are subject to the 90 day purge.
Tip
To find your project quota, you use the df command as described in Project Home Path, Quota, and Permissions, instead of the quota command.
User Home Permissions
The default permissions for user home directories is shown in the Filesystem Summary Table. Users have the ability to change permissions on their home directories, although it is recommended that permissions be set to as restrictive as possible (without interfering with your work).
Note
Moderate enhanced projects have home directory permissions set to 0700 and are automatically reset to that if changed by the user.
User Home Backups
If you accidentally delete files from your home directory, you may be able to retrieve them. Online backups are performed at regular intervals. Hourly backups for the past 24 hours, daily backups for the last 7 days, and once-weekly backups are available. It is possible that the deleted files are available in one of those backups. The backup directories are named hourly.*, daily.*, and weekly.* where * is the date/time stamp of backup creation. For example, hourly.2020-01-01-0905 is an hourly backup made on January 1st, 2020 at 9:05 AM.
The backups are accessed via the .snapshot subdirectory. Note that ls alone (or even ls -a) will not show the .snapshot subdirectory exists, though ls .snapshot will show its contents. The .snapshot feature is available in any subdirectory of your home directory and will show the online backups available for that subdirectory.
To retrieve a backup, simply copy it into your desired destination with the cp command.
Note
There are no backups for moderate enhanced project home directories.
User Website Directory
Users interested in sharing files publicly via the World Wide Web can request a user website directory be created for their account. User website directories (~/www) have a 5GB storage quota and allow access to files at http://users.nccs.gov/~user (where user is your userid). If you are interested in having a user website directory created, please contact the User Assistance Center at help@olcf.ornl.gov.
Notes on Project-Centric Data Storage
Project directories provide members of a project with a common place to store code, data, and other files related to their project.
Project Home Directories (NFS)
Open and Moderate Projects are provided with a Project Home storage area in the NFS-mounted filesystem. This area is intended for storage of data, code, and other files that are of interest to all members of a project. Since Project Home is an NFS-mounted filesystem, its performance will not be as high as other filesystems.
Note
Moderate Enhanced projects are not provided with Project Home spaces, just Project Work spaces.
Project Home Path, Quota, and Permissions
The path, quota, and permissions for Project Home directories are summarized in the Filesystem Summary Table.
Quotas are enforced on Project Home directories. To check a Project Home directory’s usage, run df -h /ccs/proj/[projid] (where [projid] is the project ID). Note, however, that permission settings on some subdirectories may prevent you from accessing them, and in that case you will not be able to obtain the correct usage. If this is the case, contact help@olcf.ornl.gov for the usage information.
Project Home directories are root-owned and are associated with the project’s Unix group. Default permissions are set such that only members of the project can access the directory, and project members are not able to change permissions of the top-level directory.
Project Home Backups
If you accidentally delete files from your project home directory, you may be able to retrieve them. Online backups are performed at regular intervals. Hourly backups for the past 24 hours, daily backups for the last 7 days, and once-weekly backups are available. It is possible that the deleted files are available in one of those backups. The backup directories are named hourly.*, daily.*, and weekly.* where * is the date/time stamp of backup creation. For example, hourly.2020-01-01-0905 is an hourly backup made on January 1st, 2020 at
9:05 AM.
The backups are accessed via the .snapshot subdirectory. Note that ls alone (or even ls -a) will not show the .snapshot subdirectory exists, though ls .snapshot will show its contents. The .snapshot feature is available in any subdirectory of your project home directory and will show the online backups available for that subdirectory.
To retrieve a backup, simply copy it into your desired destination with the cp command.
Project Work Areas
Three Project Work Areas to Facilitate Collaboration
To facilitate collaboration among researchers, the OLCF provides (3) distinct types of project-centric work storage areas: Member Work directories, Project Work directories, and World Work directories. Each directory should be used for storing files generated by computationally-intensive HPC jobs related to a project.
Note
Moderate enhanced projects do not have World Work directories and the filesystem is called “arx” rather than “alpine”
Moderate projects subject to export control do not have World Work directories
Open projects’ work areas are in the “wolf” filesystem rather than “alpine”
The difference between the three storage areas lies in the accessibility of the data to project members and to researchers outside of the project. Member Work directories are accessible only by an individual project member by default. Project Work directories are accessible by all project members. World Work directories are potentially readable by any user on the system.
Permissions
UNIX Permissions on each project-centric work storage area differ according to the area’s intended collaborative use. Under this setup, the process of sharing data with other researchers amounts to simply ensuring that the data resides in the proper work directory.
Member Work Directory:
700Project Work Directory:
770World Work Directory:
775
For example, if you have data that must be restricted only to yourself, keep them in your Member Work directory for that project (and leave the default permissions unchanged). If you have data that you intend to share with researchers within your project, keep them in the project’s Project Work directory. If you have data that you intend to share with researchers outside of a project, keep them in the project’s World Work directory.
Backups
Member Work, Project Work, and World Work directories are not backed up. Project members are responsible for backing up these files, either to Project Archive areas (Kronos Nearline Archival Storage System) or to an off-site location.
Project Archive Directories
Moderate projects without export control restrictions are also allocated project-specific archival space on Kronos Nearline Archival Storage System. The default quota is shown on the table at the top of this page (200TB). If a higher quota is needed, contact the User Assistance Center.
Note
There is no archival storage for Moderate Enhanced Projects, Moderate Projects subject to export control, or Open projects.
Three Project Archive Areas Facilitate Collaboration on Archival Data
To facilitate collaboration among researchers, the OLCF provides (3) distinct types of project-centric archival storage areas: Member Archive directories, Project Archive directories, and World Archive directories. These directories should be used for storage of data not immediately needed in either the Project Home (NFS) areas or Project Work (Orion/Alpine2) areas and to serve as a location to store backup copies of project-related files.
As with the three project work areas, the difference between these three areas lies in the accessibility of data to project members and to researchers outside of the project. Member Archive directories are accessible only by an individual project member by default, Project Archive directories are accessible by all project members, and World Archive directories are readable by any user on the system.
All three archival storage areas above share a single 200TB project-centric quota on Kronos.
Permissions
UNIX Permissions on each project-centric archive storage area differ according to the area’s intended collaborative use. Under this setup, the process of sharing data with other researchers amounts to simply ensuring that the data resides in the proper archive directory.
Member Archive Directory:
700Project Archive Directory:
770World Archive Directory:
775
For example, if you have data that must be restricted only to yourself, keep them in your Member Archive directory for that project (and leave the default permissions unchanged). If you have data that you intend to share with researchers within your project, keep them in the project’s Project Archive directory. If you have data that you intend to share with researchers outside of a project, keep them in the project’s World Archive directory.
Kronos Project Archive Access
For information on accessing archival storage areas on Kronos, see the Kronos Nearline Archival Storage System section.
Data Policies
Information
Although there are no hard quota limits for project storage, an upper storage limit should be reported in the project request. The available space of a project can be modified upon request.
Special Requests
If you need an exception to the limits listed in the table above, such as a higher quota in your User/Project Home or a purge exemption in a Member/Project/World Work area, contact help@olcf.ornl.gov with a summary of the exception that you need.
Data Retention
By default, the OLCF does not guarantee lifetime data retention on any OLCF resources. Following a user account deactivation or project end, user and project data in non-purged areas will be retained for 90 days. After this timeframe, the OLCF retains the right to delete data. Data in purged areas remains subject to normal purge policies.
Orion Lustre HPE ClusterStor Filesystem
Frontier mounts Orion, a parallel filesystem based on Lustre and HPE ClusterStor, with a 679 PB usable namespace (/lustre/orion/). In addition to Frontier, Orion is available on the OLCF’s data transfer nodes. Files older than 90 days are purged from Orion.
Orion is a cluster of servers with approximately 500 nodes. Each node plays a role in providing a POSIX namespace for users (/lustre/orion/). A file on Lustre consists of one or more components that may hit one or more servers. Lustre has a distributed lock management process for concurrent access to files or regions within files.
Orion has three performance tiers:
A flash-based performance tier of 5,400 nonvolatile memory express (NVMe) devices that provides 11.5 petabytes (PB) of capacity at peak read-write speeds of 10 TB/s.
A hard-disk-based capacity tier that provides 679 PB at peak read speeds of 5.5 TB/s and peak write speeds of 4.6 TB/s.
A flash-based metadata tier of 480 NVMe devices provides an additional capacity of 10 PB.
Orion Performance Tiers and File Striping Policy
Lustre, in addition to other servers and components, is composed of Objects Storage Targets (OSTs) on which the data for files is stored. A file may be “striped” or divided over multiple OSTs. Striping provides the ability to store files that are larger than the space available on any single OST and allows a larger I/O bandwidth than could be managed by a single OST. Striping is one of the main differences between Frontier’s Orion Lustre and Summit’s Alpine GPFS filesystems because GPFS has no concept of striping exposed to the user. For Orion, files are striped between object storage targets (OST) in the three capacity tiers to achieve the best performance. Below, we describe this automatic file striping policy and its motivations.
Orion uses a feature called Data-on-Metadata-Target (DoM), where a portion of the file is stored along with the file’s metadata. Currently, directories are configured to store up to the first 256 KB of a file on the metadata tier using DoM. This reduces contention and provides better performance for small file I/O. Orion uses a feature called Progressive File Layout (PFL) to change the striping of a file as it grows. For example, a file smaller than 8 MB will be striped to a single OST, and larger files will be striped across multiple OSTs, taking advantage of more hardware resources. As files grow larger, they are automatically striped between the storage tiers. OLCF is refining the automatic file striping policy to optimize I/O performance for users.
Note
Because of the complexity of file striping between Orion’s performance tiers, users should refrain from attempting to manually control file striping, unless they are writing single files in excess of 512 GB in size.
Some sufficiently large (>512 GB per file) single-shared-file workloads may benefit from explicit striping. Below are some reccomendations:
Size |
Stripe Command |
|---|---|
512 GB+ |
lfs setstripe -c 8 -p capacity -S 16M |
1 TB+ |
lfs setstripe -c 16 -p capacity -S 16M |
8 TB+ |
lfs setstripe -c 64 -p capacity -S 16M |
16 TB+ |
lfs setstripe -c 128 -p capacity -S 16M |
Note
When manually setting striping you must specify -p capacity with the stripe command. Otherwise, Orion defaults to using the performance tier, which isn’t optimized for handling larger single files.
If you feel that the default file striping on Orion or the recommended striping for large single-shared-file workloads is not meeting your needs, please contact OLCF-help so that we can work with you to understand your application’s I/O performance.
I/O Patterns that Benefit from File Striping
Lustre’s file striping will most likely improve performance for applications that read or write to a single (or multiple) large shared files.
Striping will likely have little or no performance benefit for:
Serial I/O, where a single processor performs all the I/O
Multiple nodes perform I/O but access files at different times.
Multiple nodes perform I/O simultaneously to different files that are small (each < 100 MB)
I/O that uses one file per process
LFS setstripe wrapper
The OLCF provides a wrapper for the lfs setstripe command that simplifies the process of striping files. The wrapper will enforce that certain settings are used to ensure that striping is done correctly. This will help to ensure good performance for users as well as prevent filesystem issues that could arise from incorrect striping practices. The wrapper is accessible via the lfs-wrapper module and will soon be added to the default environment on Frontier.
Orion is different than other Lustre filesystems that you may have used previously. To make effective use of Orion and to help ensure that the filesystem performs well for all users, it is important that you do the following:
Use the capacity OST pool tier (e.g.,
lfs setstripe -p capacity)Stripe across no more than 450 OSTs (e.g.,
lfs setstripe -c<= 450)
When the module is active in your environment, the wrapper will enforce the above settings. The wrapper will also do the following:
If a user provides a stripe count of -1 (e.g.,
lfs setstripe -c -1) the wrapper will set the stripe count to the maximum allowed by the filesystem (currently 450)If a user provides a stripe count of 0 (e.g.,
lfs setstripe -c 0) the wrapper will use the OLCF default striping command which has been optimized by the OLCF filesystem managers:lfs setstripe -E 256K -L mdt -E 8M -c 1 -S 1M -p performance -z 64M -E 128G -c 1 -S 1M -z 16G -p capacity -E -1 -z 256G -c 8 -S 1M -p capacity
Please contact the OLCF User Assistance Center if you have any questions about using the wrapper or if you encounter any issues.
Lustre File Locking Tips
File locking is the process of restricting only one process or user to access a file or region of a file. It prevents race conditions when writing data from multiple processes. Lustre uses a distributed lock management (LDLM) system for consistency and access. Concurrent operations on files/directories flow through this LDLM system. Locks are generally managed on a per-client level and there are limits to the number of concurrent locks each client can have on each storage target (MDT/OST). While locking is good and necessary, certain I/O patterns can become very slow if they generate a large amount of lock contention.
Here are some things to avoid to minimizing lock impact:
Multiple clients opening the same byte range of a file for writing
Multiple clients appending to the same file (subset of previous)
Multiple clients concurrently creating numerous files or directories in the same directory
If your code does any of these, you may want to adjust it to avoid or limit them and then test to see if that improves your write performance.
Darshan-runtime and I/O Profiling
The darshan-runtime modulefile is part of DefApps and is loaded by default on Frontier. This module allows users to profile the I/O of their applications with minimal impact. The logs are available to users on the Orion file system in /lustre/orion/darshan/<system>/<yyyy>/<mm>/<dd>.
Unloading darshan-runtime is recommended for users profiling their applications with other profilers to prevent conflicts.
Purge
To help ensure performance and availability for all projects, Orion is regularly purged. Files that have not been accessed (e.g., read) or modified within 90-days are eligible to be purged. The purge runs continuously as a rolling window, deleting data as it finds eligible files.
For example, let’s say you have these files on Orion as of 01/01/2025:
$ ls -l
-rw-r--r--  1 ...  ...  ... Oct 2 2024 file1.txt (eligible to be purged on 1/1/25) (currently 91 days old)
-rw-r--r--  1 ...  ...  ... Oct 3 2024 file2.txt (eligible to be purged on 1/2/25) (currently 90 days old)
-rw-r--r--  1 ...  ...  ... Dec 1 2024 file3.txt (eligible to be purged on 3/2/25) (currently 31 days old)
Because file1.txt is over 90 days old, file1.txt will be purged “today”.
Although file2.txt is safe “today”, on January 2nd (“tomorrow”), file2.txt will be purged.
The purge will continuously run and it won’t be until March 2nd that file3.txt will be purged (unless accessed or modified by that time).
Because Orion is considered scratch and not backed-up by the center, data owners should ensure needed data is regularly backed-up. See Kronos Nearline Archival Storage System for information about using the center’s archival storage resource.
Temporary purge exmptions can be requested by contacting help@olcf.ornl.gov .
Warning
Orion is a scratch filesystem. Data that has not been accessed in 90-days are eligible for purge. Data owners are responsible for backing up needed data.
HPSS Data Archival System
Warning
On January 31, 2025, HPSS was decommissioned. The OLCF is no longer be able to retrieve data remaining on HPSS.
Kronos Nearline Archival Storage System
Kronos is the center’s new nearline storage resource. Kronos is multi-tiered containing both disk and tape. Users will interact with the system’s disk sub-system which leverages IBM Storage Scale (GPFS). Data stored on the disk sub-system will automatically be stored on the system’s tape sub-system. The disk sub-system will provide an initial capacity of 134 PB with the ability to expand as need increases. Kronos is capable of bandwidth of up-to 200 GB/s from the center’s Data Transfer Nodes.
Warning
While Kronos automatically backs up disk data to tape, files larger than 45TB will not be automatically backed up to the tape sub-system and will remain only on the disk.
Access / Data Transfer
Kronos is mounted on the moderate security enclave Data Transfer Nodes (dtn.ccs.ornl.gov) and is accessible via Globus at the “OLCF Kronos” collection. Standard UNIX commands and tools can also be used to interact with Kronos (scp, rsync, etc.).
For more information on using scp and rsync to transfer data to and from OLCF resources, see the Command-Line/Terminal Tools section.
For more information on using Globus to transfer data to and from OLCF resources, see the Globus section.
Note
Kronos is only available through the “OLCF Kronos” Globus collection and is NOT accessible from the “OLCF DTN (Globus 5)” collection.
Directory Structure
Kronos uses a directory structure similar to other center-wide storage resources:
Path |
Permissions |
Owner |
Group |
Description |
|---|---|---|---|---|
|
755 |
root |
<projectID> UNIX group |
Data shared between project members. |
|
700 |
<userID> |
<projectID> UNIX group |
User data, access is limited to user by default, but each user can modify their directory permissions to share with other project members. |
|
2775 |
root |
<projectID> UNIX group |
Data accessible to others in the OLCF user community |
Project Quotas
To help ensure available space for all Kronos projects, each project has a 200TB quota. All data stored in /nl/kronos/olcf/<projectID> will count toward the project’s quota. Please reach out to help@olcf.ornl.gov to request exemptions to the default quota.
Tip
To find your project quota on Kronos you use mmlsquota -g <projectID> --block-size 1T kronos, instead of the quota command.
$ mmlsquota -g gen007 --block-size 1T kronos
Disk quotas for group gen007 (gid 22315):
                        Block Limits                                               |     File Limits
Filesystem Fileset    type             TB      quota      limit   in_doubt    grace |    files   quota    limit in_doubt    grace  Remarks
kronos     fs_olcf    GRP               0        196        196          0     none |       33       0        0        0     none kronos.ccs.ornl.gov
Kronos and HPSS Comparison
Process |
HPSS |
Kronos |
|---|---|---|
Accessibility |
DTNs and login nodes |
DTNs |
Transfer tools |
hsi, htar, globus |
globus and standard UNIX transfer utilities |
File and directory management |
hsi |
standard UNIX utilities |
Data retrieval speeds |
Fluctuates based on data location, can see delay if only stored on tape |
All data stored on disk providing consistent access experience |
Transferring Data
Globus
Three Globus Collections have been established for OLCF resources.
Globus Collection |
Storage Areas |
|---|---|
OLCF DTN (Globus 5) |
Moderate User/Project Home (NFS), Orion (Lustre), and Alpine2 (GPFS) filesystems |
OLCF Kronos |
Kronos (Archival) |
NCCS Open DTN (Globus 5) |
Open User/Project Home (NFS), Wolf2 (GPFS) filesystem |
By selecting one of these collections and some offsite collection, you can use Globus to transfer data to/from that storage area at OLCF. By selecting the “OLCF DTN (Globus 5)” and “OLCF Kronos” collections, you can transfer data between Kronos and one of our other filesystems mounted on the DTNs.
Note
Globus v4 collections are no longer be supported. Please use the “OLCF DTN (Globus 5)”, “OLCF Open DTN (Globus 5), and “OLCF Kronos” collections.
Globus Warnings:
Globus transfers do not preserve file permissions. Arriving files will have (rw-r–r–) permissions, meaning arriving files will have user read and write permissions and group and world read permissions. Note that the arriving files will not have any execute permissions, so you will need to use chmod to reset execute permissions before running a Globus-transferred executable.
Globus will overwrite files at the destination with identically named source files. This is done without warning.
Globus has restriction of 8 active transfers across all the users. Each user has a limit of 3 active transfers, so it is required to transfer a lot of data on each transfer than less data across many transfers.
If a folder is constituted with mixed files including thousands of small files (less than 1MB each one), it would be better to tar the small files. Otherwise, if the files are larger, Globus will handle them.
Using Globus to Move Data Between Collections
The following example is intended to help users move data to and from the Orion filesystem.
Note
Globus does not preserve file permissions and will overwrite destination files with identically named source files without warning.
Below is a summary of the steps for data transfer using Globus:
1. Login to globus.org using your globus ID and password. If you do not have a globusID, set one up here: Generate a globusID.
Once you are logged in, Globus will open the “File Manager” page. Click the left side “Collection” text field in the File Manager and type “OLCF DTN (Globus 5)”.
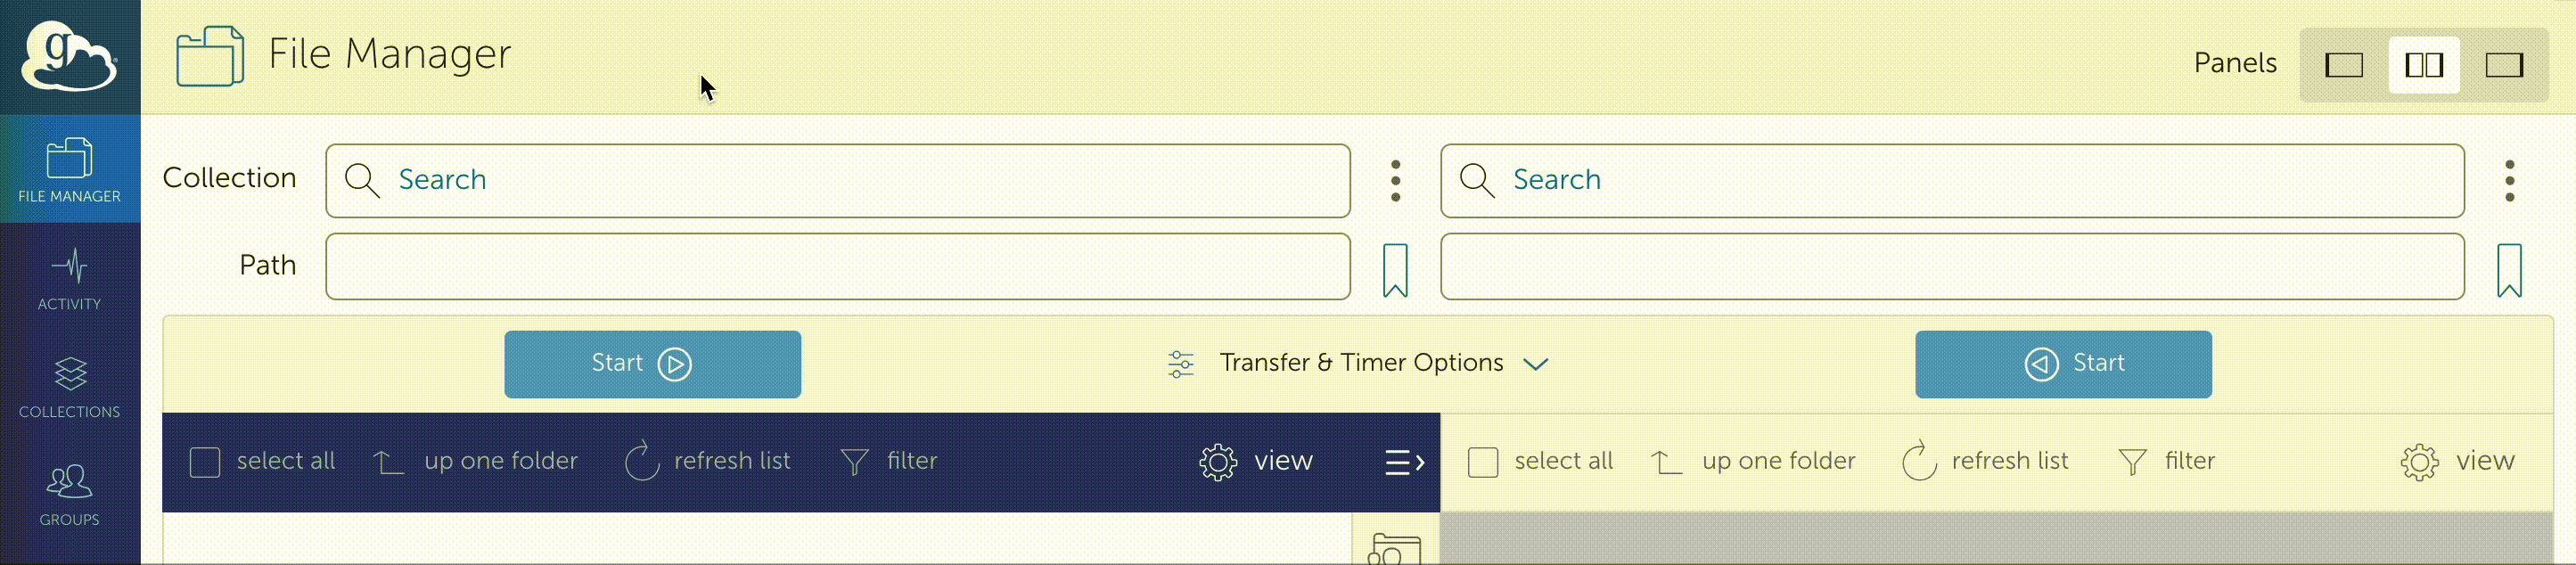
When prompted, authenticate into the OLCF DTN (Globus 5) collection using your OLCF username and PIN followed by your RSA passcode.
Click in the left side “Path” box in the File Manager and enter the path to your data on Orion. For example, /lustre/orion/stf007/proj-shared/my_orion_data. You should see a list of your files and folders under the left “Path” Box.
Click on all files or folders that you want to transfer in the list. This will highlight them.
Click on the right side “Collection” box in the File Manager and type the name of a second collection at OLCF or at another institution. You can transfer data between different paths on the Orion filesystem with this method too; Just use the OLCF DTN (Globus 5) collection again in the right side “Collection” box.
Click in the right side “Path” box and enter the path where you want to put your data on the second collection’s filesystem.
Click the left “Start” button.
Click on “Activity“ in the left blue menu bar to monitor your transfer. Globus will send you an email when the transfer is complete.
Using Globus From Your Local Workstation
Globus is most frequently used to facilitate data transfer between two institutional filesystems. However, it can also be used to facilitate data transfer involving an individual workstation or laptop. The following instructions demonstrate creating a local Globus collection on your computer.
Visit https://app.globus.org/collections/gcp, login into globus, and Install Globus Connect Personal, it is available for Windows, Mac, and Linux.
Follow the given instructions for setting up an collection on your computer, noting the name of the collection that you setup.
Once the collection is setup and globus is installed on your computer, you can search for and access the collection from the globus web interface just like any other collection, however your computer must be connected to the internet and globus must be actively running on it for the transfer to happen.
Command-Line/Terminal Tools
Command-line tools such as scp and rsync can be used to transfer data from outside OLCF. In general, when transferring data into or out of OLCF from the command line, it’s best to initiate the transfer from outside OLCF. If moving many small files, it can be beneficial to compress them into a single archive file, then transfer just the one archive file. When using command-line tools, you should use the Data Transfer Nodes rather than systems like Frontier or Andes.
scp- secure copy (remote file copy program)Sending a file to OLCF
scp yourfile $USER@dtn.ccs.ornl.gov:/path/
Retrieving a file from OLCF
scp $USER@dtn.ccs.ornl.gov:/path/yourfile .
Sending a directory to OLCF
scp -r yourdirectory $USER@dtn.ccs.ornl.gov:/path/
rsync- a fast, versatile, remote (and local) file-copying toolSync a directory named
mydirfrom your local system to the OLCF
rsync -avz mydir/ $USER@dtn.ccs.ornl.gov:/path/
- where:
ais for archive modevis for verbose modezis for compressed mode
Sync a directory from the OLCF to a local directory
rsync -avz $USER@dtn.ccs.ornl.gov:/path/dir/ mydir/
Transfer data and show progress while transferring
rsync -avz --progress mydir/ $USER@dtn.ccs.ornl.gov:/path/
Include files or directories starting with T and exclude all others
rsync -avz --progress --include 'T*' --exclude '*' mydir/ $USER@dtn.ccs.ornl.gov:/path/
If the file or directory exists at the target but not on the source, then delete it
rsync -avz --delete $USER@dtn.ccs.ornl.gov:/path/ .
Transfer only the files that are smaller than 1MB
rsync -avz --max-size='1m' mydir/ $USER@dtn.ccs.ornl.gov:/path/
If you want to verify the behavior is as intended, execute a dry-run
rsync -avz --dry-run mydir/ $USER@dtn.ccs.ornl.gov:/path/
See the manual pages for more information:
$ man scp
$ man rsync
- Differences:
scpcannot continue if it is interrupted.rsynccan.rsyncis optimized for performance.By default,
rsyncchecks if the transfer of the data was successful.
Note
Standard file transfer protocol (FTP) and remote copy (RCP) should not be used to transfer files to the NCCS high-performance computing (HPC) systems due to security concerns.