Odo
System Overview
Note
Odo is a training system that is not intended to be used as an OLCF user resource. Access to the system is only obtained through OLCF training events.
Odo is a 32-node stand-alone system with the same architecture as Frontier, so most of the Frontier User Guide can be referenced for Odo as well. However, aside from the number of compute nodes, there are other differences between the two systems. Most notably, Odo sits in the NCCS Open Security Enclave, which is subject to fewer restrictions than the Moderate Security Enclave that systems such as Frontier belong to. This means that participants in OLCF training events can go through a streamlined version of the approval process before gaining access to the system. The remainder of this section of the user guide describes “Odo-specific” information intended for participants of OLCF training events.
Two of Odo’s 32 nodes are login nodes and the rest are comptue nodes. Each Odo compute node consists of one 64-core AMD “Optimized 3rd Gen EPYC” CPU with 2 hardware threads per physical core and access to 512 GB of DDR4 memory. Each node also contains 4 AMD MI250X, each with 2 Graphics Compute Dies (GCDs) for a total of 8 GCDs per node. The programmer can think of the 8 GCDs as 8 separate GPUs, each having 64 GB of high-bandwidth memory. For more details on the nodes see the Frontier guide at Frontier Compute Nodes.
File Systems
It is important to note that because Odo sits in the NCCS Open Security Enclave, it also mounts different file systems than Frontier. These file systems provide both user-affiliated and project-affiliated storage areas for each user.
NFS Directories
Upon logging into Odo, users will be placed in their own personal
home (NFS) directory, /ccsopen/home/[userid], which can only be
accessed by that user. Users also have access to an NFS project
directory, /ccsopen/proj/[projid], which is visible to all members
of a project. Both NFS directories are commonly used to store
source code and build applications.
GPFS Directories
Users also have access to a (GPFS) parallel file system, called wolf2,
which is where data should be written when running on Odo’s compute
nodes. Under /gpfs/wolf2/olcf/[projid], there are 3 directories:
$ ls /gpfs/wolf2/olcf/[projid]
proj-shared  scratch  world-shared
proj-sharedcan be accessed by all members of a project.scratchcontains directories for each user of a project and only that user can access their own directory.world-sharedcan be accessed by any users on the system in any project.
Obtaining Access to Odo
Note
Odo is a training system that is not intended to be used as an OLCF user resource. Access to the system is only obtained through OLCF training events.
This sub-section describes the process of obtaining access to Odo for an OLCF training event. Please follow the steps below to request access.
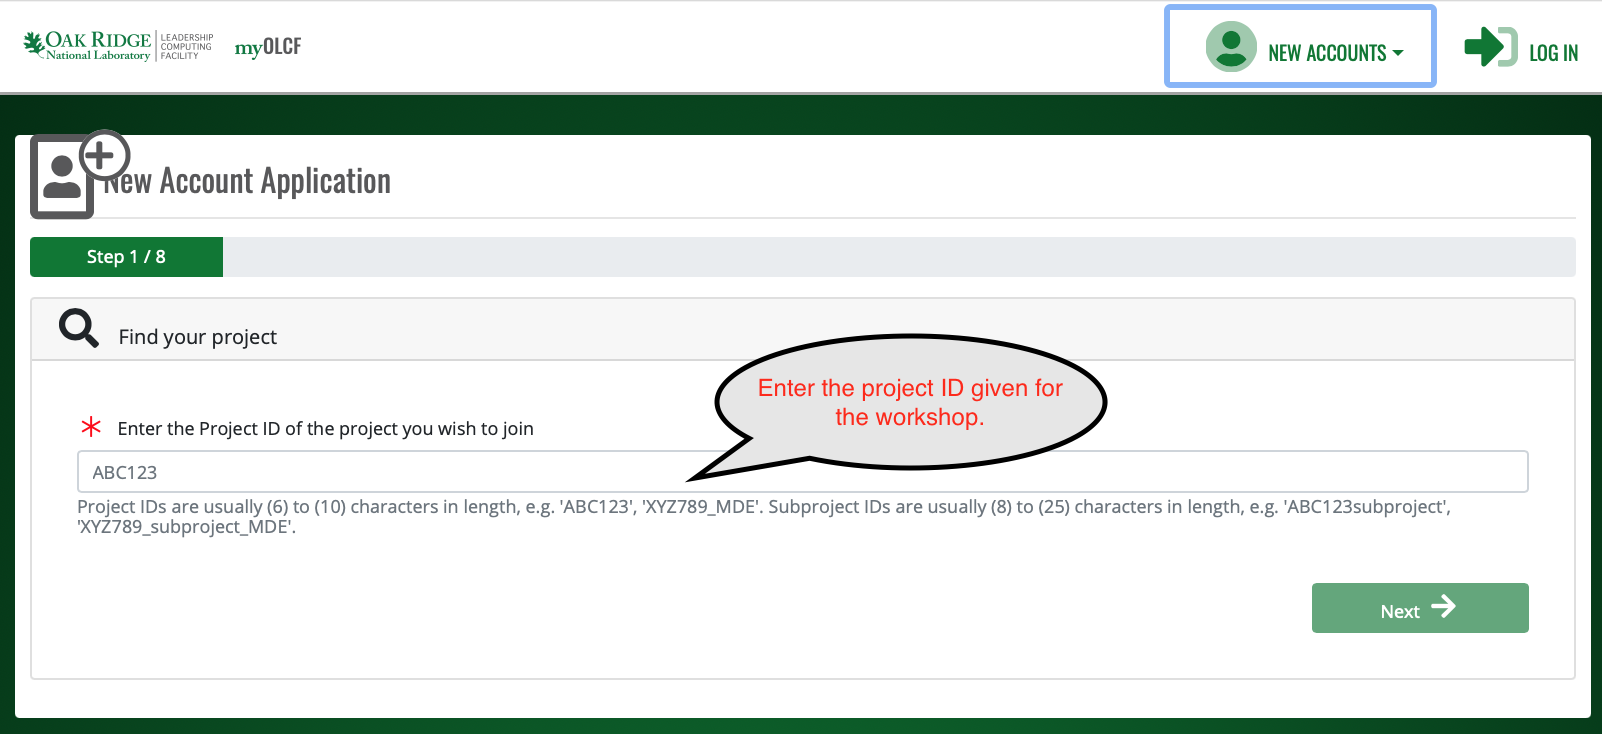
Step 1: Go to the myOLCF Account Application Form
Once on the form, linked above, fill in the project ID in the “Enter the Project ID of the project you wish to join” field and click “Next”.
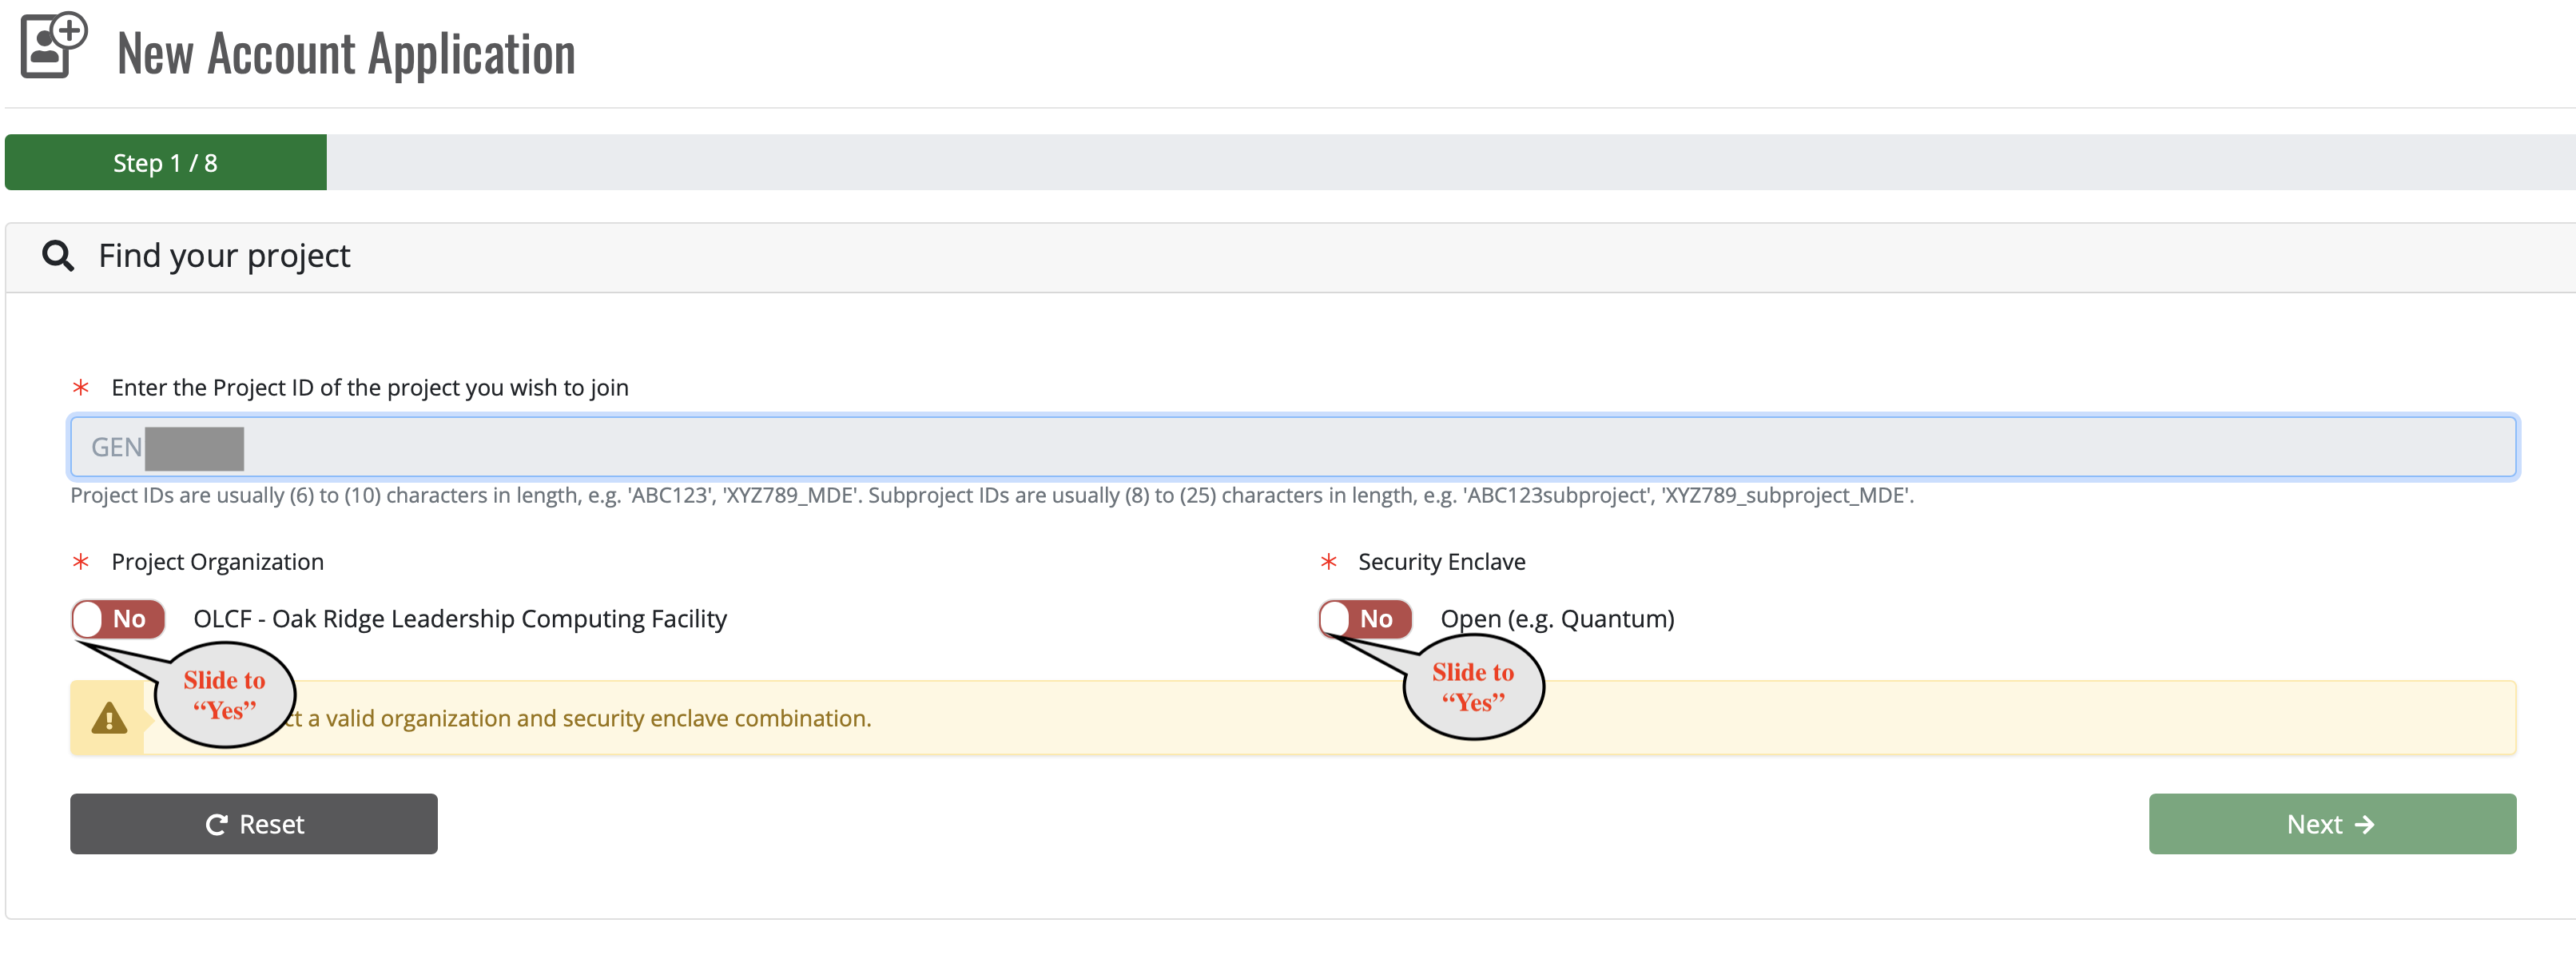
After you enter the Project ID, use the sliders to select “Yes” for OLCF as the Project Organization and select “Yes” for Open as the Security Enclave.
The next screen will show you some information about the project, you don’t need to change anything, just click “Next”.
Fill in your personal information and then click “Next”.
Fill in your shipping information and then click “Next”.
Fill in your Employment/Institution Information. If you are student please use your school affiliation for both “Employer” and “Funding Source”. If you are a student and you do not see your school listed, choose “other” for both “Employer” and “Funding Source” and then manually enter your school affiliation in the adjacent fields. Click “Next” when you are done.
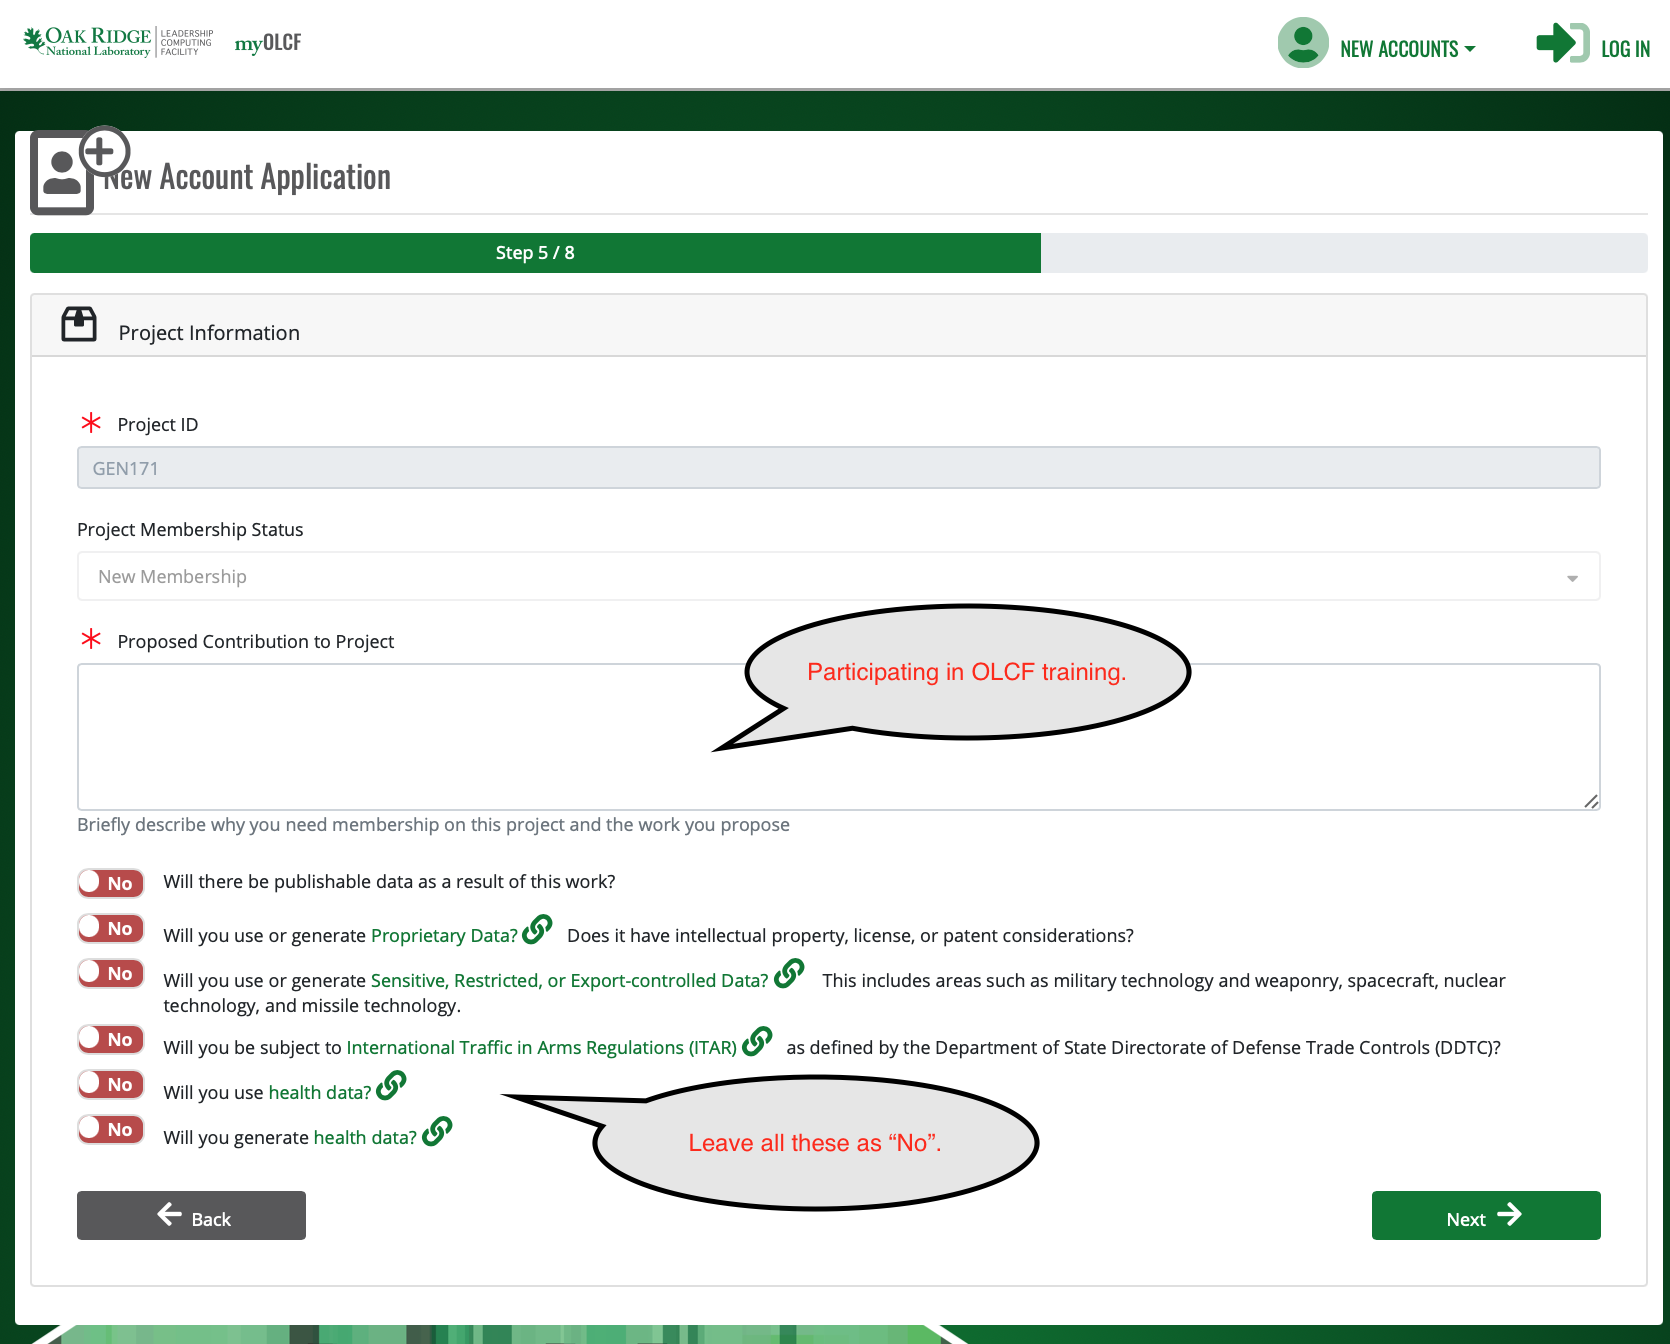
On the Project information screen fill the “Proposed Contribution to Project” with “Participating in OLCF training.” Leave all the questions about the project set to “no” and click “Next”.
On the user account page, selected “yes” or “no” for the questions asking about any pre-existing account names. If this is your first account with us, leave those questions set to “no”. Also enter your preferred shell. If you do not know which shell to use, select “/bin/bash”. We can change this later if needed. Click “Next”.
On the “Policies & Agreements” page click the links to read the polices and then answer “Yes” to affirm you have read each. Certify your application by selecting “Yes” as well. Then Click “Submit.”
Note
After submitting your application, it will need to pass through the approval process. Depending on when you submit, approval might not occur until the next business day.
Step 2: Set Your XCAMS/UCAMS Password
Once approved, if you are a new user, your account will be created and an email will be sent asking you to set up a password. If you already had an XCAMS/UCAMS account, you will not be sent the email asking you to setup a new password (simply use your existing credentials). Once passwords are known, users can log in to Odo using their XCAMS/UCAMS username and password (see the next section)
Logging In to Odo
To log in to Odo, please use your XCAMS/UCAMS username and password:
$ ssh USERNAME@login1.odo.olcf.ornl.gov
Note
You do not need to use an RSA token to log in to Odo. Please use your XCAMS/UCAMS username and password (which is different from the username and PIN + RSA token code used to log in to other OLCF systems such as Frontier).
Note
It will take ~5 minutes for your directories to be created, so if your account was just created and you log in and you do not have a home directory, this is likely the reason.