Crusher Quick-Start Guide
Warning
This system was decommissioned on April 12, 2024 and is no longer online. Information here is presented as an archive and is no longer updated.
System Overview
Crusher is an National Center for Computational Sciences (NCCS) moderate-security system that contains identical hardware and similar software as the upcoming Frontier system. It is used as an early-access testbed for Center for Accelerated Application Readiness (CAAR) and Exascale Computing Project (ECP) teams as well as NCCS staff and our vendor partners. The system has 2 cabinets, the first with 128 compute nodes and the second with 64 compute nodes, for a total of 192 compute nodes.
Crusher Compute Nodes
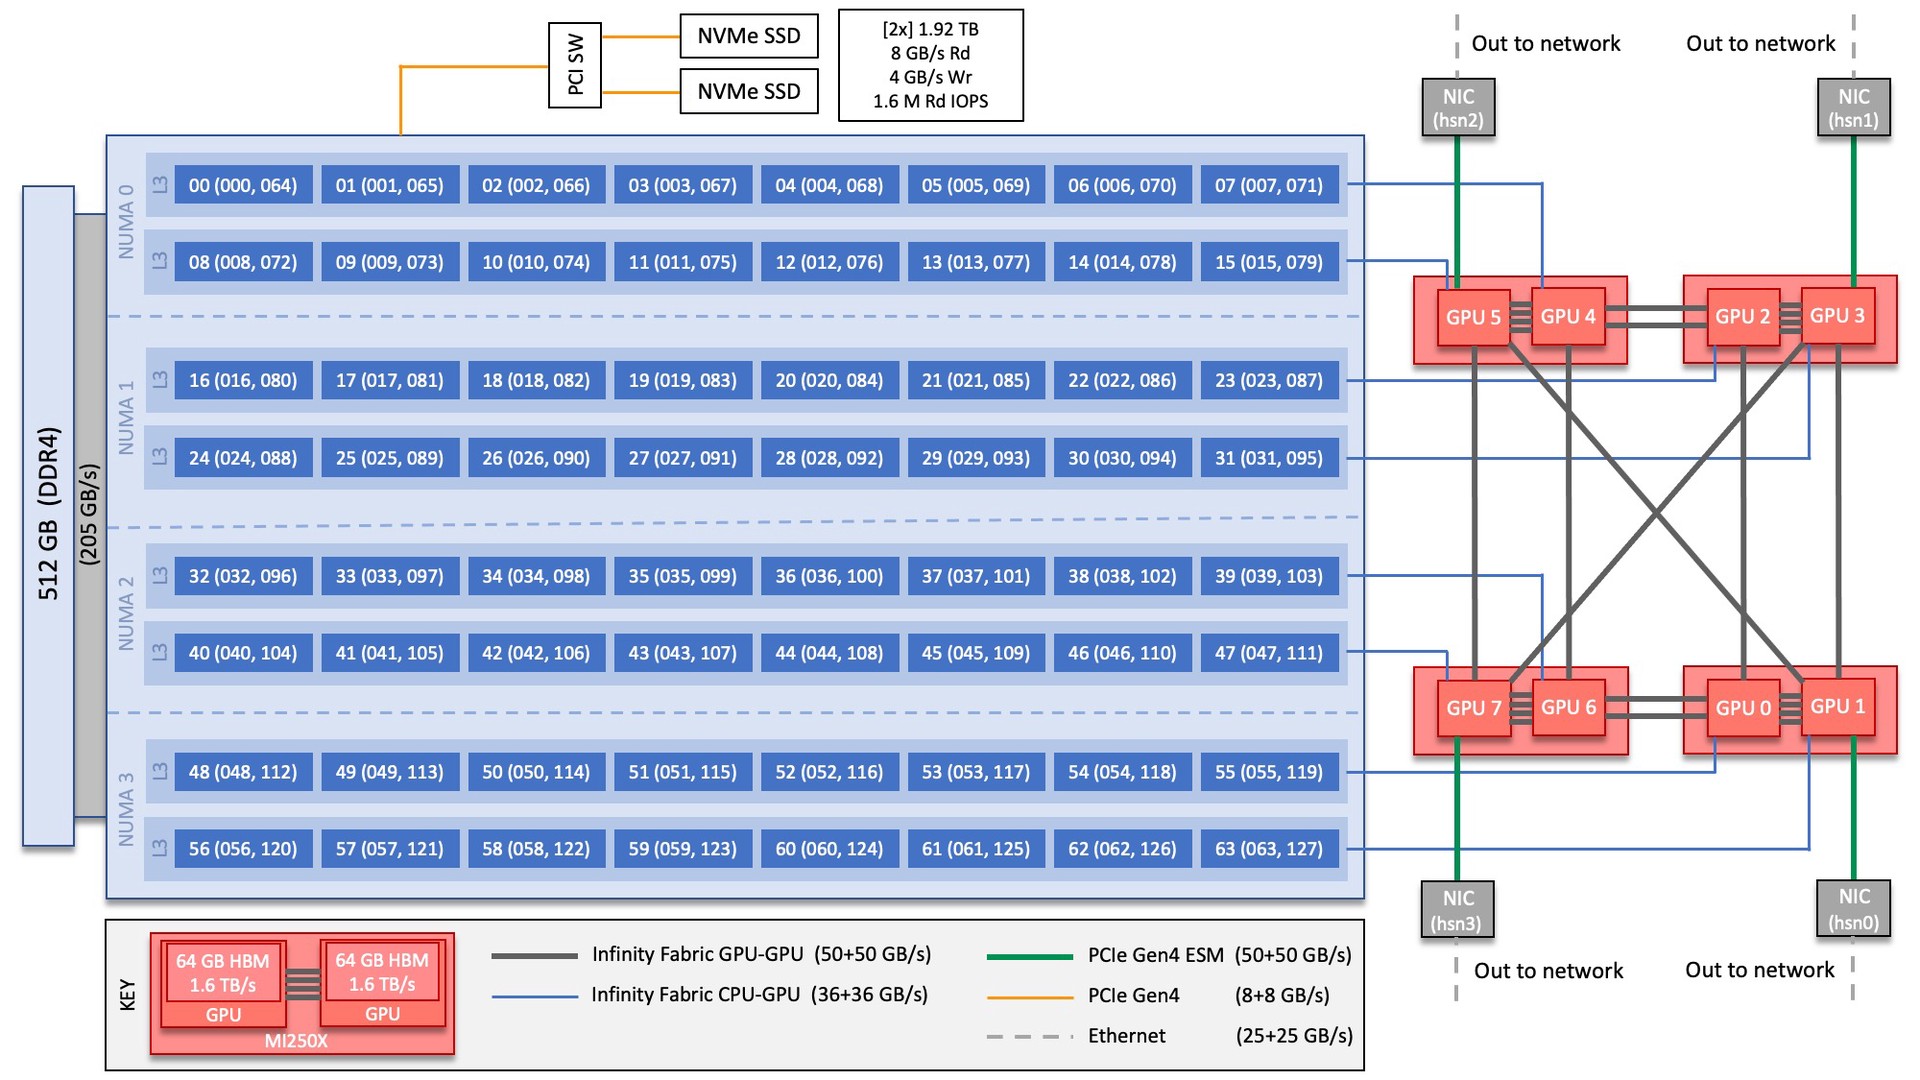
Each Crusher compute node consists of [1x] 64-core AMD EPYC 7A53 “Optimized 3rd Gen EPYC” CPU (with 2 hardware threads per physical core) with access to 512 GB of DDR4 memory. Each node also contains [4x] AMD MI250X, each with 2 Graphics Compute Dies (GCDs) for a total of 8 GCDs per node. The programmer can think of the 8 GCDs as 8 separate GPUs, each having 64 GB of high-bandwidth memory (HBM2E). The CPU is connected to each GCD via Infinity Fabric CPU-GPU, allowing a peak host-to-device (H2D) and device-to-host (D2H) bandwidth of 36+36 GB/s. The 2 GCDs on the same MI250X are connected with Infinity Fabric GPU-GPU with a peak bandwidth of 200 GB/s. The GCDs on different MI250X are connected with Infinity Fabric GPU-GPU in the arrangement shown in the Crusher Node Diagram below, where the peak bandwidth ranges from 50-100 GB/s based on the number of Infinity Fabric connections between individual GCDs.
Note
TERMINOLOGY:
The 8 GCDs contained in the 4 MI250X will show as 8 separate GPUs according to Slurm, ROCR_VISIBLE_DEVICES, and the ROCr runtime, so from this point forward in the quick-start guide, we will simply refer to the GCDs as GPUs.
Note
There are [4x] NUMA domains per node and [2x] L3 cache regions per NUMA for a total of [8x] L3 cache regions. The 8 GPUs are each associated with one of the L3 regions as follows:
NUMA 0:
hardware threads 000-007, 064-071 | GPU 4
hardware threads 008-015, 072-079 | GPU 5
NUMA 1:
hardware threads 016-023, 080-087 | GPU 2
hardware threads 024-031, 088-095 | GPU 3
NUMA 2:
hardware threads 032-039, 096-103 | GPU 6
hardware threads 040-047, 104-111 | GPU 7
NUMA 3:
hardware threads 048-055, 112-119 | GPU 0
hardware threads 056-063, 120-127 | GPU 1
System Interconnect
The Crusher nodes are connected with [4x] HPE Slingshot 200 Gbps (25 GB/s) NICs providing a node-injection bandwidth of 800 Gbps (100 GB/s).
File Systems
Crusher is connected to the center-wide IBM Spectrum Scale™ filesystem providing 250 PB of storage capacity with a peak write speed of 2.5 TB/s. Crusher also has access to the center-wide NFS-based filesystem (which provides user and project home areas). While Crusher does not have direct access to the center’s Nearline archival storage system (Kronos) - for user and project archival storage - users can log in to the moderate DTNs to move data to/from Kronos or use the “OLCF Kronos” Globus collection. For more information on using Kronos, see the Kronos Nearline Archival Storage System section.
GPUs
Crusher contains a total of 768 AMD MI250X. The AMD MI250X has a peak performance of 53 TFLOPS in double-precision for modeling and simulation. Each MI250X contains 2 GPUs, where each GPU has a peak performance of 26.5 TFLOPS (double-precision), 110 compute units, and 64 GB of high-bandwidth memory (HBM2) which can be accessed at a peak of 1.6 TB/s. The 2 GPUs on an MI250X are connected with Infinity Fabric with a bandwidth of 200 GB/s (in both directions simultaneously).
Connecting
To connect to Crusher, ssh to crusher.olcf.ornl.gov. For example:
$ ssh <username>@crusher.olcf.ornl.gov
For more information on connecting to OLCF resources, see Connecting for the first time.
Data and Storage
For more detailed information about center-wide file systems and data archiving available on Crusher, please refer to the pages on Data Storage and Transfers, but the two subsections below give a quick overview of NFS and Lustre storage spaces.
NFS Filesystem
Area |
Path |
Type |
Permissions |
Quota |
Backups |
Purged |
Retention |
On Compute Nodes |
|---|---|---|---|---|---|---|---|---|
User Home |
|
NFS |
User set |
50 GB |
Yes |
No |
90 days |
Read-only |
Project Home |
|
NFS |
770 |
50 GB |
Yes |
No |
90 days |
Read-only |
Lustre Filesystem
Area |
Path |
Type |
Permissions |
Quota |
Backups |
Purged |
Retention |
On Compute Nodes |
|---|---|---|---|---|---|---|---|---|
Member Work |
|
Lustre HPE ClusterStor |
700 |
50 TB |
No |
90 days |
N/A |
Yes |
Project Work |
|
Lustre HPE ClusterStor |
770 |
50 TB |
No |
90 days |
N/A |
Yes |
World Work |
|
Lustre HPE ClusterStor |
775 |
50 TB |
No |
90 days |
N/A |
Yes |
Programming Environment
Crusher users are provided with many pre-installed software packages and scientific libraries. To facilitate this, environment management tools are used to handle necessary changes to the shell.
Environment Modules (Lmod)
Environment modules are provided through Lmod, a Lua-based module system for dynamically altering shell environments. By managing changes to the shell’s environment variables (such as PATH, LD_LIBRARY_PATH, and PKG_CONFIG_PATH), Lmod allows you to alter the software available in your shell environment without the risk of creating package and version combinations that cannot coexist in a single environment.
General Usage
The interface to Lmod is provided by the module command:
Command |
Description |
|---|---|
|
Shows a terse list of the currently loaded modules |
|
Shows a table of the currently available modules |
|
Shows help information about |
|
Shows the environment changes made by the |
|
Searches all possible modules according to |
|
Loads the given |
|
Adds |
|
Removes |
|
Unloads all modules |
|
Resets loaded modules to system defaults |
|
Reloads all currently loaded modules |
Searching for Modules
Modules with dependencies are only available when the underlying dependencies, such as compiler families, are loaded. Thus, module avail will only display modules that are compatible with the current state of the environment. To search the entire hierarchy across all possible dependencies, the spider sub-command can be used as summarized in the following table.
Command |
Description |
|---|---|
|
Shows the entire possible graph of modules |
|
Searches for modules named |
|
Searches for a specific version of |
|
Searches for modulefiles containing |
Compilers
Cray, AMD, and GCC compilers are provided through modules on Crusher. The Cray and AMD compilers are both based on LLVM/Clang. There is also a system/OS versions of GCC available in /usr/bin. The table below lists details about each of the module-provided compilers.
Note
It is highly recommended to use the Cray compiler wrappers (cc, CC, and ftn) whenever possible. See the next section for more details.
Vendor |
Programming Environment |
Compiler Module |
Language |
Compiler Wrapper |
Compiler |
|---|---|---|---|---|---|
Cray |
|
|
C |
|
|
C++ |
|
|
|||
Fortran |
|
|
|||
AMD |
|
|
C |
|
|
C++ |
|
|
|||
Fortran |
|
|
|||
GCC |
|
|
C |
|
|
C++ |
|
|
|||
Fortran |
|
|
Cray Programming Environment and Compiler Wrappers
Cray provides PrgEnv-<compiler> modules (e.g., PrgEnv-cray) that load compatible components of a specific compiler toolchain. The components include the specified compiler as well as MPI, LibSci, and other libraries. Loading the PrgEnv-<compiler> modules also defines a set of compiler wrappers for that compiler toolchain that automatically add include paths and link in libraries for Cray software. Compiler wrappers are provided for C (cc), C++ (CC), and Fortran (ftn).
Note
Use the -craype-verbose flag to display the full include and link information used by the Cray compiler wrappers. This must be called on a file to see the full output (e.g., CC -craype-verbose test.cpp).
MPI
The MPI implementation available on Crusher is Cray’s MPICH, which is “GPU-aware” so GPU buffers can be passed directly to MPI calls.
Compiling
This section covers how to compile for different programming models using the different compilers covered in the previous section.
MPI
Implementation |
Module |
Compiler |
Header Files & Linking |
|---|---|---|---|
Cray MPICH |
|
|
MPI header files and linking is built into the Cray compiler wrappers |
|
-L${MPICH_DIR}/lib -lmpi${CRAY_XPMEM_POST_LINK_OPTS} -lxpmem${PE_MPICH_GTL_DIR_amd_gfx90a} ${PE_MPICH_GTL_LIBS_amd_gfx90a}-I${MPICH_DIR}/include |
GPU-Aware MPI
To use GPU-aware Cray MPICH, users must set the following modules and environment variables:
module load craype-accel-amd-gfx90a
module load rocm

export MPICH_GPU_SUPPORT_ENABLED=1
Note
There are extra steps needed to enable GPU-aware MPI on Crusher, which depend on the compiler that is used (see 1. and 2. below).
1. Compiling with the Cray compiler wrappers, cc or CC
To use GPU-aware Cray MPICH with the Cray compiler wrappers, the following environment variables must be set before compiling. These variables are automatically set by the cray-mpich modulefile:
## These must be set before compiling so the executable picks up GTL
PE_MPICH_GTL_DIR_amd_gfx90a="-L${CRAY_MPICH_ROOTDIR}/gtl/lib"
PE_MPICH_GTL_LIBS_amd_gfx90a="-lmpi_gtl_hsa"
In addition, the following header files and libraries must be included:
-I${ROCM_PATH}/include
-L${ROCM_PATH}/lib -lamdhip64
where the include path implies that #include <hip/hip_runtime.h> is included in the source file.
2. Compiling with hipcc
To use GPU-aware Cray MPICH with hipcc, users must include appropriate headers, libraries, and flags:
-I${MPICH_DIR}/include
-L${MPICH_DIR}/lib -lmpi \
  ${CRAY_XPMEM_POST_LINK_OPTS} -lxpmem \
  ${PE_MPICH_GTL_DIR_amd_gfx90a} ${PE_MPICH_GTL_LIBS_amd_gfx90a}

HIPFLAGS = --amdgpu-target=gfx90a
Determining the Compatibility of Cray MPICH and ROCm
Releases of cray-mpich are each built with a specific version of ROCm, and compatibility across multiple versions is not guaranteed. OLCF will maintain compatible default modules when possible. If using non-default modules, you can determine compatibility by reviewing the Product and OS Dependencies section in the cray-mpich release notes. This can be displayed by running module show cray-mpich/<version>. If the notes indicate compatibility with AMD ROCM X.Y or later, only use rocm/X.Y.Z modules. If using a non-default version of cray-mpich, you must add ${CRAY_MPICH_ROOTDIR}/gtl/lib to either your LD_LIBRARY_PATH at run time or your executable’s rpath at build time.
The compatibility table below was determined by linker testing with all current combinations of cray-mpich and rocm modules on Crusher.
cray-mpich |
ROCm |
|---|---|
8.1.12 |
4.5.2, 4.5.0 |
8.1.14 |
4.5.2, 4.5.0 |
8.1.15 |
5.4.0, 5.3.0, 5.2.0, 5.1.0, 5.0.2, 5.0.0 |
8.1.16 |
5.4.0, 5.3.0, 5.2.0, 5.1.0, 5.0.2, 5.0.0 |
8.1.17 |
5.4.0, 5.3.0, 5.2.0, 5.1.0, 5.0.2, 5.0.0 |
8.1.18 |
5.4.0, 5.3.0, 5.2.0, 5.1.0, 5.0.2, 5.0.0 |
8.1.19 |
5.4.0, 5.3.0, 5.2.0, 5.1.0, 5.0.2, 5.0.0 |
8.1.21 |
5.4.0, 5.3.0, 5.2.0, 5.1.0, 5.0.2, 5.0.0 |
8.1.23 |
5.4.0, 5.3.0, 5.2.0, 5.1.0, 5.0.2, 5.0.0 |
OpenMP
This section shows how to compile with OpenMP using the different compilers covered above.
Vendor |
Module |
Language |
Compiler |
OpenMP flag (CPU thread) |
|---|---|---|---|---|
Cray |
|
C, C++ |
cc (wraps craycc)CC (wraps crayCC) |
|
Fortran |
|
-homp-fopenmp (alias) |
||
AMD |
|
C
C++
Fortran
|
cc (wraps amdclang)CC (wraps amdclang++)ftn (wraps amdflang) |
|
GCC |
|
C
C++
Fortran
|
cc (wraps $GCC_PATH/bin/gcc)CC (wraps $GCC_PATH/bin/g++)ftn (wraps $GCC_PATH/bin/gfortran) |
|
OpenMP GPU Offload
This section shows how to compile with OpenMP Offload using the different compilers covered above.
Note
Make sure the craype-accel-amd-gfx90a module is loaded when using OpenMP offload.
Vendor |
Module |
Language |
Compiler |
OpenMP flag (GPU) |
|---|---|---|---|---|
Cray |
|
C C++ |
cc (wraps craycc)CC (wraps crayCC) |
|
Fortran |
|
-homp-fopenmp (alias) |
||
AMD |
|
C
C++
Fortran
|
cc (wraps amdclang)CC (wraps amdclang++)ftn (wraps amdflang)hipcc (requires flags below) |
|
Note
If invoking amdclang, amdclang++, or amdflang directly, or using hipcc you will need to add:
-fopenmp -target x86_64-pc-linux-gnu -fopenmp-targets=amdgcn-amd-amdhsa -Xopenmp-target=amdgcn-amd-amdhsa -march=gfx90a.
HIP
This section shows how to compile HIP codes using the Cray compiler wrappers and hipcc compiler driver.
Note
Make sure the craype-accel-amd-gfx90a module is loaded when compiling HIP with the Cray compiler wrappers.
Compiler |
Compile/Link Flags, Header Files, and Libraries |
|---|---|
CCOnly with
PrgEnv-crayPrgEnv-amd |
CFLAGS = -std=c++11 -D__HIP_ROCclr__ -D__HIP_ARCH_GFX90A__=1 --rocm-path=${ROCM_PATH} --offload-arch=gfx90a -x hipLFLAGS = --rocm-path=${ROCM_PATH}-L${ROCM_PATH}/lib -lamdhip64 |
|
Can be used directly to compile HIP source files.
To see what is being invoked within this compiler driver, issue the command,
hipcc --verboseTo explicitly target AMD MI250X, use
--amdgpu-target=gfx90a |
HIP + OpenMP CPU Threading
This section describes how to compile HIP + OpenMP CPU threading hybrid codes.
For all compiler toolchains, HIP kernels and kernel launch calls (ie hipLaunchKernelGGL) cannot be implemented in the same file that requires -fopenmp.
HIP API calls (hipMalloc, hipMemcpy) are allowed in files that require -fopenmp.
HIP source files should be compiled into object files using the instructions in the HIP section, with the -c flag added to generate an object file.
OpenMP and other non-HIP source files should be compiled into object files using the instructions in the OpenMP section.
Then these object files should be linked using the following link flags: -fopenmp -L${ROCM_PATH}/lib -lamdhip64.
SYCL
This section shows how to compile SYCL codes using the DPC++ compiler.
Note
Make sure the ums ums015 dpcpp module is loaded when compiling SYCL with clang or clang++.
Compiler |
Compile/Link Flags, Header Files, and Libraries |
|---|---|
clangclang++ |
CFLAGS = -fsycl -fsycl-targets=amdgcn-amd-amdhsa -Xsycl-target-backend --offload-arch=gfx90a |
Note
These compilers are built weekly from the latest open-source rather than releases. As such, these compilers will get new features and updates quickly but may break on occasion. If you experience regressions, please load an older version of the module rather than the latest.
Running Jobs
This section describes how to run programs on the Crusher compute nodes, including a brief overview of Slurm and also how to map processes and threads to CPU cores and GPUs.
Slurm Workload Manager
Slurm is the workload manager used to interact with the compute nodes on Crusher. In the following subsections, the most commonly used Slurm commands for submitting, running, and monitoring jobs will be covered, but users are encouraged to visit the official documentation and man pages for more information.
Batch Scheduler and Job Launcher
Slurm provides 3 ways of submitting and launching jobs on Crusher’s compute nodes: batch scripts, interactive, and single-command. The Slurm commands associated with these methods are shown in the table below and examples of their use can be found in the related subsections. Please note that regardless of the submission method used, the job will launch on compute nodes, with the first compute in the allocation serving as head-node.
|
Used to submit a batch script to allocate a Slurm job allocation. The script contains options preceded with
#SBATCH.(see Batch Scripts section below)
|
|
Used to allocate an interactive Slurm job allocation, where one or more job steps (i.e.,
srun commands) can then be launched on the allocated resources (i.e., nodes).(see Interactive Jobs section below)
|
|
Used to run a parallel job (job step) on the resources allocated with sbatch or
salloc.If necessary, srun will first create a resource allocation in which to run the parallel job(s).
(see Single Command section below)
|
Batch Scripts
A batch script can be used to submit a job to run on the compute nodes at a later time. In this case, stdout and stderr will be written to a file(s) that can be opened after the job completes. Here is an example of a simple batch script:
1#!/bin/bash
2#SBATCH -A <project_id>
3#SBATCH -J <job_name>
4#SBATCH -o %x-%j.out
5#SBATCH -t 00:05:00
6#SBATCH -p <partition>
7#SBATCH -N 2
8
9srun -n4 --ntasks-per-node=2 ./a.out
The Slurm submission options are preceded by #SBATCH, making them appear as comments to a shell (since comments begin with #). Slurm will look for submission options from the first line through the first non-comment line. Options encountered after the first non-comment line will not be read by Slurm. In the example script, the lines are:
Line |
Description |
|---|---|
1 |
[Optional] shell interpreter line |
2 |
OLCF project to charge |
3 |
Job name |
4 |
stdout file name ( |
5 |
Walltime requested ( |
6 |
Batch queue |
7 |
Number of compute nodes requested |
8 |
Blank line |
9 |
|
Interactive Jobs
To request an interactive job where multiple job steps (i.e., multiple srun commands) can be launched on the allocated compute node(s), the salloc command can be used:
$ salloc -A <project_id> -J <job_name> -t 00:05:00 -p <partition> -N 2
salloc: Granted job allocation 4258
salloc: Waiting for resource configuration
salloc: Nodes crusher[010-011] are ready for job

$ srun -n 4 --ntasks-per-node=2 ./a.out
<output printed to terminal>

$ srun -n 2 --ntasks-per-node=1 ./a.out
<output printed to terminal>
Here, salloc is used to request an allocation of 2 compute nodes for 5 minutes. Once the resources become available, the user is granted access to the compute nodes (crusher010 and crusher011 in this case) and can launch job steps on them using srun.
Single Command (non-interactive)
$ srun -A <project_id> -t 00:05:00 -p <partition> -N 2 -n 4 --ntasks-per-node=2 ./a.out
<output printed to terminal>
The job name and output options have been removed since stdout/stderr are typically desired in the terminal window in this usage mode.
Common Slurm Submission Options
The table below summarizes commonly-used Slurm job submission options:
|
Project ID to charge |
|
Name of job |
|
Partition / batch queue |
|
Wall clock time < |
|
Number of compute nodes |
|
Standard output file name |
|
Standard error file name |
|
Number of active hardware threads per core [1 (default) or 2] |
For more information about these and/or other options, please see the sbatch man page.
Other Common Slurm Commands
The table below summarizes commonly-used Slurm commands:
|
Used to view partition and node information.
E.g., to view user-defined details about the batch queue:
sinfo -p batch -o "%15N %10D %10P %10a %10c %10z" |
|
Used to view job and job step information for jobs in the scheduling queue.
E.g., to see all jobs from a specific user:
squeue -l -u <user_id> |
|
Used to view accounting data for jobs and job steps in the job accounting log (currently in the queue or recently completed).
E.g., to see a list of specified information about all jobs submitted/run by a users since 1 PM on January 4, 2021:
sacct -u <username> -S 2021-01-04T13:00:00 -o "jobid%5,jobname%25,user%15,nodelist%20" -X |
|
Used to signal or cancel jobs or job steps.
E.g., to cancel a job:
scancel <jobid> |
|
Used to view or modify job configuration.
E.g., to place a job on hold:
scontrol hold <jobid> |
Slurm Compute Node Partitions
Crusher’s compute nodes are contained within a single Slurm partition (queue) for both CAAR and ECP projects. Please see the table below for details.
Partition
The CAAR and ECP “batch” partition consists of 192 total compute nodes. On a per-project basis, each user can have 2 running and 2 eligible jobs at a time, with up to 20 jobs submitted.
Number of Nodes |
Max Walltime |
|---|---|
1 - 8 |
8 hours |
9 - 64 |
4 hours |
65 - 160 |
2 hours |
Note
If CAAR or ECP teams require a temporary exception to this policy, please email help@olcf.ornl.gov with your request and it will be given to the OLCF Resource Utilization Council (RUC) for review.
Process and Thread Mapping
This section describes how to map processes (e.g., MPI ranks) and process threads (e.g., OpenMP threads) to the CPUs and GPUs on Crusher. The Crusher Compute Nodes diagram will be helpful when reading this section to understand which physical CPU cores (and hardware threads) your processes and threads run on.
Note
Users are highly encouraged to use the CPU- and GPU-mapping programs used in the following sections to check their understanding of the job steps (i.e., srun commands) the intend to use in their actual jobs.
CPU Mapping
In this sub-section, a simple MPI+OpenMP “Hello, World” program (hello_mpi_omp) will be used to clarify the mappings. Slurm’s Interactive Jobs method was used to request an allocation of 1 compute node for these examples: salloc -A <project_id> -t 30 -p <parition> -N 1
The srun options used in this section are (see man srun for more information):
|
Request that
ncpus be allocated per process (default is 1).(
ncpus refers to hardware threads) |
|
In task layout, use the specified maximum number of hardware threads per core
(default is 1; there are 2 hardware threads per physical CPU core).
Must also be set in
salloc or sbatch if using 2 threads per core. |
|
Bind tasks to CPUs.
threads - Automatically generate masks binding tasks to threads.(Although this option is not explicitly used in these examples, it is the default CPU binding.)
|
Note
In the srun man page (and so the table above), threads refers to hardware threads.
2 MPI ranks - each with 2 OpenMP threads
In this example, the intent is to launch 2 MPI ranks, each of which spawn 2 OpenMP threads, and have all of the 4 OpenMP threads run on different physical CPU cores.
First (INCORRECT) attempt
To set the number of OpenMP threads spawned per MPI rank, the OMP_NUM_THREADS environment variable can be used. To set the number of MPI ranks launched, the srun flag -n can be used.
$ export OMP_NUM_THREADS=2
$ srun -N1 -n2 ./hello_mpi_omp | sort

WARNING: Requested total thread count and/or thread affinity may result in
oversubscription of available CPU resources!  Performance may be degraded.
Explicitly set OMP_WAIT_POLICY=PASSIVE or ACTIVE to suppress this message.
Set CRAY_OMP_CHECK_AFFINITY=TRUE to print detailed thread-affinity messages.

MPI 000 - OMP 000 - HWT 001 - Node crusher001
MPI 000 - OMP 001 - HWT 001 - Node crusher001
MPI 001 - OMP 000 - HWT 009 - Node crusher001
MPI 001 - OMP 001 - HWT 009 - Node crusher001
The first thing to notice here is the WARNING about oversubscribing the available CPU cores. Also, the output shows each MPI rank did spawn 2 OpenMP threads, but both OpenMP threads ran on the same hardware thread (for a given MPI rank). This was not the intended behavior; each OpenMP thread was meant to run on its own physical CPU core.
The problem here arises from two default settings; 1) each MPI rank is only allocated 1 physical CPU core (-c 1) and, 2) only 1 hardware thread per physical CPU core is enabled (--threads-per-core=1). So in this case, each MPI rank only has 1 physical core (with 1 hardware thread) to run on - including any threads the process spawns - hence the WARNING and undesired behavior.
Second (CORRECT) attempt
In order for each OpenMP thread to run on its own physical CPU core, each MPI rank should be given 2 physical CPU cores (-c 2). Now the OpenMP threads will be mapped to unique hardware threads on separate physical CPU cores.
$ export OMP_NUM_THREADS=2
$ srun -N1 -n2 -c2 ./hello_mpi_omp | sort

MPI 000 - OMP 000 - HWT 001 - Node crusher001
MPI 000 - OMP 001 - HWT 002 - Node crusher001
MPI 001 - OMP 000 - HWT 009 - Node crusher001
MPI 001 - OMP 001 - HWT 010 - Node crusher001
Now the output shows that each OpenMP thread ran on (one of the hardware threads of) its own physical CPU core. More specifically (see the Crusher Compute Node diagram), OpenMP thread 000 of MPI rank 000 ran on hardware thread 001 (i.e., physical CPU core 01), OpenMP thread 001 of MPI rank 000 ran on hardware thread 002 (i.e., physical CPU core 02), OpenMP thread 000 of MPI rank 001 ran on hardware thread 009 (i.e., physical CPU core 09), and OpenMP thread 001 of MPI rank 001 ran on hardware thread 010 (i.e., physical CPU core 10) - as intended.
Third attempt - Using multiple threads per core
To use both available hardware threads per core, the job must be allocated with --threads-per-core=2 (as opposed to only the job step - i.e., srun command). That value will then be inherited by srun unless explcitly overridden with --threads-per-core=1.
$ salloc -N1 -A <project_id> -t <time> -p <partition> --threads-per-core=2

$ export OMP_NUM_THREADS=2
$ srun -N1 -n2 -c2 ./hello_mpi_omp | sort

MPI 000 - OMP 000 - HWT 001 - Node crusher001
MPI 000 - OMP 001 - HWT 065 - Node crusher001
MPI 001 - OMP 000 - HWT 009 - Node crusher001
MPI 001 - OMP 001 - HWT 073 - Node crusher001
Comparing this output to the Crusher Compute Node diagram, we see that each pair of OpenMP threads is contained within a single physical core. MPI rank 000 ran on hardware threads 001 and 065 (i.e. physical CPU core 01) and MPI rank 001 ran on hardware threads 009 and 073 (i.e. physical CPU core 09).
Note
There are many different ways users might choose to perform these mappings, so users are encouraged to clone the hello_mpi_omp program and test whether or not processes and threads are running where intended.
GPU Mapping
In this sub-section, an MPI+OpenMP+HIP “Hello, World” program (hello_jobstep) will be used to clarify the GPU mappings. Again, Slurm’s Interactive Jobs method was used to request an allocation of 2 compute nodes for these examples: salloc -A <project_id> -t 30 -p <parition> -N 2. The CPU mapping part of this example is very similar to the example used above in the CPU Mapping sub-section, so the focus here will be on the GPU mapping part.
The following srun options will be used in the examples below. See man srun for a complete list of options and more information.
|
Specify the number of GPUs required for the job (total GPUs across all nodes). |
|
Specify the number of GPUs per node required for the job. |
|
Binds each task to the GPU which is on the same NUMA domain as the CPU core the MPI rank is running on. |
|
Bind tasks to specific GPUs by setting GPU masks on tasks (or ranks) as specified where
|
|
Request that there are ntasks tasks invoked for every GPU. |
|
Specifies the distribution of MPI ranks across compute nodes, sockets (L3 regions on Crusher), and cores,
respectively. The default values are |
Note
Due to the unique architecture of Crusher compute nodes and the way that Slurm currently allocates GPUs and CPU cores to job steps, it is suggested that all 8 GPUs on a node are allocated to the job step to ensure that optimal bindings are possible.
Note
In general, GPU mapping can be accomplished in different ways. For example, an application might map MPI ranks to GPUs programmatically within the code using, say, hipSetDevice. In this case, since all GPUs on a node are available to all MPI ranks on that node by default, there might not be a need to map to GPUs using Slurm (just do it in the code). However, in another application, there might be a reason to make only a subset of GPUs available to the MPI ranks on a node. It is this latter case that the following examples refer to.
Mapping 1 task per GPU
In the following examples, each MPI rank (and its OpenMP threads) will be mapped to a single GPU.
Example 0: 1 MPI rank with 1 OpenMP thread and 1 GPU (single-node)
Somewhat counterintuitively, this common test case is currently among the most difficult. Slurm ignores GPU bindings for nodes with only a single task, so we do not use --gpu-bind here. We must allocate only a single GPU to ensure that only one GPU is available to the task, and since we get the first GPU available we should bind the task to the CPU closest to the allocated GPU.
$ export OMP_NUM_THREADS=1
$ srun -N1 -n1 -c1 --cpu-bind=map_cpu:49 --gpus=1 ./hello_jobstep

MPI 000 - OMP 000 - HWT 049 - Node crusher001 - RT_GPU_ID 0 - GPU_ID 0 - Bus_ID c1
Example 1: 8 MPI ranks - each with 2 OpenMP threads and 1 GPU (single-node)
This example launches 8 MPI ranks (-n8), each with 2 physical CPU cores (-c2) to launch 2 OpenMP threads (OMP_NUM_THREADS=2) on. In addition, each MPI rank (and its 2 OpenMP threads) should have access to only 1 GPU. To accomplish the GPU mapping, two new srun options will be used:
--gpus-per-nodespecifies the number of GPUs required for the job--gpu-bind=closestbinds each task to the GPU which is closest.
Note
Without these additional flags, all MPI ranks would have access to all GPUs (which is the default behavior).
$ export OMP_NUM_THREADS=2
$ srun -N1 -n8 -c2 --gpus-per-node=8 --gpu-bind=closest ./hello_jobstep | sort

MPI 000 - OMP 000 - HWT 001 - Node crusher001 - RT_GPU_ID 0 - GPU_ID 4 - Bus_ID d1
MPI 000 - OMP 001 - HWT 002 - Node crusher001 - RT_GPU_ID 0 - GPU_ID 4 - Bus_ID d1
MPI 001 - OMP 000 - HWT 009 - Node crusher001 - RT_GPU_ID 0 - GPU_ID 5 - Bus_ID d6
MPI 001 - OMP 001 - HWT 010 - Node crusher001 - RT_GPU_ID 0 - GPU_ID 5 - Bus_ID d6
MPI 002 - OMP 000 - HWT 017 - Node crusher001 - RT_GPU_ID 0 - GPU_ID 2 - Bus_ID c9
MPI 002 - OMP 001 - HWT 018 - Node crusher001 - RT_GPU_ID 0 - GPU_ID 2 - Bus_ID c9
MPI 003 - OMP 000 - HWT 025 - Node crusher001 - RT_GPU_ID 0 - GPU_ID 3 - Bus_ID ce
MPI 003 - OMP 001 - HWT 026 - Node crusher001 - RT_GPU_ID 0 - GPU_ID 3 - Bus_ID ce
MPI 004 - OMP 000 - HWT 033 - Node crusher001 - RT_GPU_ID 0 - GPU_ID 6 - Bus_ID d9
MPI 004 - OMP 001 - HWT 034 - Node crusher001 - RT_GPU_ID 0 - GPU_ID 6 - Bus_ID d9
MPI 005 - OMP 000 - HWT 041 - Node crusher001 - RT_GPU_ID 0 - GPU_ID 7 - Bus_ID de
MPI 005 - OMP 001 - HWT 042 - Node crusher001 - RT_GPU_ID 0 - GPU_ID 7 - Bus_ID de
MPI 006 - OMP 000 - HWT 049 - Node crusher001 - RT_GPU_ID 0 - GPU_ID 0 - Bus_ID c1
MPI 006 - OMP 001 - HWT 050 - Node crusher001 - RT_GPU_ID 0 - GPU_ID 0 - Bus_ID c1
MPI 007 - OMP 000 - HWT 057 - Node crusher001 - RT_GPU_ID 0 - GPU_ID 1 - Bus_ID c6
MPI 007 - OMP 001 - HWT 058 - Node crusher001 - RT_GPU_ID 0 - GPU_ID 1 - Bus_ID c6
The output from the program contains a lot of information, so let’s unpack it. First, there are different IDs associated with the GPUs so it is important to describe them before moving on. GPU_ID is the node-level (or global) GPU ID, which is labeled as one might expect from looking at the Crusher Node Diagram: 0, 1, 2, 3, 4, 5, 6, 7. RT_GPU_ID is the HIP runtime GPU ID, which can be though of as each MPI rank’s local GPU ID number (with zero-based indexing). So in the output above, each MPI rank has access to only 1 unique GPU - where MPI 000 has access to “global” GPU 4, MPI 001 has access to “global” GPU 5, etc., but all MPI ranks show a HIP runtime GPU ID of 0. The reason is that each MPI rank only “sees” one GPU and so the HIP runtime labels it as “0”, even though it might be global GPU ID 0, 1, 2, 3, 4, 5, 6, or 7. The GPU’s bus ID is included to definitively show that different GPUs are being used.
Here is a summary of the different GPU IDs reported by the example program:
GPU_IDis the node-level (or global) GPU ID read fromROCR_VISIBLE_DEVICES. If this environment variable is not set (either by the user or by Slurm), the value ofGPU_IDwill be set toN/Aby this program.RT_GPU_IDis the HIP runtime GPU ID (as reported from, sayhipGetDevice).Bus_IDis the physical bus ID associated with the GPUs. Comparing the bus IDs is meant to definitively show that different GPUs are being used.
So the job step (i.e., srun command) used above gave the desired output. Each MPI rank spawned 2 OpenMP threads and had access to a unique GPU. The --gpus-per-node=8 allocated 8 GPUs for node and the --gpu-bind=closest ensured that the closest GPU to each rank was the one used.
Note
This example shows an important peculiarity of the Crusher nodes; the “closest” GPUs to each MPI rank are not in sequential order. For example, MPI rank 000 and its two OpenMP threads ran on hardware threads 000 and 001. As can be seen in the Crusher node diagram, these two hardware threads reside in the same L3 cache region, and that L3 region is connected via Infinity Fabric (blue line in the diagram) to GPU 4. This is an important distinction that can affect performance if not considered carefully.
Example 2: 16 MPI ranks - each with 2 OpenMP threads and 1 GPU (multi-node)
This example will extend Example 1 to run on 2 nodes. As the output shows, it is a very straightforward exercise of changing the number of nodes to 2 (-N2) and the number of MPI ranks to 16 (-n16).
$ export OMP_NUM_THREADS=2
$ srun -N2 -n16 -c2 --gpus-per-node=8 --gpu-bind=closest ./hello_jobstep | sort

MPI 000 - OMP 000 - HWT 001 - Node crusher001 - RT_GPU_ID 0 - GPU_ID 4 - Bus_ID d1
MPI 000 - OMP 001 - HWT 002 - Node crusher001 - RT_GPU_ID 0 - GPU_ID 4 - Bus_ID d1
MPI 001 - OMP 000 - HWT 009 - Node crusher001 - RT_GPU_ID 0 - GPU_ID 5 - Bus_ID d6
MPI 001 - OMP 001 - HWT 010 - Node crusher001 - RT_GPU_ID 0 - GPU_ID 5 - Bus_ID d6
MPI 002 - OMP 000 - HWT 017 - Node crusher001 - RT_GPU_ID 0 - GPU_ID 2 - Bus_ID c9
MPI 002 - OMP 001 - HWT 018 - Node crusher001 - RT_GPU_ID 0 - GPU_ID 2 - Bus_ID c9
MPI 003 - OMP 000 - HWT 025 - Node crusher001 - RT_GPU_ID 0 - GPU_ID 3 - Bus_ID ce
MPI 003 - OMP 001 - HWT 026 - Node crusher001 - RT_GPU_ID 0 - GPU_ID 3 - Bus_ID ce
MPI 004 - OMP 000 - HWT 033 - Node crusher001 - RT_GPU_ID 0 - GPU_ID 6 - Bus_ID d9
MPI 004 - OMP 001 - HWT 034 - Node crusher001 - RT_GPU_ID 0 - GPU_ID 6 - Bus_ID d9
MPI 005 - OMP 000 - HWT 041 - Node crusher001 - RT_GPU_ID 0 - GPU_ID 7 - Bus_ID de
MPI 005 - OMP 001 - HWT 042 - Node crusher001 - RT_GPU_ID 0 - GPU_ID 7 - Bus_ID de
MPI 006 - OMP 000 - HWT 049 - Node crusher001 - RT_GPU_ID 0 - GPU_ID 0 - Bus_ID c1
MPI 006 - OMP 001 - HWT 050 - Node crusher001 - RT_GPU_ID 0 - GPU_ID 0 - Bus_ID c1
MPI 007 - OMP 000 - HWT 057 - Node crusher001 - RT_GPU_ID 0 - GPU_ID 1 - Bus_ID c6
MPI 007 - OMP 001 - HWT 058 - Node crusher001 - RT_GPU_ID 0 - GPU_ID 1 - Bus_ID c6
MPI 008 - OMP 000 - HWT 001 - Node crusher002 - RT_GPU_ID 0 - GPU_ID 4 - Bus_ID d1
MPI 008 - OMP 001 - HWT 002 - Node crusher002 - RT_GPU_ID 0 - GPU_ID 4 - Bus_ID d1
MPI 009 - OMP 000 - HWT 009 - Node crusher002 - RT_GPU_ID 0 - GPU_ID 5 - Bus_ID d6
MPI 009 - OMP 001 - HWT 010 - Node crusher002 - RT_GPU_ID 0 - GPU_ID 5 - Bus_ID d6
MPI 010 - OMP 000 - HWT 017 - Node crusher002 - RT_GPU_ID 0 - GPU_ID 2 - Bus_ID c9
MPI 010 - OMP 001 - HWT 018 - Node crusher002 - RT_GPU_ID 0 - GPU_ID 2 - Bus_ID c9
MPI 011 - OMP 000 - HWT 025 - Node crusher002 - RT_GPU_ID 0 - GPU_ID 3 - Bus_ID ce
MPI 011 - OMP 001 - HWT 026 - Node crusher002 - RT_GPU_ID 0 - GPU_ID 3 - Bus_ID ce
MPI 012 - OMP 000 - HWT 033 - Node crusher002 - RT_GPU_ID 0 - GPU_ID 6 - Bus_ID d9
MPI 012 - OMP 001 - HWT 034 - Node crusher002 - RT_GPU_ID 0 - GPU_ID 6 - Bus_ID d9
MPI 013 - OMP 000 - HWT 041 - Node crusher002 - RT_GPU_ID 0 - GPU_ID 7 - Bus_ID de
MPI 013 - OMP 001 - HWT 042 - Node crusher002 - RT_GPU_ID 0 - GPU_ID 7 - Bus_ID de
MPI 014 - OMP 000 - HWT 049 - Node crusher002 - RT_GPU_ID 0 - GPU_ID 0 - Bus_ID c1
MPI 014 - OMP 001 - HWT 050 - Node crusher002 - RT_GPU_ID 0 - GPU_ID 0 - Bus_ID c1
MPI 015 - OMP 000 - HWT 057 - Node crusher002 - RT_GPU_ID 0 - GPU_ID 1 - Bus_ID c6
MPI 015 - OMP 001 - HWT 058 - Node crusher002 - RT_GPU_ID 0 - GPU_ID 1 - Bus_ID c6
Example 3: 8 MPI ranks - each with 2 OpenMP threads and 1 *specific* GPU (single-node)
This example will be very similar to Example 1, but instead of using --gpu-bind=closest to map each MPI rank to the closest GPU, --gpu-bind=map_gpu will be used to map each MPI rank to a specific GPU. The map_gpu option takes a comma-separated list of GPU IDs to specify how the MPI ranks are mapped to GPUs, where the form of the comma-separated list is <gpu_id_for_task_0>, <gpu_id_for_task_1>,....
$ export OMP_NUM_THREADS=2
$ srun -N1 -n8 -c2 --gpus-per-node=8 --gpu-bind=map_gpu:4,5,2,3,6,7,0,1 ./hello_jobstep | sort

MPI 000 - OMP 000 - HWT 001 - Node crusher001 - RT_GPU_ID 0 - GPU_ID 4 - Bus_ID d1
MPI 000 - OMP 001 - HWT 002 - Node crusher001 - RT_GPU_ID 0 - GPU_ID 4 - Bus_ID d1
MPI 001 - OMP 000 - HWT 009 - Node crusher001 - RT_GPU_ID 0 - GPU_ID 5 - Bus_ID d6
MPI 001 - OMP 001 - HWT 010 - Node crusher001 - RT_GPU_ID 0 - GPU_ID 5 - Bus_ID d6
MPI 002 - OMP 000 - HWT 017 - Node crusher001 - RT_GPU_ID 0 - GPU_ID 2 - Bus_ID c9
MPI 002 - OMP 001 - HWT 018 - Node crusher001 - RT_GPU_ID 0 - GPU_ID 2 - Bus_ID c9
MPI 003 - OMP 000 - HWT 025 - Node crusher001 - RT_GPU_ID 0 - GPU_ID 3 - Bus_ID ce
MPI 003 - OMP 001 - HWT 026 - Node crusher001 - RT_GPU_ID 0 - GPU_ID 3 - Bus_ID ce
MPI 004 - OMP 000 - HWT 033 - Node crusher001 - RT_GPU_ID 0 - GPU_ID 6 - Bus_ID d9
MPI 004 - OMP 001 - HWT 034 - Node crusher001 - RT_GPU_ID 0 - GPU_ID 6 - Bus_ID d9
MPI 005 - OMP 000 - HWT 041 - Node crusher001 - RT_GPU_ID 0 - GPU_ID 7 - Bus_ID de
MPI 005 - OMP 001 - HWT 042 - Node crusher001 - RT_GPU_ID 0 - GPU_ID 7 - Bus_ID de
MPI 006 - OMP 000 - HWT 049 - Node crusher001 - RT_GPU_ID 0 - GPU_ID 0 - Bus_ID c1
MPI 006 - OMP 001 - HWT 050 - Node crusher001 - RT_GPU_ID 0 - GPU_ID 0 - Bus_ID c1
MPI 007 - OMP 000 - HWT 057 - Node crusher001 - RT_GPU_ID 0 - GPU_ID 1 - Bus_ID c6
MPI 007 - OMP 001 - HWT 058 - Node crusher001 - RT_GPU_ID 0 - GPU_ID 1 - Bus_ID c6
Here, the output is the same as the results from Example 1. This is because the 8 GPU IDs in the comma-separated list happen to specify the GPUs within the same L3 cache region that the MPI ranks are in. So MPI 000 is mapped to GPU 4, MPI 001 is mapped to GPU 5, etc.
While this level of control over mapping MPI ranks to GPUs might be useful for some applications, it is always important to consider the implication of the mapping. For example, if the order of the GPU IDs in the map_gpu option is reversed, the MPI ranks and the GPUs they are mapped to would be in different L3 cache regions, which could potentially lead to poorer performance.
Example 4: 16 MPI ranks - each with 2 OpenMP threads and 1 *specific* GPU (multi-node)
Extending Examples 2 and 3 to run on 2 nodes is also a straightforward exercise by changing the number of nodes to 2 (-N2) and the number of MPI ranks to 16 (-n16).
$ export OMP_NUM_THREADS=2
$ srun -N2 -n16 -c2 --gpus-per-node=8 --gpu-bind=map_gpu:4,5,2,3,6,7,0,1 ./hello_jobstep | sort

MPI 000 - OMP 000 - HWT 001 - Node crusher002 - RT_GPU_ID 0 - GPU_ID 4 - Bus_ID d1
MPI 000 - OMP 001 - HWT 002 - Node crusher002 - RT_GPU_ID 0 - GPU_ID 4 - Bus_ID d1
MPI 001 - OMP 000 - HWT 009 - Node crusher002 - RT_GPU_ID 0 - GPU_ID 5 - Bus_ID d6
MPI 001 - OMP 001 - HWT 010 - Node crusher002 - RT_GPU_ID 0 - GPU_ID 5 - Bus_ID d6
MPI 002 - OMP 000 - HWT 017 - Node crusher002 - RT_GPU_ID 0 - GPU_ID 2 - Bus_ID c9
MPI 002 - OMP 001 - HWT 018 - Node crusher002 - RT_GPU_ID 0 - GPU_ID 2 - Bus_ID c9
MPI 003 - OMP 000 - HWT 025 - Node crusher002 - RT_GPU_ID 0 - GPU_ID 3 - Bus_ID ce
MPI 003 - OMP 001 - HWT 026 - Node crusher002 - RT_GPU_ID 0 - GPU_ID 3 - Bus_ID ce
MPI 004 - OMP 000 - HWT 033 - Node crusher002 - RT_GPU_ID 0 - GPU_ID 6 - Bus_ID d9
MPI 004 - OMP 001 - HWT 034 - Node crusher002 - RT_GPU_ID 0 - GPU_ID 6 - Bus_ID d9
MPI 005 - OMP 000 - HWT 041 - Node crusher002 - RT_GPU_ID 0 - GPU_ID 7 - Bus_ID de
MPI 005 - OMP 001 - HWT 042 - Node crusher002 - RT_GPU_ID 0 - GPU_ID 7 - Bus_ID de
MPI 006 - OMP 000 - HWT 049 - Node crusher002 - RT_GPU_ID 0 - GPU_ID 0 - Bus_ID c1
MPI 006 - OMP 001 - HWT 050 - Node crusher002 - RT_GPU_ID 0 - GPU_ID 0 - Bus_ID c1
MPI 007 - OMP 000 - HWT 057 - Node crusher002 - RT_GPU_ID 0 - GPU_ID 1 - Bus_ID c6
MPI 007 - OMP 001 - HWT 058 - Node crusher002 - RT_GPU_ID 0 - GPU_ID 1 - Bus_ID c6
MPI 008 - OMP 000 - HWT 001 - Node crusher004 - RT_GPU_ID 0 - GPU_ID 4 - Bus_ID d1
MPI 008 - OMP 001 - HWT 002 - Node crusher004 - RT_GPU_ID 0 - GPU_ID 4 - Bus_ID d1
MPI 009 - OMP 000 - HWT 009 - Node crusher004 - RT_GPU_ID 0 - GPU_ID 5 - Bus_ID d6
MPI 009 - OMP 001 - HWT 010 - Node crusher004 - RT_GPU_ID 0 - GPU_ID 5 - Bus_ID d6
MPI 010 - OMP 000 - HWT 017 - Node crusher004 - RT_GPU_ID 0 - GPU_ID 2 - Bus_ID c9
MPI 010 - OMP 001 - HWT 018 - Node crusher004 - RT_GPU_ID 0 - GPU_ID 2 - Bus_ID c9
MPI 011 - OMP 000 - HWT 025 - Node crusher004 - RT_GPU_ID 0 - GPU_ID 3 - Bus_ID ce
MPI 011 - OMP 001 - HWT 026 - Node crusher004 - RT_GPU_ID 0 - GPU_ID 3 - Bus_ID ce
MPI 012 - OMP 000 - HWT 033 - Node crusher004 - RT_GPU_ID 0 - GPU_ID 6 - Bus_ID d9
MPI 012 - OMP 001 - HWT 034 - Node crusher004 - RT_GPU_ID 0 - GPU_ID 6 - Bus_ID d9
MPI 013 - OMP 000 - HWT 041 - Node crusher004 - RT_GPU_ID 0 - GPU_ID 7 - Bus_ID de
MPI 013 - OMP 001 - HWT 042 - Node crusher004 - RT_GPU_ID 0 - GPU_ID 7 - Bus_ID de
MPI 014 - OMP 000 - HWT 049 - Node crusher004 - RT_GPU_ID 0 - GPU_ID 0 - Bus_ID c1
MPI 014 - OMP 001 - HWT 050 - Node crusher004 - RT_GPU_ID 0 - GPU_ID 0 - Bus_ID c1
MPI 015 - OMP 000 - HWT 057 - Node crusher004 - RT_GPU_ID 0 - GPU_ID 1 - Bus_ID c6
MPI 015 - OMP 001 - HWT 058 - Node crusher004 - RT_GPU_ID 0 - GPU_ID 1 - Bus_ID c6
Mapping multiple MPI ranks to a single GPU
In the following examples, 2 MPI ranks will be mapped to 1 GPU. For the sake of brevity, OMP_NUM_THREADS will be set to 1, so -c1 will be used unless otherwise specified.
Note
On AMD’s MI250X, multi-process service (MPS) is not needed since multiple MPI ranks per GPU is supported natively.
Example 5: 16 MPI ranks - where 2 ranks share a GPU (round-robin, single-node)
This example launches 16 MPI ranks (-n16), each with 1 physical CPU core (-c1) to launch 1 OpenMP thread (OMP_NUM_THREADS=1) on. The MPI ranks will be assigned to GPUs in a round-robin fashion so that each of the 8 GPUs on the node are shared by 2 MPI ranks. To accomplish this GPU mapping, a new srun options will be used:
--ntasks-per-gpuspecifies the number of MPI ranks that will share access to a GPU.
$ export OMP_NUM_THREADS=1
$ srun -N1 -n16 -c1 --ntasks-per-gpu=2 --gpu-bind=closest ./hello_jobstep | sort

MPI 000 - OMP 000 - HWT 001 - Node crusher002 - RT_GPU_ID 0 - GPU_ID 4 - Bus_ID d1
MPI 001 - OMP 000 - HWT 009 - Node crusher002 - RT_GPU_ID 0 - GPU_ID 5 - Bus_ID d6
MPI 002 - OMP 000 - HWT 017 - Node crusher002 - RT_GPU_ID 0 - GPU_ID 2 - Bus_ID c9
MPI 003 - OMP 000 - HWT 025 - Node crusher002 - RT_GPU_ID 0 - GPU_ID 3 - Bus_ID ce
MPI 004 - OMP 000 - HWT 033 - Node crusher002 - RT_GPU_ID 0 - GPU_ID 6 - Bus_ID d9
MPI 005 - OMP 000 - HWT 041 - Node crusher002 - RT_GPU_ID 0 - GPU_ID 7 - Bus_ID de
MPI 006 - OMP 000 - HWT 049 - Node crusher002 - RT_GPU_ID 0 - GPU_ID 0 - Bus_ID c1
MPI 007 - OMP 000 - HWT 057 - Node crusher002 - RT_GPU_ID 0 - GPU_ID 1 - Bus_ID c6
MPI 008 - OMP 000 - HWT 002 - Node crusher002 - RT_GPU_ID 0 - GPU_ID 4 - Bus_ID d1
MPI 009 - OMP 000 - HWT 010 - Node crusher002 - RT_GPU_ID 0 - GPU_ID 5 - Bus_ID d6
MPI 010 - OMP 000 - HWT 018 - Node crusher002 - RT_GPU_ID 0 - GPU_ID 2 - Bus_ID c9
MPI 011 - OMP 000 - HWT 026 - Node crusher002 - RT_GPU_ID 0 - GPU_ID 3 - Bus_ID ce
MPI 012 - OMP 000 - HWT 034 - Node crusher002 - RT_GPU_ID 0 - GPU_ID 6 - Bus_ID d9
MPI 013 - OMP 000 - HWT 042 - Node crusher002 - RT_GPU_ID 0 - GPU_ID 7 - Bus_ID de
MPI 014 - OMP 000 - HWT 050 - Node crusher002 - RT_GPU_ID 0 - GPU_ID 0 - Bus_ID c1
MPI 015 - OMP 000 - HWT 058 - Node crusher002 - RT_GPU_ID 0 - GPU_ID 1 - Bus_ID c6
The output shows the round-robin (cyclic) distribution of MPI ranks to GPUs. In fact, it is a round-robin distribution of MPI ranks to L3 cache regions (the default distribution). The GPU mapping is a consequence of where the MPI ranks are distributed; --gpu-bind=closest simply maps the GPU in an L3 cache region to the MPI ranks in the same L3 region.
Example 6: 32 MPI ranks - where 2 ranks share a GPU (round-robin, multi-node)
This example is an extension of Example 5 to run on 2 nodes.
$ export OMP_NUM_THREADS=1
$ srun -N2 -n32 -c1 --ntasks-per-gpu=2 --gpu-bind=closest ./hello_jobstep | sort

MPI 000 - OMP 000 - HWT 001 - Node crusher002 - RT_GPU_ID 0 - GPU_ID 4 - Bus_ID d1
MPI 001 - OMP 000 - HWT 009 - Node crusher002 - RT_GPU_ID 0 - GPU_ID 5 - Bus_ID d6
MPI 002 - OMP 000 - HWT 017 - Node crusher002 - RT_GPU_ID 0 - GPU_ID 2 - Bus_ID c9
MPI 003 - OMP 000 - HWT 025 - Node crusher002 - RT_GPU_ID 0 - GPU_ID 3 - Bus_ID ce
MPI 004 - OMP 000 - HWT 033 - Node crusher002 - RT_GPU_ID 0 - GPU_ID 6 - Bus_ID d9
MPI 005 - OMP 000 - HWT 041 - Node crusher002 - RT_GPU_ID 0 - GPU_ID 7 - Bus_ID de
MPI 006 - OMP 000 - HWT 049 - Node crusher002 - RT_GPU_ID 0 - GPU_ID 0 - Bus_ID c1
MPI 007 - OMP 000 - HWT 057 - Node crusher002 - RT_GPU_ID 0 - GPU_ID 1 - Bus_ID c6
MPI 008 - OMP 000 - HWT 002 - Node crusher002 - RT_GPU_ID 0 - GPU_ID 4 - Bus_ID d1
MPI 009 - OMP 000 - HWT 010 - Node crusher002 - RT_GPU_ID 0 - GPU_ID 5 - Bus_ID d6
MPI 010 - OMP 000 - HWT 018 - Node crusher002 - RT_GPU_ID 0 - GPU_ID 2 - Bus_ID c9
MPI 011 - OMP 000 - HWT 026 - Node crusher002 - RT_GPU_ID 0 - GPU_ID 3 - Bus_ID ce
MPI 012 - OMP 000 - HWT 034 - Node crusher002 - RT_GPU_ID 0 - GPU_ID 6 - Bus_ID d9
MPI 013 - OMP 000 - HWT 042 - Node crusher002 - RT_GPU_ID 0 - GPU_ID 7 - Bus_ID de
MPI 014 - OMP 000 - HWT 050 - Node crusher002 - RT_GPU_ID 0 - GPU_ID 0 - Bus_ID c1
MPI 015 - OMP 000 - HWT 058 - Node crusher002 - RT_GPU_ID 0 - GPU_ID 1 - Bus_ID c6
MPI 016 - OMP 000 - HWT 001 - Node crusher004 - RT_GPU_ID 0 - GPU_ID 4 - Bus_ID d1
MPI 017 - OMP 000 - HWT 009 - Node crusher004 - RT_GPU_ID 0 - GPU_ID 5 - Bus_ID d6
MPI 018 - OMP 000 - HWT 017 - Node crusher004 - RT_GPU_ID 0 - GPU_ID 2 - Bus_ID c9
MPI 019 - OMP 000 - HWT 025 - Node crusher004 - RT_GPU_ID 0 - GPU_ID 3 - Bus_ID ce
MPI 020 - OMP 000 - HWT 033 - Node crusher004 - RT_GPU_ID 0 - GPU_ID 6 - Bus_ID d9
MPI 021 - OMP 000 - HWT 041 - Node crusher004 - RT_GPU_ID 0 - GPU_ID 7 - Bus_ID de
MPI 022 - OMP 000 - HWT 049 - Node crusher004 - RT_GPU_ID 0 - GPU_ID 0 - Bus_ID c1
MPI 023 - OMP 000 - HWT 057 - Node crusher004 - RT_GPU_ID 0 - GPU_ID 1 - Bus_ID c6
MPI 024 - OMP 000 - HWT 002 - Node crusher004 - RT_GPU_ID 0 - GPU_ID 4 - Bus_ID d1
MPI 025 - OMP 000 - HWT 010 - Node crusher004 - RT_GPU_ID 0 - GPU_ID 5 - Bus_ID d6
MPI 026 - OMP 000 - HWT 018 - Node crusher004 - RT_GPU_ID 0 - GPU_ID 2 - Bus_ID c9
MPI 027 - OMP 000 - HWT 026 - Node crusher004 - RT_GPU_ID 0 - GPU_ID 3 - Bus_ID ce
MPI 028 - OMP 000 - HWT 034 - Node crusher004 - RT_GPU_ID 0 - GPU_ID 6 - Bus_ID d9
MPI 029 - OMP 000 - HWT 042 - Node crusher004 - RT_GPU_ID 0 - GPU_ID 7 - Bus_ID de
MPI 030 - OMP 000 - HWT 050 - Node crusher004 - RT_GPU_ID 0 - GPU_ID 0 - Bus_ID c1
MPI 031 - OMP 000 - HWT 058 - Node crusher004 - RT_GPU_ID 0 - GPU_ID 1 - Bus_ID c6
Example 7: 16 MPI ranks - where 2 ranks share a GPU (packed, single-node)
This example launches 16 MPI ranks (-n16), each with 4 physical CPU cores (-c4) to launch 1 OpenMP thread (OMP_NUM_THREADS=1) on. Because it is using 4 physical CPU cores per task, core specialization needs to be disabled (-S 0). The MPI ranks will be assigned to GPUs in a packed fashion so that each of the 8 GPUs on the node are shared by 2 MPI ranks. Similar to Example 5, -ntasks-per-gpu=2 will be used, but a new srun flag will be used to change the default round-robin (cyclic) distribution of MPI ranks across NUMA domains:
--distribution=<value>[:<value>][:<value>]specifies the distribution of MPI ranks across compute nodes, sockets (L3 cache regions on Crusher), and cores, respectively. The default values areblock:cyclic:cyclic, which is where thecyclicassignment comes from in the previous examples.
Note
In the job step for this example, --distribution=*:block is used, where * represents the default value of block for the distribution of MPI ranks across compute nodes and the distribution of MPI ranks across L3 cache regions has been changed to block from its default value of cyclic.
Note
Because the distribution across L3 cache regions has been changed to a “packed” (block) configuration, caution must be taken to ensure MPI ranks end up in the L3 cache regions where the GPUs they intend to be mapped to are located. To accomplish this, the number of physical CPU cores assigned to an MPI rank was increased - in this case to 4. Doing so ensures that only 2 MPI ranks can fit into a single L3 cache region. If the value of -c was left at 1, all 8 MPI ranks would be “packed” into the first L3 region, where the “closest” GPU would be GPU 4 - the only GPU in that L3 region.
Notice that this is not a workaround like in Example 6, but a requirement due to the block distribution of MPI ranks across NUMA domains.
$ salloc -N 1 -S 0 ...
<job starts>
$ export OMP_NUM_THREADS=1
$ srun -N1 -n16 -c3 --ntasks-per-gpu=2 --gpu-bind=closest --distribution=*:block ./hello_jobstep | sort

MPI 000 - OMP 000 - HWT 002 - Node crusher002 - RT_GPU_ID 0 - GPU_ID 4 - Bus_ID d1
MPI 001 - OMP 000 - HWT 006 - Node crusher002 - RT_GPU_ID 0 - GPU_ID 4 - Bus_ID d1
MPI 002 - OMP 000 - HWT 010 - Node crusher002 - RT_GPU_ID 0 - GPU_ID 5 - Bus_ID d6
MPI 003 - OMP 000 - HWT 014 - Node crusher002 - RT_GPU_ID 0 - GPU_ID 5 - Bus_ID d6
MPI 004 - OMP 000 - HWT 016 - Node crusher002 - RT_GPU_ID 0 - GPU_ID 2 - Bus_ID c9
MPI 005 - OMP 000 - HWT 021 - Node crusher002 - RT_GPU_ID 0 - GPU_ID 2 - Bus_ID c9
MPI 006 - OMP 000 - HWT 027 - Node crusher002 - RT_GPU_ID 0 - GPU_ID 3 - Bus_ID ce
MPI 007 - OMP 000 - HWT 031 - Node crusher002 - RT_GPU_ID 0 - GPU_ID 3 - Bus_ID ce
MPI 008 - OMP 000 - HWT 034 - Node crusher002 - RT_GPU_ID 0 - GPU_ID 6 - Bus_ID d9
MPI 009 - OMP 000 - HWT 037 - Node crusher002 - RT_GPU_ID 0 - GPU_ID 6 - Bus_ID d9
MPI 010 - OMP 000 - HWT 042 - Node crusher002 - RT_GPU_ID 0 - GPU_ID 7 - Bus_ID de
MPI 011 - OMP 000 - HWT 045 - Node crusher002 - RT_GPU_ID 0 - GPU_ID 7 - Bus_ID de
MPI 012 - OMP 000 - HWT 049 - Node crusher002 - RT_GPU_ID 0 - GPU_ID 0 - Bus_ID c1
MPI 013 - OMP 000 - HWT 053 - Node crusher002 - RT_GPU_ID 0 - GPU_ID 0 - Bus_ID c1
MPI 014 - OMP 000 - HWT 057 - Node crusher002 - RT_GPU_ID 0 - GPU_ID 1 - Bus_ID c6
MPI 015 - OMP 000 - HWT 061 - Node crusher002 - RT_GPU_ID 0 - GPU_ID 1 - Bus_ID c6
The overall effect of using --distribution=*:block and increasing the number of physical CPU cores available to each MPI rank is to place the first two MPI ranks in the first L3 cache region with GPU 4, the next two MPI ranks in the second L3 cache region with GPU 5, and so on.
Example 8: 32 MPI ranks - where 2 ranks share a GPU (packed, multi-node)
This example is an extension of Example 7 to use 2 compute nodes. Again, because it is using 4 physical CPU cores per task, core specialization needs to be disabled (-S 0). With the appropriate changes put in place in Example 7, it is a straightforward exercise to change to using 2 nodes (-N2) and 32 MPI ranks (-n32).
$ export OMP_NUM_THREADS=1
$ srun -N2 -n32 -c4 --ntasks-per-gpu=2 --gpu-bind=closest --distribution=*:block ./hello_jobstep | sort

MPI 000 - OMP 000 - HWT 001 - Node crusher002 - RT_GPU_ID 0 - GPU_ID 4 - Bus_ID d1
MPI 001 - OMP 000 - HWT 005 - Node crusher002 - RT_GPU_ID 0 - GPU_ID 4 - Bus_ID d1
MPI 002 - OMP 000 - HWT 009 - Node crusher002 - RT_GPU_ID 0 - GPU_ID 5 - Bus_ID d6
MPI 003 - OMP 000 - HWT 014 - Node crusher002 - RT_GPU_ID 0 - GPU_ID 5 - Bus_ID d6
MPI 004 - OMP 000 - HWT 017 - Node crusher002 - RT_GPU_ID 0 - GPU_ID 2 - Bus_ID c9
MPI 005 - OMP 000 - HWT 020 - Node crusher002 - RT_GPU_ID 0 - GPU_ID 2 - Bus_ID c9
MPI 006 - OMP 000 - HWT 025 - Node crusher002 - RT_GPU_ID 0 - GPU_ID 3 - Bus_ID ce
MPI 007 - OMP 000 - HWT 029 - Node crusher002 - RT_GPU_ID 0 - GPU_ID 3 - Bus_ID ce
MPI 008 - OMP 000 - HWT 033 - Node crusher002 - RT_GPU_ID 0 - GPU_ID 6 - Bus_ID d9
MPI 009 - OMP 000 - HWT 037 - Node crusher002 - RT_GPU_ID 0 - GPU_ID 6 - Bus_ID d9
MPI 010 - OMP 000 - HWT 042 - Node crusher002 - RT_GPU_ID 0 - GPU_ID 7 - Bus_ID de
MPI 011 - OMP 000 - HWT 045 - Node crusher002 - RT_GPU_ID 0 - GPU_ID 7 - Bus_ID de
MPI 012 - OMP 000 - HWT 049 - Node crusher002 - RT_GPU_ID 0 - GPU_ID 0 - Bus_ID c1
MPI 013 - OMP 000 - HWT 054 - Node crusher002 - RT_GPU_ID 0 - GPU_ID 0 - Bus_ID c1
MPI 014 - OMP 000 - HWT 058 - Node crusher002 - RT_GPU_ID 0 - GPU_ID 1 - Bus_ID c6
MPI 015 - OMP 000 - HWT 063 - Node crusher002 - RT_GPU_ID 0 - GPU_ID 1 - Bus_ID c6
MPI 016 - OMP 000 - HWT 001 - Node crusher004 - RT_GPU_ID 0 - GPU_ID 4 - Bus_ID d1
MPI 017 - OMP 000 - HWT 005 - Node crusher004 - RT_GPU_ID 0 - GPU_ID 4 - Bus_ID d1
MPI 018 - OMP 000 - HWT 009 - Node crusher004 - RT_GPU_ID 0 - GPU_ID 5 - Bus_ID d6
MPI 019 - OMP 000 - HWT 014 - Node crusher004 - RT_GPU_ID 0 - GPU_ID 5 - Bus_ID d6
MPI 020 - OMP 000 - HWT 017 - Node crusher004 - RT_GPU_ID 0 - GPU_ID 2 - Bus_ID c9
MPI 021 - OMP 000 - HWT 021 - Node crusher004 - RT_GPU_ID 0 - GPU_ID 2 - Bus_ID c9
MPI 022 - OMP 000 - HWT 026 - Node crusher004 - RT_GPU_ID 0 - GPU_ID 3 - Bus_ID ce
MPI 023 - OMP 000 - HWT 028 - Node crusher004 - RT_GPU_ID 0 - GPU_ID 3 - Bus_ID ce
MPI 024 - OMP 000 - HWT 033 - Node crusher004 - RT_GPU_ID 0 - GPU_ID 6 - Bus_ID d9
MPI 025 - OMP 000 - HWT 037 - Node crusher004 - RT_GPU_ID 0 - GPU_ID 6 - Bus_ID d9
MPI 026 - OMP 000 - HWT 042 - Node crusher004 - RT_GPU_ID 0 - GPU_ID 7 - Bus_ID de
MPI 027 - OMP 000 - HWT 045 - Node crusher004 - RT_GPU_ID 0 - GPU_ID 7 - Bus_ID de
MPI 028 - OMP 000 - HWT 049 - Node crusher004 - RT_GPU_ID 0 - GPU_ID 0 - Bus_ID c1
MPI 029 - OMP 000 - HWT 052 - Node crusher004 - RT_GPU_ID 0 - GPU_ID 0 - Bus_ID c1
MPI 030 - OMP 000 - HWT 059 - Node crusher004 - RT_GPU_ID 0 - GPU_ID 1 - Bus_ID c6
MPI 031 - OMP 000 - HWT 061 - Node crusher004 - RT_GPU_ID 0 - GPU_ID 1 - Bus_ID c6
Example 9: 4 independent and simultaneous job steps in a single allocation
This example shows how to run multiple job steps simultaneously in a single allocation. The example below demonstrates running 4 independent, single rank MPI executions on a single node, however the example could be extrapolated to more complex invocations using the above examples.
Submission script:
#!/bin/bash
#SBATCH -A <projid>
#SBATCH -N 1
#SBATCH -t 10

srun -N1 -c1 --gpus-per-task=1 --exact ./hello_jobstep &
sleep 1
srun -N1 -c1 --gpus-per-task=1 --exact ./hello_jobstep &
sleep 1
srun -N1 -c1 --gpus-per-task=1 --exact ./hello_jobstep &
sleep 1
srun -N1 -c1 --gpus-per-task=1 --exact ./hello_jobstep &
wait
Output:
MPI 000 - OMP 000 - HWT 017 - Node crusher166 - RT_GPU_ID 0 - GPU_ID 2 - Bus_ID c9
MPI 000 - OMP 000 - HWT 057 - Node crusher166 - RT_GPU_ID 0 - GPU_ID 1 - Bus_ID c6
MPI 000 - OMP 000 - HWT 049 - Node crusher166 - RT_GPU_ID 0 - GPU_ID 0 - Bus_ID c1
MPI 000 - OMP 000 - HWT 025 - Node crusher166 - RT_GPU_ID 0 - GPU_ID 3 - Bus_ID ce
Note
The --exact parameter is important to avoid the error message srun: Job <job id> step creation temporarily disabled, retrying (Requested nodes are busy). The wait command is also critical, or your job script and allocation will immediately end after launching your jobs in the background. The sleep command is currently required to work around a known issue that causes MPICH ERROR. sleep will no longer be needed in a future update.
Note
This may result in a sub-optimal alignment of CPU and GPU on the node, as shown in the example output. Unfortunately, at the moment there is not a workaround for this, however improvements are possible in future SLURM updates.
Multiple GPUs per MPI rank
As mentioned previously, all GPUs are accessible by all MPI ranks by default, so it is possible to programatically map any combination of GPUs to MPI ranks. It should be noted however that Cray MPICH does not support GPU-aware MPI for multiple GPUs per rank, so this binding is not suggested.
Note
There are many different ways users might choose to perform these mappings, so users are encouraged to clone the hello_jobstep program and test whether or not processes and threads are running where intended.
NVMe Usage
Each Crusher compute node has [2x] 1.92 TB NVMe devices (SSDs) with a peak sequential performance of 5500 MB/s (read) and 2000 MB/s (write). To use the NVMe, users must request access during job allocation using the -C nvme option to sbatch, salloc, or srun. Once the devices have been granted to a job, users can access them at /mnt/bb/<userid>. Users are responsible for moving data to/from the NVMe before/after their jobs. Here is a simple example script:
#!/bin/bash
#SBATCH -A <projid>
#SBATCH -J nvme_test
#SBATCH -o %x-%j.out
#SBATCH -t 00:05:00
#SBATCH -p batch
#SBATCH -N 1
#SBATCH -C nvme

date

# Change directory to user scratch space (Orion)
cd /lustre/orion/<projid>/scratch/<userid>

echo " "
echo "*****ORIGINAL FILE*****"
cat test.txt
echo "***********************"

# Move file from Orion to SSD
mv test.txt /mnt/bb/<userid>

# Edit file from compute node
srun -n1 hostname >> /mnt/bb/<userid>/test.txt

# Move file from SSD back to Orion
mv /mnt/bb/<userid>/test.txt .

echo " "
echo "*****UPDATED FILE******"
cat test.txt
echo "***********************"
And here is the output from the script:
$ cat nvme_test-<jobid>.out
Fri Oct 8 12:28:18 EDT 2021

*****ORIGINAL FILE*****
This is my file. There are many like it but this one is mine.
***********************

*****UPDATED FILE******
This is my file. There are many like it but this one is mine.
crusher025
***********************
Tips for Launching at Scale
SBCAST your executable and libraries
Slurm contains a utility called sbcast. This program takes a file and broadcasts it to each node’s node-local storage (ie, /tmp, NVMe).
This is useful for sharing large input files, binaries and shared libraries, while reducing the overhead on shared file systems and overhead at startup.
This is highly recommended at scale if you have multiple shared libraries on Lustre/NFS file systems.
SBCASTing a single file
Here is a simple example of a file sbcast from a user’s scratch space on Lustre to each node’s NVMe drive:
#!/bin/bash
#SBATCH -A <projid>
#SBATCH -J sbcast_to_nvme
#SBATCH -o %x-%j.out
#SBATCH -t 00:05:00
#SBATCH -p batch
#SBATCH -N 2
#SBATCH -C nvme

date

# Change directory to user scratch space (Orion)
cd /lustre/orion/<projid>/scratch/<userid>

echo "This is an example file" > test.txt
echo
echo "*****ORIGINAL FILE*****"
cat test.txt
echo "***********************"

# SBCAST file from Orion to NVMe -- NOTE: ``-C nvme`` is required to use the NVMe drive
sbcast -pf test.txt /mnt/bb/$USER/test.txt
if [ ! "$?" == "0" ]; then
    # CHECK EXIT CODE. When SBCAST fails, it may leave partial files on the compute nodes, and if you continue to launch srun,
    # your application may pick up partially complete shared library files, which would give you confusing errors.
    echo "SBCAST failed!"
    exit 1
fi

echo
echo "*****DISPLAYING FILES ON EACH NODE IN THE ALLOCATION*****"
# Check to see if file exists
srun -N ${SLURM_NNODES} -n ${SLURM_NNODES} --ntasks-per-node=1 bash -c "echo \"\$(hostname): \$(ls -lh /mnt/bb/$USER/test.txt)\""
echo "*********************************************************"

echo
# Showing the file on the current node -- this will be the same on all other nodes in the allocation
echo "*****SBCAST FILE ON CURRENT NODE******"
cat /mnt/bb/$USER/test.txt
echo "**************************************"
and here is the output from that script:
Fri 03 Mar 2023 03:43:30 PM EST

*****ORIGINAL FILE*****
This is an example file
***********************

*****DISPLAYING FILES ON EACH NODE IN THE ALLOCATION*****
crusher001: -rw-r--r-- 1 hagertnl hagertnl 24 Mar  3 15:43 /mnt/bb/hagertnl/test.txt
crusher002: -rw-r--r-- 1 hagertnl hagertnl 24 Mar  3 15:43 /mnt/bb/hagertnl/test.txt
*********************************************************

*****SBCAST FILE ON CURRENT NODE******
This is an example file
**************************************
Alternative: SBCASTing a binary with all libraries
As mentioned above, you can use --exclude=NONE on sbcast to send all libraries along with the binary.
Using --exclude=NONE requires more effort but substantially simplifies the linker configuration at run-time.
A job script for the previous example, modified for sending all libraries is shown below.
#!/bin/bash
#SBATCH -A <projid>
#SBATCH -J sbcast_binary_to_nvme
#SBATCH -o %x-%j.out
#SBATCH -t 00:05:00
#SBATCH -p batch
#SBATCH -N 2
#SBATCH -C nvme

date

# Change directory to user scratch space (Orion)
cd /lustre/orion/<projid>/scratch/<userid>

# For this example, I use a HIP-enabled LAMMPS binary, with dependencies to MPI, HIP, and HWLOC
exe="lmp"

echo "*****ldd ./${exe}*****"
ldd ./${exe}
echo "*************************"

# SBCAST executable from Orion to NVMe -- NOTE: ``-C nvme`` is needed in SBATCH headers to use the NVMe drive
# NOTE: dlopen'd files will NOT be picked up by sbcast
sbcast --send-libs --exclude=NONE -pf ${exe} /mnt/bb/$USER/${exe}
if [ ! "$?" == "0" ]; then
    # CHECK EXIT CODE. When SBCAST fails, it may leave partial files on the compute nodes, and if you continue to launch srun,
    # your application may pick up partially complete shared library files, which would give you confusing errors.
    echo "SBCAST failed!"
    exit 1
fi

# Check to see if file exists
echo "*****ls -lh /mnt/bb/$USER*****"
ls -lh /mnt/bb/$USER/
echo "*****ls -lh /mnt/bb/$USER/${exe}_libs*****"
ls -lh /mnt/bb/$USER/${exe}_libs

# SBCAST sends all libraries detected by `ld` (minus any excluded), and stores them in the same directory in each node's node-local storage
# Any libraries opened by `dlopen` are NOT sent, since they are not known by the linker at run-time.

# All required libraries now reside in /mnt/bb/$USER/${exe}_libs
export LD_LIBRARY_PATH="/mnt/bb/$USER/${exe}_libs"

# libfabric dlopen's several libraries:
export LD_LIBRARY_PATH="${LD_LIBRARY_PATH}:$(pkg-config --variable=libdir libfabric)"

# cray-mpich dlopen's libhsa-runtime64.so and libamdhip64.so (non-versioned), so symlink on each node:
srun -N ${SLURM_NNODES} -n ${SLURM_NNODES} --ntasks-per-node=1 --label -D /mnt/bb/$USER/${exe}_libs \
    bash -c "if [ -f libhsa-runtime64.so.1 ]; then ln -s libhsa-runtime64.so.1 libhsa-runtime64.so; fi;
    if [ -f libamdhip64.so.5 ]; then ln -s libamdhip64.so.5 libamdhip64.so; fi"

# RocBLAS has over 1,000 device libraries that may be `dlopen`'d by RocBLAS during a run.
# It's impractical to SBCAST all of these, so you can set this path instead, if you use RocBLAS:
#export ROCBLAS_TENSILE_LIBPATH=${ROCM_PATH}/lib/rocblas/library

# You may notice that some libraries are still linked from /sw/crusher, even after SBCASTing.
# This is because the Spack-build modules use RPATH to find their dependencies. This behavior cannot be changed.
echo "*****ldd /mnt/bb/$USER/${exe}*****"
ldd /mnt/bb/$USER/${exe}
echo "*************************************"
Some libraries still resolved to paths outside of /mnt/bb, and the reason for that is that the executable may have several paths in RPATH.
Profiling Applications
Getting Started with the HPE Performance Analysis Tools (PAT)
The Performance Analysis Tools (PAT), formerly CrayPAT, are a suite of utilities that enable users to capture and analyze performance data generated during program execution. These tools provide an integrated infrastructure for measurement, analysis, and visualization of computation, communication, I/O, and memory utilization to help users optimize programs for faster execution and more efficient computing resource usage.
There are three programming interfaces available: (1) Perftools-lite, (2) Perftools, and (3) Perftools-preload.
Below are two examples that generate an instrumented executable using Perftools, which is an advanced interface that provides full-featured data collection and analysis capability, including full traces with timeline displays.
The first example generates an instrumented executable using a PrgEnv-amd build:
module load PrgEnv-amd
module load craype-accel-amd-gfx90a
module load rocm
module load perftools

export PATH="${PATH}:${ROCM_PATH}/llvm/bin"
export CXX='CC -x hip'
export CXXFLAGS='-ggdb -O3 -std=c++17 –Wall'
export LD='CC'
export LDFLAGS="${CXXFLAGS} -L${ROCM_PATH}/lib"
export LIBS='-lamdhip64'

make clean
make

pat_build -g hip,io,mpi -w -f <executable>
The second example generates an instrumened executable using a hipcc build:
module load perftools
module load craype-accel-amd-gfx90a
module load rocm

export CXX='hipcc'
export CXXFLAGS="$(pat_opts include hipcc) \
  $(pat_opts pre_compile hipcc) -g -O3 -std=c++17 -Wall \
  --offload-arch=gfx90a -I${CRAY_MPICH_DIR}/include \
  $(pat_opts post_compile hipcc)"
export LD='hipcc'
export LDFLAGS="$(pat_opts pre_link hipcc) ${CXXFLAGS} \
  -L${CRAY_MPICH_DIR}/lib ${PE_MPICH_GTL_DIR_amd_gfx908}"
export LIBS="-lmpi ${PE_MPICH_GTL_LIBS_amd_gfx908} \
  $(pat_opts post_link hipcc)"

make clean
make

pat_build -g hip,io,mpi -w -f <executable>
The pat_build command in the above examples generates an instrumented executable with +pat appended to the executable name (e.g., hello_jobstep+pat).
When run, the instrumented executable will trace HIP, I/O, MPI, and all user functions and generate a folder of results (e.g., hello_jobstep+pat+39545-2t).
To analyze these results, use the pat_report command, e.g.:
pat_report hello_jobstep+pat+39545-2t
The resulting report includes profiles of functions, profiles of maximum function times, details on load imbalance, details on program energy and power usages, details on memory high water mark, and more.
More detailed information on the HPE Performance Analysis Tools can be found in the HPE Performance Analysis Tools User Guide.
Note
When using perftools-lite-gpu, there is a known issue causing ld.lld not to be found. A workaround this issue can be found here.
Getting Started with HPCToolkit
HPCToolkit is an integrated suite of tools for measurement and analysis of program performance on computers ranging from multicore desktop systems to the nation’s largest supercomputers. HPCToolkit provides accurate measurements of a program’s work, resource consumption, and inefficiency, correlates these metrics with the program’s source code, works with multilingual, fully optimized binaries, has very low measurement overhead, and scales to large parallel systems. HPCToolkit’s measurements provide support for analyzing a program execution cost, inefficiency, and scaling characteristics both within and across nodes of a parallel system.
Programming models supported by HPCToolkit include MPI, OpenMP, OpenACC, CUDA, OpenCL, DPC++, HIP, RAJA, Kokkos, and others.
Below is an example that generates a profile and loads the results in their GUI-based viewer.
module use /gpfs/alpine/csc322/world-shared/modulefiles/x86_64
module load hpctoolkit

# 1. Profile and trace an application using CPU time and GPU performance counters
srun <srun_options> hpcrun -o <measurement_dir> -t -e CPUTIME -e gpu=amd <application>

# 2. Analyze the binary of executables and its dependent libraries
hpcstruct <measurement_dir>

# 3. Combine measurements with program structure information and generate a database
hpcprof -o <database_dir> <measurement_dir>

# 4. Understand performance issues by analyzing profiles and traces with the GUI
hpcviewer <database_dir>
More detailed information on HPCToolkit can be found in the HPCToolkit User’s Manual.
Note
HPCToolkit does not require a recompile to profile the code. It is recommended to use the -g optimization flag for attribution to source lines.
Getting Started with the ROCm Profiler
rocprof gathers metrics on kernels run on AMD GPU architectures. The profiler works for HIP kernels, as well as offloaded kernels from OpenMP target offloading, OpenCL, and abstraction layers such as Kokkos.
For a simple view of kernels being run, rocprof --stats --timestamp on is a great place to start.
With the --stats option enabled, rocprof will generate a file that is named results.stats.csv by default, but named <output>.stats.csv if the -o flag is supplied.
This file will list all kernels being run, the number of times they are run, the total duration and the average duration (in nanoseconds) of the kernel, and the GPU usage percentage.
More detailed infromation on rocprof profiling modes can be found at ROCm Profiler documentation.
Note
If you are using sbcast, you need to explicitly sbcast the AQL profiling library found in ${ROCM_PATH}/hsa-amd-aqlprofile/lib/libhsa-amd-aqlprofile64.so.
A symbolic link to this library can also be found in ${ROCM_PATH}/lib.
Alternatively, you may leave ${ROCM_PATH}/lib in your LD_LIBRARY_PATH.
Roofline Profiling with the ROCm Profiler
The Roofline performance model is an increasingly popular way to demonstrate and understand application performance.
This section documents how to construct a simple roofline model for a single kernel using rocprof.
This roofline model is designed to be comparable to rooflines constructed by NVIDIA’s NSight Compute.
A roofline model plots the achieved performance (in floating-point operations per second, FLOPS/s) as a function of arithmetic (or operational) intensity (in FLOPS per Byte).
The model detailed here calculates the bytes moved as they move to and from the GPU’s HBM.
Note
Integer instructions and cache levels are currently not documented here.
To get started, you will need to make an input file for rocprof, to be passed in through rocprof -i <input_file> --timestamp on -o my_output.csv <my_exe>.
Below is an example, and contains the information needed to roofline profile GPU 0, as seen by each rank:
pmc : TCC_EA_RDREQ_32B_sum TCC_EA_RDREQ_sum TCC_EA_WRREQ_sum TCC_EA_WRREQ_64B_sum SQ_INSTS_VALU_ADD_F16 SQ_INSTS_VALU_MUL_F16 SQ_INSTS_VALU_FMA_F16 SQ_INSTS_VALU_TRANS_F16 SQ_INSTS_VALU_ADD_F32 SQ_INSTS_VALU_MUL_F32 SQ_INSTS_VALU_FMA_F32 SQ_INSTS_VALU_TRANS_F32
pmc : SQ_INSTS_VALU_ADD_F64 SQ_INSTS_VALU_MUL_F64 SQ_INSTS_VALU_FMA_F64 SQ_INSTS_VALU_TRANS_F64 SQ_INSTS_VALU_MFMA_MOPS_F16 SQ_INSTS_VALU_MFMA_MOPS_BF16 SQ_INSTS_VALU_MFMA_MOPS_F32 SQ_INSTS_VALU_MFMA_MOPS_F64
gpu: 0
Note
In an application with more than one kernel, you should strongly consider filtering by kernel name by adding a line like: kernel: <kernel_name> to the rocprof input file.
This provides the minimum set of metrics used to construct a roofline model, in the minimum number of passes.
Each line that begins with pmc indicates that the application will be re-run, and the metrics in that line will be collected.
rocprof can collect up to 8 counters from each block (SQ, TCC) in each application re-run.
To gather metrics across multiple MPI ranks, you will need to use a command that redirects the output of rocprof to a unique file for each task.
For example:
srun -N 2 -n 16 --ntasks-per-node=8 --gpus-per-node=8 --gpu-bind=closest bash -c 'rocprof -o ${SLURM_JOBID}_${SLURM_PROCID}.csv -i <input_file> --timestamp on <exe>'
Note
The gpu: filter in the rocprof input file identifies GPUs by the number the MPI rank would see them as. In the srun example above,
each MPI rank only has 1 GPU, so each rank sees its GPU as GPU 0.
Theoretical Roofline
The theoretical (not attainable) peak roofline constructs a theoretical maximum performance for each operational intensity.
Note
theoretical peak is determined by the hardware specifications and is not attainable in practice. attaiable peak is the performance as measured by
in-situ microbenchmarks designed to best utilize the hardware. achieved performance is what the profiled application actually achieves.
The theoretical roofline can be constructed as:
On Crusher, the memory bandwidth for HBM is 1.6 TB/s, and the theoretical peak floating-point FLOPS/s when using vector registers is calculated by:
However, when using MFMA instructions, the theoretical peak floating-point FLOPS/s is calculated by:
where flop_per_cycle(precision) is the published floating-point operations per clock cycle, per compute unit.
Those values are:
Data Type |
Flops/Clock/CU |
|---|---|
FP64 |
256 |
FP32 |
256 |
FP16 |
1024 |
BF16 |
1024 |
INT8 |
1024 |
Note
Attainable peak rooflines are constructed using microbenchmarks, and are not currently discussed here. Attainable rooflines consider the limitations of cooling and power consumption and are more representative of what an application can achieve.
Achieved FLOPS/s
We calculate the achieved performance at the desired level (here, double-precision floating point, FP64), by summing each metric count and weighting the FMA metric by 2, since a fused multiply-add is considered 2 floating point operations.
Also note that these SQ_INSTS_VALU_<ADD,MUL,TRANS> metrics are reported as per-simd, so we mutliply by the wavefront size as well.
The SQ_INSTS_VALU_MFMA_MOPS_* instructions should be multiplied by the Flops/Cycle/CU value listed above.
We use this equation to calculate the number of double-precision FLOPS:
When SQ_INSTS_VALU_MFMA_MOPS_*_F64 instructions are used, then 47.8 TF/s is considered the theoretical maximum FLOPS/s.
If only SQ_INSTS_VALU_<ADD,MUL,TRANS> are found, then 23.9 TF/s is the theoretical maximum FLOPS/s.
Then, we divide the number of FLOPS by the elapsed time of the kernel to find FLOPS per second.
This is found from subtracting the rocprof metrics EndNs by BeginNs, provided by --timestamp on, then converting from nanoseconds to seconds by dividing by 1,000,000,000 (power(10,9)).
Calculating for all precisions
The above formula can be adapted to compute the total FLOPS across all floating-point precisions (INT excluded).
Arithmetic Intensity
Arithmetic intensity calculates the ratio of FLOPS to bytes moved between HBM and L2 cache.
We calculated FLOPS above (FP64_FLOPS).
We can calculate the number of bytes moved using the rocprof metrics TCC_EA_WRREQ_64B, TCC_EA_WRREQ_sum, TCC_EA_RDREQ_32B, and TCC_EA_RDREQ_sum.
TCC refers to the L2 cache, and EA is the interface between L2 and HBM.
WRREQ and RDREQ are write-requests and read-requests, respectively.
Each of these requests is either 32 bytes or 64 bytes.
So we calculate the number of bytes traveling over the EA interface as:
where
Omnitrace
OLCF provides installations of AMD’s Omnitrace profiling tools on Frontier.
AMD provides documentation on the usage of Omnitrace at https://amdresearch.github.io/omnitrace/.
This section details the installation and common pitfalls of the omnitrace module on Frontier.
Unlike omniperf, the omnitrace module only relies on a ROCm module (amd, amd-mixed, or rocm).
A ROCm module must be loaded before being able to do view or load the omnitrace module.
As a rule of thumb, always load the omnitrace module last (especially after you load a ROCm module like amd, rocm, amd-mixed).
If you load a new version of ROCm, you will need to re-load omnitrace.
To use omnitrace, you may use the following commands
module load amd-mixed
module load omnitrace
Omniperf
OLCF provides installations of AMD’s Omniperf profiling tools on Frontier.
AMD provides documentation on the usage of Omniperf at https://amdresearch.github.io/omniperf/.
This section details the installation and common pitfalls of the omniperf module on Frontier.
The omniperf module relies on two other modules – a ROCm module (amd, amd-mixed, or rocm) and optionally a cray-python module.
A ROCm module must be loaded before being able to do view or load the omniperf module.
As for cray-python, omniperf is a Python script and has several dependencies that cannot be met by the system’s default Python, and are not met by the default cray-python installation.
As such, you must either (1) load the cray-python module or (2) satisfy the Python dependencies in your own Python environment (ie, in a Conda environment).
As a rule of thumb, always load the omniperf module last (especially after you load a ROCm module like amd, rocm, amd-mixed).
If you load a new version of ROCm, you will need to re-load omniperf.
Using cray-python
To use omniperf with cray-python, you may use the following commands:
module load amd-mixed
module load cray-python
module load omniperf
No more work is needed on your part – omniperf points to a directory that contains pre-built libraries for the cray-python version you are running.
It is critically important that if you load a different version of ROCm or cray-python that you re-load omniperf.
Note
Omniperf requires relatively new versions of many dependencies.
Installing dependencies may break some currently installed packages that require older versions of the dependencies.
It is recommended that you use the newest cray-python modules available.
Using your own Python
To use omniperf with your own Python installation, you must first install the dependencies of Omniperf in your Python’s environment.
To do so, use the requirements.txt file in the Omniperf GitHub Repo.
You may install the dependencies using a command like:
python3 -m pip install -r requirements.txt
Once you have installed the dependencies, you may load omniperf using commands like:
# Your Python environment should be active by this point
module load amd-mixed
module load omniperf
Again, it is critically important that if you load a different version of ROCm that you re-load omniperf.
Notable Differences between Summit and Crusher
This section details ‘tips and tricks’ and information of interest to users when porting from Summit to Crusher.
Using reduced precision (FP16 and BF16 datatypes)
Users leveraging BF16 and FP16 datatypes for applications such as ML/AI training and low-precision matrix multiplication should be aware that the AMD MI250X GPU has different denormal handling than the V100 GPUs on Summit. On the MI250X, the V_DOT2 and the matrix instructions for FP16 and BF16 flush input and output denormal values to zero. FP32 and FP64 MFMA instructions do not flush input and output denormal values to zero.
When training deep learning models using FP16 precision, some models may fail to converge with FP16 denorms flushed to zero. This occurs in operations encountering denormal values, and so is more likely to occur in FP16 because of a small dynamic range. BF16 numbers have a larger dynamic range than FP16 numbers and are less likely to encounter denormal values.
AMD has provided a solution in ROCm 5.0 which modifies the behavior of Tensorflow, PyTorch, and rocBLAS. This modification starts with FP16 input values, casting the intermediate FP16 values to BF16, and then casting back to FP16 output after the accumulate FP32 operations. In this way, the input and output types are unchanged. The behavior is enabled by default in machine learning frameworks. This behavior requires user action in rocBLAS, via a special enum type. For more information, see the rocBLAS link below.
If you encounter significant differences when running using reduced precision, explore replacing non-converging models in FP16 with BF16, because of the greater dynamic range in BF16. We recommend using BF16 for ML models in general. If you have further questions or encounter issues, contact help@olcf.ornl.gov.
- Additional information on MI250X reduced precision can be found at:
The MI250X ISA specification details the flush to zero denorm behavior at: https://developer.amd.com/wp-content/resources/CDNA2_Shader_ISA_18November2021.pdf (See page 41 and 46)
AMD rocBLAS library reference guide details this behavior at: https://rocblas.readthedocs.io/en/master/API_Reference_Guide.html#mi200-gfx90a-considerations
Enabling GPU Page Migration
The AMD MI250X and operating system on Crusher supports unified virtual addressing across the entire host and device memory, and automatic page migration between CPU and GPU memory. Migratable, universally addressable memory is sometimes called ‘managed’ or ‘unified’ memory, but neither of these terms fully describes how memory may behave on Crusher. In the following section we’ll discuss how the heterogenous memory space on a Crusher node is surfaced within your application.
The accessibility of memory from GPU kernels and whether pages may migrate depends three factors: how the memory was allocated; the XNACK operating mode of the GPU; whether the kernel was compiled to support page migration. The latter two factors are intrinsically linked, as the MI250X GPU operating mode restricts the types of kernels which may run.
XNACK (pronounced X-knack) refers to the AMD GPU’s ability to retry memory accesses that fail due to a page fault. The XNACK mode of an MI250X can be changed by setting the environment variable HSA_XNACK before starting a process that uses the GPU. Valid values are 0 (disabled) and 1 (enabled), and all processes connected to a GPU must use the same XNACK setting. The default MI250X on Crusher is HSA_XNACK=0.
If HSA_XNACK=0, page faults in GPU kernels are not handled and will terminate the kernel. Therefore all memory locations accessed by the GPU must either be resident in the GPU HBM or mapped by the HIP runtime. Memory regions may be migrated between the host DDR4 and GPU HBM using explicit HIP library functions such as hipMemAdvise and hipPrefetchAsync, but memory will not be automatically migrated based on access patterns alone.
If HSA_XNACK=1, page faults in GPU kernels will trigger a page table lookup. If the memory location can be made accessible to the GPU, either by being migrated to GPU HBM or being mapped for remote access, the appropriate action will occur and the access will be replayed. Page migration will happen between CPU DDR4 and GPU HBM according to page touch. The exceptions are if the programmer uses a HIP library call such as hipPrefetchAsync to request migration, or if a preferred location is set via hipMemAdvise, or if GPU HBM becomes full and the page must forcibly be evicted back to CPU DDR4 to make room for other data.
Migration of Memory by Allocator and XNACK Mode
Most applications that use “managed” or “unified” memory on other platforms will want to enable XNACK to take advantage of automatic page migration on Crusher. The following table shows how common allocators currently behave with XNACK enabled. The behavior of a specific memory region may vary from the default if the programmer uses certain API calls.
Note
The page migration behavior summarized by the following tables represents the current, observable behavior. Said behavior will likely change in the near future.
HSA_XNACK=1 Automatic Page Migration Enabled
Allocator |
Initial Physical Location |
CPU Access after GPU First Touch |
Default Behavior for GPU Access |
|---|---|---|---|
System Allocator (malloc,new,allocate, etc) |
CPU DDR4 |
Migrate to CPU DDR4 on touch |
Migrate to GPU HBM on touch |
hipMallocManaged |
CPU DDR4 |
Migrate to CPU DDR4 on touch |
Migrate to GPU HBM on touch |
hipHostMalloc |
CPU DDR4 |
Local read/write |
Zero copy read/write over Infinity Fabric |
hipMalloc |
GPU HBM |
Zero copy read/write over Inifinity Fabric |
Local read/write |
Disabling XNACK will not necessarily result in an application failure, as most types of memory can still be accessed by the AMD “Optimized 3rd Gen EPYC” CPU and AMD MI250X GPU. In most cases, however, the access will occur in a zero-copy fashion over the Infinity Fabric. The exception is memory allocated through standard system allocators such as malloc, which cannot be accessed directly from GPU kernels without previously being registered via a HIP runtime call such as hipHostRegister. Access to malloc’ed and unregistered memory from GPU kernels will result in fatal unhandled page faults. The table below shows how common allocators behave with XNACK disabled.
HSA_XNACK=0 Automatic Page Migration Disabled
Allocator |
Initial Physical Location |
Default Behavior for CPU Access |
Default Behavior for GPU Access |
|---|---|---|---|
System Allocator (malloc,new,allocate, etc) |
CPU DDR4 |
Local read/write |
Fatal Unhandled Page Fault |
hipMallocManaged |
CPU DDR4 |
Local read/write |
Zero copy read/write over Infinity Fabric |
hipHostMalloc |
CPU DDR4 |
Local read/write |
Zero copy read/write over Infinity Fabric |
hipMalloc |
GPU HBM |
Zero copy read/write over Inifinity Fabric |
Local read/write |
Compiling HIP kernels for specific XNACK modes
Although XNACK is a capability of the MI250X GPU, it does require that kernels be able to recover from page faults. Both the ROCm and CCE HIP compilers will default to generating code that runs correctly with both XNACK enabled and disabled. Some applications may benefit from using the following compilation options to target specific XNACK modes.
hipcc --amdgpu-target=gfx90a or CC --offload-arch=gfx90a -x hiphipcc --amdgpu-target=gfx90a:xnack+ or CC --offload-arch=gfx90a:xnack+ -x hipHSA_XNACK=1 to enable XNACK. Performance may be better than “xnack any”, but attempts to run with XNACK disabled will fail.hipcc --amdgpu-target=gfx90a:xnack- or CC --offload-arch=gfx90a:xnack- -x hipHSA_XNACK=0 and XNACK disabled. Performance may be better than “xnack any”, but attempts to run with XNACK enabled will fail.hipcc --amdgpu-target=gfx90a:xnack- --amdgpu-target=gfx90a:xnack+ -x hip or CC --offload-arch=gfx90a:xnack- --offload-arch=gfx90a:xnack+ -x hipHSA_XNACK=1 and as “xnack-” with HSA_XNACK=0, but the final executable will be larger since it contains two copies of every kernel.If the HIP runtime cannot find a kernel image that matches the XNACK mode of the device, it will fail with hipErrorNoBinaryForGpu.
$ HSA_XNACK=0 srun -n 1 -N 1 -t 1 ./xnack_plus.exe
"hipErrorNoBinaryForGpu: Unable to find code object for all current devices!"
srun: error: crusher002: task 0: Aborted
srun: launch/slurm: _step_signal: Terminating StepId=74100.0
One way to diagnose hipErrorNoBinaryForGpu messages is to set the environment variable AMD_LOG_LEVEL to 1 or greater:
$ AMD_LOG_LEVEL=1 HSA_XNACK=0 srun -n 1 -N 1 -t 1 ./xnack_plus.exe
:1:rocdevice.cpp            :1573: 43966598070 us: HSA_AMD_AGENT_INFO_SVM_DIRECT_HOST_ACCESS query failed.
:1:rocdevice.cpp            :1573: 43966598762 us: HSA_AMD_AGENT_INFO_SVM_DIRECT_HOST_ACCESS query failed.
:1:rocdevice.cpp            :1573: 43966599392 us: HSA_AMD_AGENT_INFO_SVM_DIRECT_HOST_ACCESS query failed.
:1:rocdevice.cpp            :1573: 43966599970 us: HSA_AMD_AGENT_INFO_SVM_DIRECT_HOST_ACCESS query failed.
:1:rocdevice.cpp            :1573: 43966600550 us: HSA_AMD_AGENT_INFO_SVM_DIRECT_HOST_ACCESS query failed.
:1:rocdevice.cpp            :1573: 43966601109 us: HSA_AMD_AGENT_INFO_SVM_DIRECT_HOST_ACCESS query failed.
:1:rocdevice.cpp            :1573: 43966601673 us: HSA_AMD_AGENT_INFO_SVM_DIRECT_HOST_ACCESS query failed.
:1:rocdevice.cpp            :1573: 43966602248 us: HSA_AMD_AGENT_INFO_SVM_DIRECT_HOST_ACCESS query failed.
:1:hip_code_object.cpp      :460 : 43966602806 us: hipErrorNoBinaryForGpu: Unable to find code object for all current devices!
:1:hip_code_object.cpp      :461 : 43966602810 us:   Devices:
:1:hip_code_object.cpp      :464 : 43966602811 us:     amdgcn-amd-amdhsa--gfx90a:sramecc+:xnack- - [Not Found]
:1:hip_code_object.cpp      :464 : 43966602811 us:     amdgcn-amd-amdhsa--gfx90a:sramecc+:xnack- - [Not Found]
:1:hip_code_object.cpp      :464 : 43966602812 us:     amdgcn-amd-amdhsa--gfx90a:sramecc+:xnack- - [Not Found]
:1:hip_code_object.cpp      :464 : 43966602813 us:     amdgcn-amd-amdhsa--gfx90a:sramecc+:xnack- - [Not Found]
:1:hip_code_object.cpp      :464 : 43966602813 us:     amdgcn-amd-amdhsa--gfx90a:sramecc+:xnack- - [Not Found]
:1:hip_code_object.cpp      :464 : 43966602814 us:     amdgcn-amd-amdhsa--gfx90a:sramecc+:xnack- - [Not Found]
:1:hip_code_object.cpp      :464 : 43966602814 us:     amdgcn-amd-amdhsa--gfx90a:sramecc+:xnack- - [Not Found]
:1:hip_code_object.cpp      :464 : 43966602815 us:     amdgcn-amd-amdhsa--gfx90a:sramecc+:xnack- - [Not Found]
:1:hip_code_object.cpp      :468 : 43966602816 us:   Bundled Code Objects:
:1:hip_code_object.cpp      :485 : 43966602817 us:     host-x86_64-unknown-linux - [Unsupported]
:1:hip_code_object.cpp      :483 : 43966602818 us:     hipv4-amdgcn-amd-amdhsa--gfx90a:xnack+ - [code object v4 is amdgcn-amd-amdhsa--gfx90a:xnack+]
"hipErrorNoBinaryForGpu: Unable to find code object for all current devices!"
srun: error: crusher129: task 0: Aborted
srun: launch/slurm: _step_signal: Terminating StepId=74102.0
The above log messages indicate the type of image required by each device, given its current mode (amdgcn-amd-amdhsa--gfx90a:sramecc+:xnack-) and the images found in the binary (hipv4-amdgcn-amd-amdhsa--gfx90a:xnack+).
Floating-Point (FP) Atomic Operations and Coarse/Fine Grained Memory Allocations
The Crusher system, equipped with CDNA2-based architecture MI250X cards, offers a coherent host interface that enables advanced memory and unique cache coherency capabilities. The AMD driver leverages the Heterogeneous Memory Management (HMM) support in the Linux kernel to perform seamless page migrations to/from CPU/GPUs. This new capability comes with a memory model that needs to be understood completely to avoid unexpected behavior in real applications. For more details, please visit the previous section.
AMD GPUs can allocate two different types of memory locations: 1) Coarse grained and 2) Fine grained.
Coarse grained memory is only guaranteed to be coherent outside of GPU kernels that modify it, enabling higher performance memory operations. Changes applied to coarse-grained memory by a GPU kernel are only visible to the rest of the system (CPU or other GPUs) when the kernel has completed. A GPU kernel is only guaranteed to see changes applied to coarse grained memory by the rest of the system (CPU or other GPUs) if those changes were made before the kernel launched.
Fine grained memory allows CPUs and GPUs to synchronize (via atomics) and coherently communicate with each other while the GPU kernel is running, allowing more advanced programming patterns. The additional visibility impacts the performance of fine grained allocated memory.
The fast hardware-based Floating point (FP) atomic operations available on MI250X are assumed to be working on coarse grained memory regions; when these instructions are applied to a fine-grained memory region, they will silently produce a no-op. To avoid returning incorrect results, the compiler never emits hardware-based FP atomics instructions by default, even when applied to coarse grained memory regions. Currently, users can use the -munsafe-fp-atomics flag to force the compiler to emit hardware-based FP atomics. Using hardware-based FP atomics translates in a substantial performance improvement over the default choice.
Users applying floating point atomic operations (e.g., atomicAdd) on memory regions allocated via regular hipMalloc() can safely apply the -munsafe-fp-atomics flags to their codes to get the best possible performance and leverage hardware supported floating point atomics. Atomic operations supported in hardware on non-FP datatypes (e.g., INT32) will work correctly regardless of the nature of the memory region used.
In ROCm-5.1 and earlier versions, the flag -munsafe-fp-atomics is interpreted as a suggestion by the compiler, whereas from ROCm-5.2 the flag will always enforce the use of fast hardware-based FP atomics.
The following tables summarize the result granularity of various combinations of allocators, flags and arguments.
For hipHostMalloc(), the following table shows the nature of the memory returned based on the flag passed as argument.
API |
Flag |
Results |
|---|---|---|
hipHostMalloc() |
hipHostMallocDefault |
Fine grained |
hipHostMalloc() |
hipHostMallocNonCoherent |
Coarse grained |
The following table shows the nature of the memory returned based on the flag passed as argument to hipExtMallocWithFlags().
API |
Flag |
Result |
|---|---|---|
hipExtMallocWithFlags() |
hipDeviceMallocDefault |
Coarse grained |
hipExtMallocWithFlags() |
hipDeviceMallocFinegrained |
Fine grained |
Finally, the following table summarizes the nature of the memory returned based on the flag passed as argument to hipMallocManaged() and the use of CPU regular malloc() routine with the possible use of hipMemAdvise().
API |
MemAdvice |
Result |
|---|---|---|
hipMallocManaged() |
Fine grained |
|
hipMallocManaged() |
hipMemAdvise (hipMemAdviseSetCoarseGrain) |
Coarse grained |
malloc() |
Fine grained |
|
malloc() |
hipMemAdvise (hipMemAdviseSetCoarseGrain) |
Coarse grained |
Performance considerations for LDS FP atomicAdd()
Hardware FP atomic operations performed in LDS memory are usually always faster than an equivalent CAS loop, in particular when contention on LDS memory locations is high. Because of a hardware design choice, FP32 LDS atomicAdd() operations can be slower than equivalent FP64 LDS atomicAdd(), in particular when contention on memory locations is low (e.g. random access pattern). The aforementioned behavior is only true for FP atomicAdd() operations. Hardware atomic operations for CAS/Min/Max on FP32 are usually faster than the FP64 counterparts. In cases when contention is very low, a FP32 CAS loop implementing an atomicAdd() operation could be faster than an hardware FP32 LDS atomicAdd(). Applications using single precision FP atomicAdd() are encouraged to experiment with the use of double precision to evaluate the trade-off between high atomicAdd() performance vs. potential lower occupancy due to higher LDS usage.
System Updates
2024-03-19
On Tuesday, March 19, 2024, Frontier’s system software was upgraded to Slingshot 2.1.1 and Slingshot Host Software 2.1.2. If you encounter any issues or have questions, please contact help@olcf.ornl.gov.
2024-01-23
On Tuesday, January 23, 2024, Crusher’s system software was upgraded. The following changes took place:
ROCm 6.0.0 is now available via the
rocm/6.0.0modulefile.HPE/Cray Programming Environment (PE) 23.12 is now available via the
cpe/23.12modulefile.ROCm 5.3.0 and HPE/Cray PE 22.12 remain as default.
The system was upgraded to AMD GPU 6.3.6 device driver (ROCm 6.0.0 release).
Please note that target default versions will be updated to PE 23.12 and ROCm 5.7.1 in the near future. Users are encouraged to try both and report any issues to help@olcf.ornl.gov.
2023-12-05
On Tuesday, December 5, 2023, Crusher’s system software was upgraded. The following changes took place:
ROCm 5.7.1 is now available via the
rocm/5.7.1modulefile.Flux 0.56.0 is now available via the
flux/0.56.0modulefile.
2023-10-03
On Tuesday, October 3, 2023, Crusher’s system software was upgraded. The following changes took place:
The system was to the AMD GPU 6.1.5 device driver (ROCm 5.6.1 release).
Slurm was upgraded to version 23.02.5
2023-09-19
On Tuesday, September 19, 2023, Crusher’s system software was upgraded. The following changes took place:
The system was upgraded to Slingshot Host Software 2.1.0.
ROCm 5.6.0 and 5.7.0 are now available via the
rocm/5.6.0androcm/5.7.0modulefiles, respectively.HPE/Cray Programming Environments (PE) 23.09 is now available via the
cpe/23.09modulefile.ROCm 5.3.0 and HPE/Cray PE 22.12 remain as default.
2023-07-18
On Tuesday, July 18, 2023, the Crusher TDS was upgraded to a new version of the system software stack. During the upgrade, the following changes took place:
The system was upgraded to Cray OS 2.5, Slingshot Host Software 2.0.2-112, and the AMD GPU 6.0.5 device driver (ROCm 5.5.1 release).
ROCm 5.5.1 is now available via the
rocm/5.5.1modulefile.HPE/Cray Programming Environments (PE) 23.05 is now available via the
cpe/23.05modulefile.HPE/Cray PE 23.05 introduces support for ROCm 5.5.1. However, due to issues identified during testing, ROCm 5.3.0 and HPE/Cray PE 22.12 remain as default.
2023-04-05
On Wednesday, April 5, 2023, the Crusher TDS was upgraded to a new software stack. A summary of the changes is included below.
The operating system was upgraded to Cray OS 2.4 based on SLES 15.4.
- HPE/Cray Programming Environment (PE):
- PE 22.12 was installed and is now default. This PE includes the following components:
Cray MPICH 8.1.23
Cray Libsci 22.12.1.1
CCE 15.0.0
- PE 23.03 is now also available and includes:
Cray MPICH 8.1.25
Cray Libsci 23.02.1.1
CCE 15.0.1
- ROCm:
ROCm 5.3.0 is now default.
ROCm 5.4.0 and 5.4.3 are available.
- File Systems:
The Orion Lustre parallel file system is now available on Crusher.
The Alpine GPFS file system remains available but will be permanently unmounted from Crusher on Tuesday, April 18, 2023. Please begin moving your data to the Orion file system as soon as possible.
2022-12-29
On Thursday, December 29, 2022 the following system configuration settings will be updated on Crusher:
Low-Noise Mode will be enabled: as a result, system processes will be constrained to core 0 on every node.
Slurm’s core specialization default will change: Slurm
--core-specor-Svalue will be set to 8. This will provide a symmetric distribution of cores per GCD to the application and will reserve one core per L3 cache region. After the outage, the default number of cores available to each GCD on a node will be 7. To change from the new default value, you can set--core-specor-Sin your job submission.The default NIC mapping will be updated to
MPICH_OFI_NIC_POLICY=NUMAto address known issues described in OLCFDEV-192 and OLCFDEV-1366.
Getting Help
If you have problems or need helping running on Crusher, please submit a ticket by emailing help@olcf.ornl.gov.