Persistent Storage
By design pods are ephemeral. They are meant to be something that can be killed with relatively little impact to the application. Since containers are ephemeral, we need a way to consume storage that is persistent and can hold data for our applications. One option that Kubernetes has for storing data is with Persistent Volumes. PersistentVolume objects are created by the cluster administrator and reference storage that is on a resilient storage platform such as NetApp. A user can request storage by creating a PersistentVolumeClaim which requests a desired size for a PersistentVolume. The cluster administrator or some automated mechanism will provision the storage on the backend and make it available to the cluster via the PersistentVolumeClaim.
Creating A Persistent Volume Claim
Using The CLI
Once the Persistent Volume is created its allocated memory is available to be claimed by a project. This is done through a Persistent Volume Claim. PVC’s are created using a YAML file in the same manner that PV’s are created. An example of a PVC that claims the PV created in the previous section follows:
apiVersion: v1
kind: PersistentVolumeClaim
metadata:
  name: storage-1
spec:
  accessModes:
    - ReadWriteOnce
  resources:
    requests:
      storage: 1Gi
The claim is then placed using:
oc create -f storage-1.yaml
Once this command has run the claim will go into the Pending state. Typically it will only be in this state for a brief amount of time before transitioning to the Bound state. You can check the state of your PVC with the following command:
oc get pvc storage-1
This will return the state of your claim. That output should look something like this once the claim has been bound:
NAME      STATUS      VOLUME                 CAPACITY   ACCESSMODES   STORAGECLASS   AGE
storage-1 Bound       openshift-data-v0019   100Gi      RWO,ROX,RWX                  7s
Using the web GUI
From the main screen of a project go to the Storage option in the hamburger menu on the left hand side of the screen, then click
Persistent Volume Claims
In the upper right click the Create Persistent Volume Claim button.

This will take you to a screen that allows you to select what you need for your PVC. Give your claim a name and request an amount of storage and click Create. You can also click
Edit YAMLto edit the PVC object directly.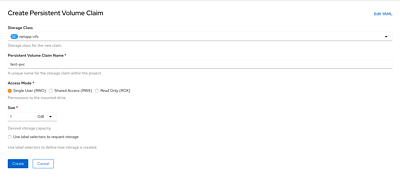
This will redirect you to the status page of your new PVC. You should see
Boundin theStatusfield.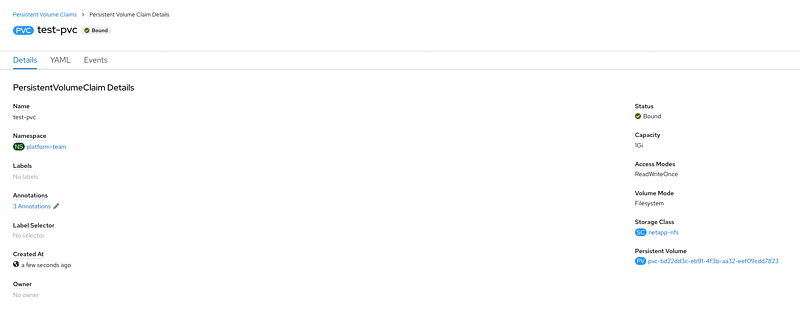
Adding PVC To Pod
Once the claim has been granted to the project a pod within that project can access that storage. To do this, edit the YAML of the pod and under the volume portion of the file add a name and the name of the claim. It will look similar to the following.
volumes:
  name: pvol
  persistentVolumeClaim:
    claimName: storage-1
Then all that is left to do is mount the storage into a container:
volumeMounts:
  - mountPath: /tmp/
    name: pvol
Below is a example of a Deployment that mounts a PVC:
apiVersion: apps/v1
kind: Deployment
metadata:
  labels:
    app: test-mount-pvc
  name: test-mount-pvc
spec:
  replicas: 1
  selector:
    matchLabels:
      app: test-mount-pvc
  template:
    metadata:
      labels:
        app: test-mount-pvc
    spec:
      containers:
      - image: busybox
        name: busybox
        volumeMounts:
        - mountPath: /data
          name: storage
      volumes:
      - name: storage
        persistentVolumeClaim:
          claimName: storage-1
Adding PVC To Pod Using Web GUI
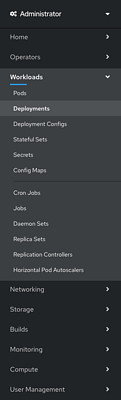
To add the PVC to a pod using the web GUI first select Workloads and then Deployments in the hamburger menu on the left had side.
Next, select the deployment that contains the pod you wish to add the storage to.
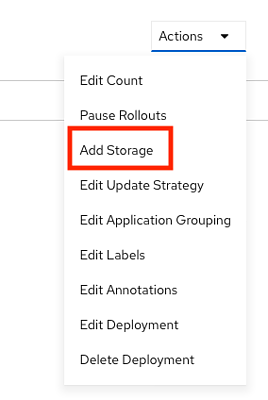
Select Actions in the upper left and then and then Add Storage.
Fill out your Mount point and other options if you need them to be non-default values. Otherwise, hit the Add button at the bottom.
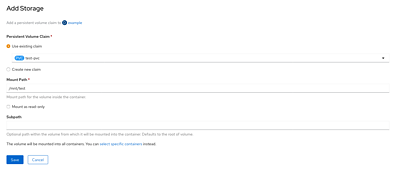
You should see a green popup appear in the upper right saying that the storage was added. This should additionally trigger a new deployment. To make sure a new deployment happened look at the Created time of the top most deployment.
Backups
A PersistentVolume is backed up by creating a VolumeSnapshot object. The VolumeSnapshot will create a point in time backup of your PersistentVolume and is something that you would likely do before an upgrade.
VolumeSnapshots
A Volume Snapshot will bind to a PersistentVolumeClaim. An example PersistentVolumeClaim to bind a VolumeSnapshot to follows:
apiVersion: v1
kind: PersistentVolumeClaim
metadata:
  name: snapshot-pvc
spec:
  accessModes:
  - ReadWriteMany
  resources:
    requests:
      storage: 1Gi
We can now create a VolumeSnapshot, which will capture the data in the PersistentVolume that was provisioned by the named PersistentVolumeClaim at the time the VolumeSnapshot is created, to backup the data.
apiVersion: snapshot.storage.k8s.io/v1beta1
kind: VolumeSnapshot
metadata:
  # Name of VolumeSnapshot
  name: pvc-snap
spec:
  source:
    # Name of persistentVolumeClaim to snapshot
    persistentVolumeClaimName: snapshot-pvc
Now, if the data in the PersistentVolume becomes corrupted or lost in some way, we can create a new PersistentVolume that is identical to the original PersistentVolume at the time the VolumeSnapshot was created.
To do this, create a PersistentVolumeClaim that contains a dataSource field in the Pod’s spec. An example follows:
apiVersion: v1
kind: PersistentVolumeClaim
metadata:
  # The name of the new Persistent Volume
  name: restore-pvc
spec:
  dataSource:
    # The name of the Volume Snapshot to retrieve data from
    name: pvc-snap
    kind: VolumeSnapshot
    apiGroup: snapshot.storage.k8s.io
  accessModes:
    - ReadWriteOnce
  resources:
    requests:
      storage: 1Gi
Once the PersistentVolume has been created from the above PersistentVolumeClaim it will contain the data from the original PersistentVolume at the time the referenced VolumeSnapshot was created.
Cloning
Cloning a persistent volume is just as easy as implementing a snapshot. First, find a
Persistent Volume Claim in the same namespace that you would like to clone for your new
persistent volume. Then it’s as simple as adding the trident.netapp.io/cloneFromPVC annotation
with a value of the name of the Persistent Volume Claim you would like to clone.
In the below example, we clone a persistent volume named source-clone-pvc into a new volume called destination-clone-pvc
apiVersion: v1
kind: PersistentVolumeClaim
metadata:
  annotations:
    trident.netapp.io/cloneFromPVC: "source-clone-pvc"
    volume.beta.kubernetes.io/storage-class: "basic"
    trident.netapp.io/splitOnClone: "true"
  name: destination-clone-pvc
spec:
  accessModes:
  - ReadWriteOnce
  resources:
    requests:
      storage: 1Gi
Cloning has applications outside of backups such as testing changes on a new Persistent Volume.