Routes
In OpenShift, a Route exposes Services with a host name, such as https://my-project.apps.<cluster>.ccs.ornl.gov.
A Service can be exposed with routes over HTTP (insecure), HTTPS (secure), and TLS with SNI (also secure).
Why Routes
Routes are best used when you have created a service which communicates over HTTP or HTTPS, and you want this service to be accessible from outside the cluster with a fully qualified domain name (FQDN).
If your application doesn’t communicate over HTTP or HTTPS, you should use NodePorts instead.
Creating Routes
Note
If no hostname is provided when creating routes, the default will be
{SERVICE_NAME}-{PROJECT_NAME}.apps.<cluster>.ccs.ornl.gov. Any hostname that follows the pattern
*.apps.<cluster>.ccs.ornl.gov can be provided, as long as another service isn’t using that hostname already.
CLI
Secured routes (over HTTPS) offer encryption to keep connections private. You can use oc create route to create a secured HTTPS route.
Secured routes can use 3 different types of secure TLS termination.
Edge Termination
Edge Termination terminates TLS at the router, before sending traffic to the service. We have a wildcard certificate on the routers for each cluster. These will be used by default if no certificate is provided, and this is the preferred method for securing a route.
$ oc create route edge --service=my-project \
  --hostname=my-project.apps.<cluster>.ccs.ornl.gov
If you would like to use your own keys with edge termination, this can be done with a command similar to this example.
$ oc create route edge --service=my-project \
  --hostname=my-project.apps.<cluster>.ccs.ornl.gov \
  --cert=ca.crt \
  --key=ca.key \
  --ca-cert=ca.crt \
Then, oc get route my-project -o yaml will show the YAML:
apiVersion: v1
kind: Route
metadata:
  name: my-project
spec:
  host: my-project.apps.<cluster>.ccs.ornl.gov
  to:
    kind: Service
    name: my-project
  tls:
    termination: edge
    key: |-
      -----BEGIN PRIVATE KEY-----
      [...]
      -----END PRIVATE KEY-----
    certificate: |-
      -----BEGIN CERTIFICATE-----
      [...]
      -----END CERTIFICATE-----
    caCertificate: |-
      -----BEGIN CERTIFICATE-----
      [...]
      -----END CERTIFICATE-----
Passthrough Termination
With Passthrough Termination, the encrypted traffic goes straight to the pod with no TLS termination. This is useful if you are running a service such as HTTPD that is handling TLS termination itself. Another use case example could be doing mutual TLS authentication from a pod.
The following command will create a secured route with passthrough termination.
oc create route passthrough --service=my-project \
  --hostname=my-project.apps.<cluster>.ccs.ornl.gov
The produced YAML will look like this:
apiVersion: v1
kind: Route
metadata:
  name: my-service
spec:
  host: my-project.apps.<cluster>.ccs.ornl.gov
  to:
    kind: Service
    name: service-name
  tls:
    termination: passthrough
Note that with passthrough termination, no keys are provided to the route.
Re-encryption Termination
Re-encryption termination combines edge termination and passthrough termination, in that the router terminates TLS, then re-encrypts its connection. The endpoint may have a different certificate. With re-encryption termination, both the internal and external network paths are encrypted.
The following command will create a secured route with re-encryption termination.
oc create route reencrypt --service=my-project \
  --hostname=my-project.apps.<cluster>.ccs.ornl.gov \
  --dest-ca-cert=ca.crt
Note that the --dest-ca-cert flag for the destination CA certificate is required for re-encryption.
The outputted YAML will look like this example:
apiVersion: v1
kind: Route
metadata:
  name: my-service
spec:
  host: my-service.apps.<cluster>.ccs.ornl.gov
  to:
    kind: Service
    name: my-service
  tls:
    termination: reencrypt
    destinationCACertificate: |-
      -----BEGIN CERTIFICATE-----
      [...]
      -----END CERTIFICATE-----
Note
As with edge encryption, by default the wildcard certificate for the router is used. You can provide your own keys if you like.
HTTP
OpenShift supports unsecured routes over HTTP, but it is not recommended for use. Use edge encryption if you are unsure.
Web Interface Configuration
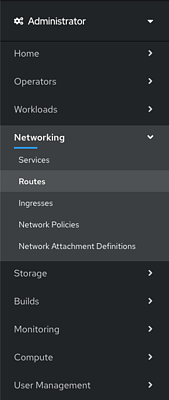
Routes can also be created from the web interface. On the hamburger menu, click Networking, then Routes.
If no routes have been created for a project, you will be presented with a Create Route button.

On the Create Route screen, fill out the form, select your service in the service dropdown.
Be sure to check the Secure Route checkbox. See the CLI sections to determine which encryption type is best
for you. If you don’t know, it’s probably edge encryption. You can leave the certificate fields blank when using edge
encryption on a wildcard *.apps.<cluster>.ccs.ornl.gov
Routes with NCCS Authentication
In order for us to maintain our existing security posture, only users who are on a project will be able to access to services that the project runs. This means that when a user accesses a route they will first be prompted to log in to OpenShift and once they are authenticated they will be able to access the service.
Requirements
All routes require authentication.
HTTPS is required on routes for authentication so that sensitive cookie information is not leaked.
The authenticated user must use their NCCS Username and RSA PASSCODE to log in to OpenShift.
The authenticated user must be on the project in order to use the application running in OpenShift.
Optional Application Authentication
The authentication will be handled by the cluster load balancers so that nothing is required by a user
application. If a user application needs to authenticate a user we set the X-Remote-User header which
is the NCCS username of the authenticated user.
An example list of headers that are set by the loadbalancer:
Host: nginx-echo-headers-stf002platform.bedrock-dev.ccs.ornl.gov
X-Remote-User: kincljc
X-Forwarded-Host: nginx-echo-headers-stf002platform.bedrock-dev.ccs.ornl.gov
X-Forwarded-Port: 443
X-Forwarded-Proto: https
Forwarded: for=160.91.195.36;host=nginx-echo-headers-stf002platform.bedrock-dev.ccs.ornl.gov;proto=https;proto-version=
X-Forwarded-For: 160.91.195.36
How
Routes are secured by adding the annotation ccs.ornl.gov/requireAuth = "true" to the route.
Exemptions
If you have an application that should not require authentication reach out to NCCS Support.
Internet-facing Services
By default, a route will only expose your Services to NCCS networks. If you need your service exposed to the world outside ORNL, you will first need to get your project approved for external routes. To do this, submit a systems ticket. In the description, give us your project name and a brief reasoning for why exposing externally is needed.
We will let you know once your project is able to set up external routes.
Labelling Routes
Once your project has been approved, you only need to give your route a label to tell the OpenShift router to expose this service externally. You can do this in the CLI or in the web interface.
CLI
On the CLI, run oc label route {ROUTE_NAME} ccs.ornl.gov/externalRoute=true.
GUI
In the web interface, from the side menu, select Networking, then Routes.
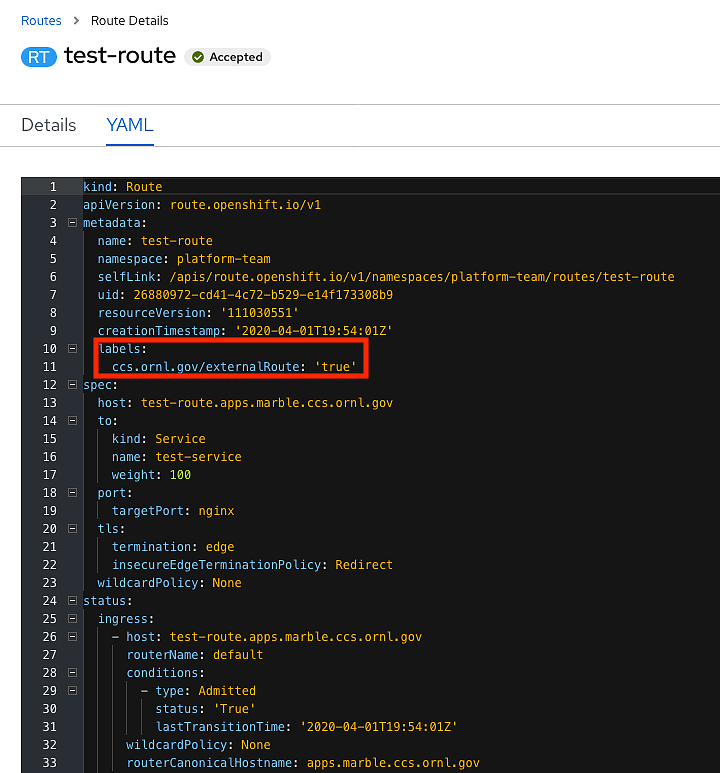
This will show a list of your routes. Click the route you want to expose, and click the YAML tab.
Under metadata, add a label for ccs.ornl.gov/externalRoute: 'true' as shown below and click the Save button at the bottom of the page.
After saving, your route will be exposed on two routers, default and external. This means your service is now
accessible from outside ORNL. Note that if your project has not yet been approved for external routing, this second
router will not expose your route.

Advanced Routes
Multiple Services
While a route usually points to one service through the to parameter in the configuration, it is
possible to have as many as four services to load balance between. This is used with A/B deployments.
Here is an example route which points to 3 services:
apiVersion: v1
kind: Route
metadata:
  name: route-alternate-service
  annotations:
    haproxy.router.openshift.io/balance: roundrobin
spec:
  host: www.example.com
  to:
    kind: Service
    name: service-name
    weight: 20
  alternateBackends:
  - kind: Service
    name: service-name2
    weight: 10
  - kind: Service
    name: service-name3
    weight: 10
Notice the weight parameter on each service. This weight must be in the range 0-256. The default
is 1. If the weight is 0, no requests will be passed to the service. If all services have a 0 weight,
then all requests will return a 503 error.
The portion of requests sent to each service is determined by its weight divided by the sum of all
weights. In the above example, service-name will get 20/40 or 1/2 of the requests, and service-name2
and service-name3 will each get 10/40 or 1/4 of the requests.
Note
When using alternateBackends, be sure to set .metadata.annotations.haproxy.router.openshift.io/balance
to roundrobin, like in the above example. This will ensure that HAProxy will use a round robin load balancing strategy.