Containers on Frontier
Apptainer v1.3.6 is installed on Frontier. Apptainer can be used for both building and running containers on Frontier. The main user documentation on how to use Apptainer can be found here. This section of our documentation will only cover any additional info that you might need to build and run containers correctly on Frontier, as well as any useful examples.
Note
This documentation is not currently stable and will change over time as we add more examples and as the best practices for containers evolve. If you find something that you were doing on Frontier is no longer working, check back here to see if the documentation has been updated with new instructions. And contributions to the documentation are always welcome!
Examples for Building and Running Containers
These examples will walk you through the common things you need to know on how to use containers on Frontier. Some of the examples will refer to files in the olcf_containers_examples Github repository.
Building and running a container image from a base Linux distribution for MPI
This example will walk through building up a container image with OpenSUSE 15.6, MPICH 3.4.2, and ROCm 6.2.4 for a GPU aware MPI code.
Clone the
olcf_containers_examplesrepositorygit clone https://github.com/olcf/olcf_containers_examples/
Navigate to
frontier/containers_on_frontier_docs/gpu_aware_mpi_exampleIn that directory, the
opensusempich342rocm624.defis an Apptainer definition file that will build a container image with MPICH 3.4.2 and ROCm 6.2.4, along with copying theping_pong_gpu_aware.cppfile from the directory into the container image, and then compiling it.If you would like to inspect and make changes to the definition file to modify what the container has, feel free to do so. Inspect the definition file to understand how we build MPICH and ROCm inside the container.
MPICH 3.4.2 is required to be installed in your container image and build your MPI application with it if you want to run MPI on Frontier with containers. This is because MPICH 3.4.2 is ABI compatible with the
cray-mpich-abimodule even though cray-mpich is based on MPICH 3.4a2. Later in the job script we will be mounting the Cray MPICH libraries into the container so that the application in the container will link and use those libraries. This is necessary for native performance.
To build the container image (the SIF file), run
apptainer build opensusempich342rocm624.sif opensusempich342rocm624.def
Apptainer builds the container image in the SIF file format. Unlike Podman, Apptainer gives you a single file for your image that you can later run as your container.
Submit the
submit624.sbatchjob script to launch the container with srun and run theping_pong_gpu_aware.exethat was built in the container to perform the ping-pong communication across two nodes.Remember to replace the
#SBATCH -Astf007with your project ID.If you inspect the
submit624.sbatchfile, you will see some modules being loaded as well as some environment variables being set. Read the comment above each for the explanations. These environment variables are required in order to run containerized MPI applications with Apptainer, with communication performance close to native and to provide GPU aware MPI.
Pushing your Apptainer image to an OCI Registry supporting ORAS (e.g. DockerHub)
One of the benefits of containers is their portability that enables easy transfer between computing environments. Thus, after building containers on Frontier and other OLCF systems, a way to distribute them is by pushing the image to an OCI container registry. An Apptainer image (a SIF file) is not an OCI image so it cannot be pushed to Dockerhub or another OCI registry as an OCI image. It can be pushed to an OCI registry that supports ORAS as an OCI artifact instead. In this section, we highlight and provide an example of pushing the container image we built to DockerHub as an OCI artifact. We will use our opensusempich342rocm571.sif image from the section above in this example.
First, create an account and then a repository on DockerHub to hold your image.
Ensure you are logged in to DockerHub from apptainer. To login, run
apptainer registry login --username <your dockerhub username> oras://registry-1.docker.io
Push the image by running
apptainer push <path to your sif file>/opensusempich342rocm624.sif oras://registry-1.docker.io/<your docker username>/<your repo name:tag>
Using
oras://tells Apptainer to push the image to given registry as an OCI artifact. Not all OCI registries support ORAS. See ORAS Adopters page for list.
Note
An Apptainer image that you push this way to Dockerhub or some other registry CANNOT be used by Docker or Podman. Apptainer images are not compatible with Docker or Podman. You can only use it with Apptainer.
Building an image on top of an existing image (local, docker image, OCI artifact)
In building container images, we often have to build on an existing image. This could be a local image in ones working directory, an OCI image from an OCI registry, or Apptainer SIF file that was stored as an OCI artifact in an OCI registry. One of the benefits of building images on top of existing images is simplified and easy to follow definition files instead of single and large ones.
This example will look at building a container image for testing collective communications for GPUs using RCCL. The image will be built on top of an existing image that builds ROCM and MPICH since both are required for RCCL. Specifically, MPICH 3.4.2 since Cray-mpich is compatible with it.
Navigate to
frontier/containers_on_frontier_docs/rccltestsof the previously cloned github repo.The Apptainer definition file for building the RCCL container image is rcclmpich342rocm624.def.
This builds on the existing opensusempich342rocm624.sif image from a previous example. Hence, MPICH 3.4.2 and ROCm 6.2.4 are used in this image.
To specify that we are building this container image off the existing opensusempich342rocm624.sif image, we indicate next to the Bootstrap Keyword (under the definition file Header), localimage, for image in your workdir.
Bootstrap: localimage
From: ../gpu_aware_mpi_example/opensusempich342rocm624.sif
At this stage, follow the steps in the Building a container image section above for building and running the RCCL container.
Note
docker and oras are other options you can specify for the Bootstrap keyword
for images in an OCI registry like DockerHub or Quay, and for SIF files stored as OCI
artifacts in OCI registries, respectively.
Bootstrap: docker
From: quay.io/opensuse/opensuse:15.6
Bootstrap: oras
From: docker.io/subilabrahamornl/ope1nsusempich342rocm624:latest
OLCF Base Images & Apptainer Modules
To assist the container workflow on Frontier, OLCF provides some base container images and apptainer modules to simplify the process. The following sections document them and provide an Example Workflow.
Base Images
Due to licensing, OLCF is currently not able to provide containers with the Cray Programming Environment (CPE) installed in them; However, we do provide a set of base container images that seek to be ABI (Application Binary Interface) compatible. Users can download these images and build their software off-site. When users are ready to run their containers on Frontier they can bind in CPE and run their software.
Important
While OLCF seeks to make these containers compatible with CPE the compatibility is NOT guaranteed. We build the images with Velocity. The image definitions can be found here.
Attention
Due to upstream vulnerabilities from software and operating systems some provided images cannot pass required security scans. In these cases the image will be temporarily unavailable. We are sorry for any inconvenience that this causes. Users are welcome to build there own images using our build tool Velocity and image definitions.
apptainer pull docker://savannah.ornl.gov/olcf-container-images/cpe:<tag>
singularity pull docker://savannah.ornl.gov/olcf-container-images/cpe:<tag>
podman pull savannah.ornl.gov/olcf-container-images/cpe:<tag>
docker pull savannah.ornl.gov/olcf-container-images/cpe:<tag>
Contents:
GNU |
CLANG |
|---|---|
gcc@12.3.0 + mpich@3.4.3 + rocm@5.7.1 |
llvm@17.0.6 + mpich@3.4.3 + rocm@5.7.1 |
Tags:
23.12_gnu_ubuntu23.12_gnu_opensuse23.12_gnu_rockylinux23.12_clang_ubuntu23.12_clang_opensuse23.12_clang_rockylinux
Contents:
GNU |
CLANG |
|---|---|
gcc@13.2.0 + mpich@3.4.3 + rocm@6.0.3 |
llvm@17.0.6 + mpich@3.4.3 + rocm@6.0.3 |
Tags:
24.03_gnu_ubuntu24.03_gnu_opensuse24.03_gnu_rockylinux24.03_clang_ubuntu24.03_clang_opensuse24.03_clang_rockylinux
Contents:
GNU |
CLANG |
|---|---|
gcc@13.2.0 + mpich@3.4.3 + rocm@6.1.3 |
llvm@18.1.8 + mpich@3.4.3 + rocm@6.1.3 |
Tags:
24.07_gnu_ubuntu24.07_gnu_opensuse24.07_gnu_rockylinux24.07_clang_ubuntu24.07_clang_opensuse24.07_clang_rockylinux
Contents:
GNU |
CLANG |
|---|---|
gcc@13.2.0 + mpich@3.4.3 + rocm@6.2.4 |
llvm@18.1.8 + mpich@3.4.3 + rocm@6.2.4 |
Tags:
24.11_gnu_ubuntu24.11_gnu_opensuse24.11_gnu_rockylinux24.11_clang_ubuntu24.11_clang_opensuse24.11_clang_rockylinux
Contents:
GNU |
CLANG |
|---|---|
gcc@14.2.0 + mpich@3.4.3 + rocm@6.3.1 |
llvm@19.1.7 + mpich@3.4.3 + rocm@6.3.1 |
Tags:
25.03_gnu_ubuntu25.03_gnu_opensuse25.03_gnu_rockylinux25.03_clang_ubuntu25.03_clang_opensuse25.03_clang_rockylinux
Apptainer Modules
Warning
The modules described in this section are experimental!
To make the use of apptainer easier, OLCF provides some modules that automatically bind in the needed libraries to run
apptainer with the host mpi and rocm. To access these modules load olcf-container-tools. You should then see two
modules apptainer-enable-mpi and apptainer-enable-gpu.
Example Workflow
To see how one might use these containers and modules we have an example of building and running lammps. You can
find examples for cpu and gpu lammps runs here.
Clone the git repo onto Frontier (or any x86_64 machine), navigate to the correct folder and run:
apptainer build lammps.sif lammps.def
After the image is built, transfer it to Frontier if it’s on another machine, and run it by submitting the
submit.slurm batch script that accompanies it.
Warning
The modules should be loaded only for running, such as in an interactive or batch job. They should not be loaded before apptainer build due to environment variables
it sets that interfere with the build process. If you load the modules and try to do an apptainer build, you might encounter
an error like
FATAL: container creation failed: mount hook function failure: mount /opt/cray->/opt/cray error: while mounting /opt/cray: destination /opt/cray doesn't exist in container
Sample Applications
Some examples of containerizing and running specific applications on Frontier can be seen in the olcf_container_examples repository . If you have suggestions for other examples you would like to see, or would like to contribute one yourself, feel free to open an issue or pull request on the Github page above.
AMD DockerHub AI/ML Workload Containers on Frontier
AMD has optimized several AI/ML frameworks to provide support on AMD hardware. Some of these frameworks are specifically equiped with ROCM backend to ensure support on AMD GPUs while others are merely equiped for standard AMD64 CPU architectures.
To ensure optimal performance on Frontier, we recommend users utilize the AMD optimized AI/ML workloads from the AMD DockerHub. We demonstrate here how to access and build those images on Frontier as well as tips/tricks in running the images. We focus on PyTorch, Tensorflow and Jax.
Building and Running the AMD DockerHub AI/ML Images on Frontier
We highlight the process of building and running AMD DockerHub PyTorch, Tensorflow and Jax images on Frontier. Since AMD releases several versions of these frameworks, we focus on the latest releases only for this documentation.
apptainer pull pytorch_latest.sif docker://rocm/pytorch-nightly:latest
apptainer pull tensorflow_latest.sif docker://rocm/tensorflow:latest
apptainer pull jax_latest.sif docker://rocm/jax-community:latest
The olcf_containers_examples repository has examples demonstrating how to use these containers on Frontier. You can see an example for AMD Pytorch container here , AMD Tensorflow container here, AMD Jax container here and the AMD vLLM container here .
Important
While OLCF demonstrates the build and usage of these container images on Frontier, the images and their content are managed by AMD on their dockerhub repository.
Debugging Applications Running in Apptainer
Debugging an MPI application running in a container is a bit more complex than debugging a regular application. You can’t directly launch a container running an MPI application with a debugging tool like gdb4hpc or with Linaro Forge. This is because the tool will start a debug session of the Apptainer runtime itself rather than the MPI application it is running.
There are two ways around this - using gdbserver from within the container to launch one MPI task (while the rest are launched normally), or attaching to the already running MPI tasks with Linaro Forge after the application is launched.
For the instructions below, we will be using the debugging example in the olcf_containers_examples repository. Make sure you clone the repository and
navigate to the frontier/containers_on_frontier_docs/debugging directory. Build the container
image with apptainer build bcastandlammps.sif bcastandlammps.def.
Using gdbserver to debug a single MPI task
In this method, we are launching an containerized MPI application with multiple MPI ranks, but one
of the ranks is started with a tool called gdbserver. This sets up a debugging server that
gdb can connect to and step through that particular rank. All the other ranks will progress as
normal until they are blocked by communication to the rank being debugged, or an MPI barrier
affecting all ranks. Once that is crossed, the other ranks will continue on again.
The disadvantage here is that this is not as fully featured as a special purpose HPC debugger like Linaro Forge or gdb4hpc. You will not be able to switch between different ranks of your program on the fly to debug them. You can only debug the rank you launched with gdbserver.
The below example uses a 2 node job, but it generalizes to larger jobs.
Start a 2-node interactive job e.g.
salloc -t 00:50:00 -A gen107 -N2 -qdebug. Make note of the nodelist (runsrun hostname | sortto print the list in the terminal). You will be sshing into the node running rank 0 later, which is usually the first node on the list.Load the container modules
module load olcf-container-tools
module load apptainer-enable-mpi
module load apptainer-enable-gpu
Modify
launchapp.shto your needs. In this example you can either debug the simplempi_bcastprogram or LAMMPS. Comment out the lines with the program you don’t want to run and uncomment the lines for the program you do want to run.launchapp.shstarts rank 0 with gdbserver and the rest of the ranks normally. You can change which rank is being debugged by changing the value of 0 in$SLURM_PROCID -eq 0inlaunchapp.sh.
Launch the MPI program with srun in a container
srun -N2 -n16 --gpus-per-task=1 --gpu-bind=closest --unbuffered apptainer exec bcastandlammps.sif ./launchapp.sh
You should see a message like
Listening on port 2345. The gdbserver is listening to that port on the first node in your allocation.In a new terminal, SSH into the first node in the nodelist and navigate to your work directory.
In the new terminal, Start an apptainer shell with the container image with
apptainer shell
bcastandlammps.sif
, and run gdb within this container that we can then connect to the gdbserver.apptainer shell bcastandlammps.sif Apptainer> gdb (gdb) target remote 0.0.0.0:2345
This is connecting to the gdbserver instance that was started. You should now be able to use regular gdb commands to step through your code.
Using Linaro Forge to attach to an already running MPI application running from containers
OLCF supports Linaro Forge on Frontier . Forge’s reverse connect feature is what is recommended for debugging regular MPI applications. However, reverse connect cannot be applied for a containerized MPI application.
Instead, we can use Linaro Forge to attach to the running containerized MPI ranks after the job is started. A process running in Apptainer is not isolated and is visible as a regular process.
Warning
Any application you want to debug must be present in the host filesystem i.e. you need to
start a shell with apptainer shell with your container, navigate to where your source code is
located on Lustre or in your home directory, and compile it there. Your source and application
cannot be built as part of your container image build and stored in your image if you wish to debug it with Forge.
Initial Setup
Follow the steps from our Linaro Forge DDT documentation upto but not including the last ‘Reverse Connect’ section.
Note
If you wish to use the ROCm debugging feature of DDT, you need to load a rocm module in your
linaro.bsh file. This is the file you created when you were following the steps earlier on
the Linaro Forge documentation page for setting up Linaro Forge usage, where you set the
ALLINEA_CONFIG_DIR and ALLINEA_REVERSE_CONNECT_DIR environment variables. So you should now have
a file in your home directory named /ccs/home/<user>/linaro.bsh with the below contents.
module load rocm
export ALLINEA_CONFIG_DIR=<Somewhere on the Filesystem that can be accessed by the compute nodes i.e. /lustre/orion/<project>>
export ALLINEA_REVERSE_CONNECT_DIR=<Somewhere on the Filesystem that can be accessed by the compute nodes i.e. /lustre/orion/<project>>
This is necessary because DDT relies on the presence of rocgdb in your PATH. rocgdb is
made available in your PATH when the rocm module is loaded. When Forge connects to Frontier with
Remote Launch, it runs your linaro.bsh file (provided its path was specified in the Remote
Script box in the Remote Launch Settings when you first configured Linaro Forge to connect to Frontier). So
loading the rocm module in linaro.bsh will make sure that rocgdb is now available for Forge
DDT to use.
In your terminal logged into Frontier:
Navigate to the
debuggingdirectory in theolcf_containers_examplesrepository you clonedStart a 2 node interactive job e.g.
salloc -t 00:50:00 -A gen107 -N2 -qdebugRun the following commands to to set up modules and create a
hostlistfile (this will create a file with the list of hosts in your allocation. We will be making use of this in the Forge client application).module reset module load olcf-container-tools module load apptainer-enable-mpi module load apptainer-enable-gpu module load linaro-forge export ALLINEA_CONFIG_DIR=<some directory> export ALLINEA_REVERSE_CONNECT_DIR=<some directory> srun hostname > hostlist
The values for ALLINEA_CONFIG_DIR and ALLINEA_REVERSE_CONNECT_DIR should be the same as what
you set when following the initial setup steps.
Start an apptainer shell with
apptainer shell -e bcastandlammps.sif(The-eflag will make sure the host’s environment is not inherited into the running container. The application needs to be compiled and linked with only the container’s own environment to emulate how it would be compiled within a container build).In the apptainer shell, compile the
mpi_bcast.cfile in the current directory withmpicc -g -O0 -o mpi_bcast mpi_bcast.c(remember that we need to do this because the source and the application needs to exist on the host’s filesystem even if the container is running it).Exit the apptainer shell.
Debugging the application
Make sure you have Linaro Forge client open on your workstation and connected to Frontier through the Remote Launch dropdown.
In your terminal running the interactive job
srun --unbuffered -N2 -n4 apptainer exec bcastandlammps.sif ./mpi_bcast
This will run the
mpi_bcastexecutable from the current directory, but it is running within the container with access to the container environment.Switch to your Linaro Forge desktop client. Make sure you are connected to Frontier through the Remote Launch option.
Click on ‘ATTACH’ in the desktop client.
In the window that opens, click on the ‘Change MPI…’ button. This will open the System Settings window. From the MPI/UPC Implementation dropdown, select ‘none’ . Click on OK.
Click on the “Choose Hosts…” button. In the window that opens, click on the “Import…” button. This will open a directory picker where you can navigate Frontier’s directory tree. Navigate to your current working directory (i.e. the directory from where you ran
srun). Select thehostlistfile you created earlier and click “Open”. This will populate the list of hosts.Select the checkboxes for all the hosts, then click on OK.
Click on the tab named “list of all processes” (The “Automatically-detected jobs” tab will detect the apptainer runtime running under srun, which is not what we want. We actually want the MPI program that is running under the container).
Select “ROCm” under the “debug GPU” option selection if you need to do GPU debugging (make sure you have
module load rocmin your/ccs/home/<user>/linaro.bshfile. If that wasn’t already set before you connected to Frontier with Remote Launch, you will need to close Linaro Forge and reconnect).In the “Filter for process names containing:” textbox, type in “bcast” to list only the
mpi_bcastprocesses. Select the items whose “Process name” or “Executable” is the name of thempi_bcastexecutable. Do not select anything that referencessrunorapptainer.
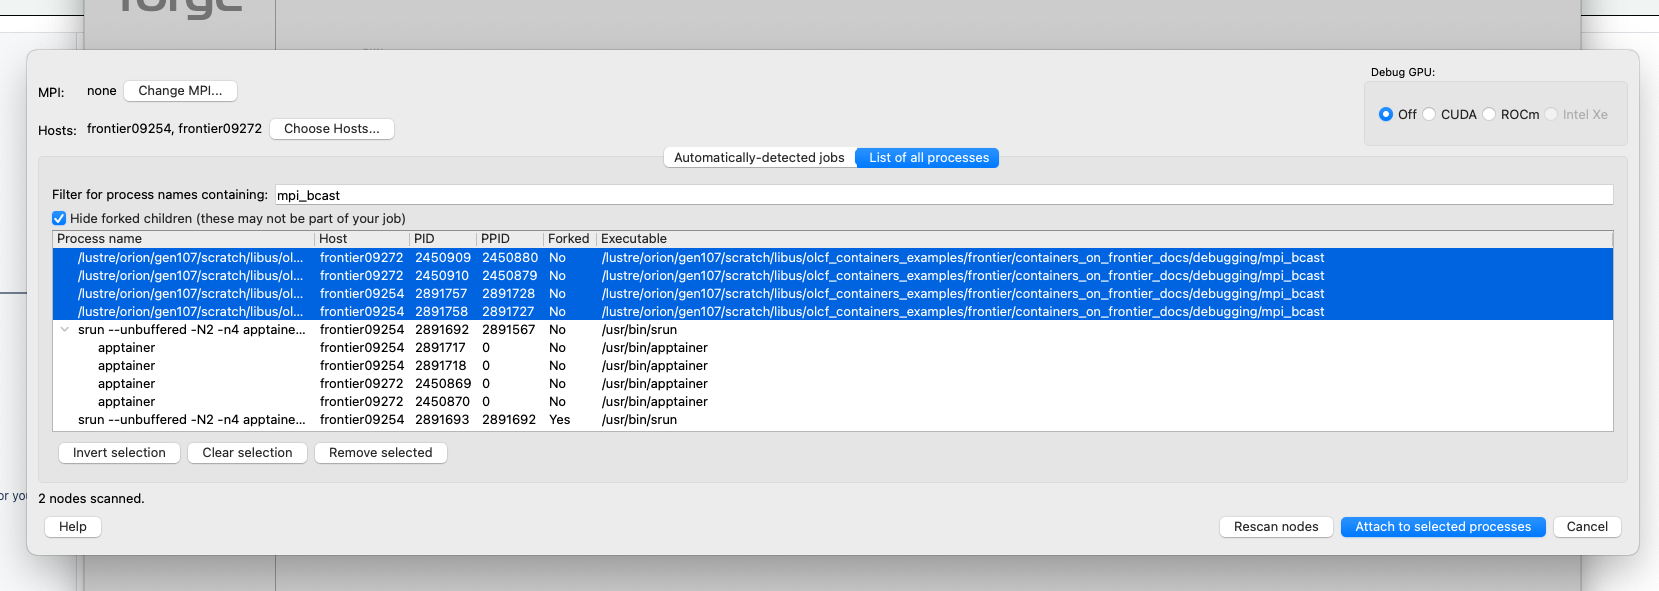
Click on “Attach to Selected Processes”. Forge will now start connecting to the processes. The execution of the application will pause once Forge is connected.
You will now get the main Linaro DDT window. You may see a message here saying “Missing debugging information”. This is not an issue.
In the navigation tree on the left, click on “Sources”, find the source file you want to examine and set breakpoints where you want to. Then click on the “Play” button (the green triangle button) on the toolbar at the top of the window. DDT will now progress the application across all processes till it hits the breakpoint.
You should now be able to use DDT to debug your application.
Note
If you encounter errors along the way, the best thing is to close Linaro Forge and retry. That usually lets things proceed.
Some Restrictions and Tips
Some packages (like
opensshon an OpenSUSE container) cannot currently be installed during your container build. This is because containers are restricted to a single user id and group id. Some package installs might try to create a new user inside the container with theuseraddcommand, which will fail. So you will need to find workarounds or alternatives for any packages that try to do this.The
cray-mpich-abimodule does not providelibmpicxx.so, onlylibmpi.soandlibmpifort.so. As a hacky solution in case your application in the container needslibmpicxx.sofrom the host, you can create a symlink namedlibmpicxx.sosomewhere that links to${CRAY_MPICH_DIR}/lib/libmpi_cray.soand then mount that symlink into the container (while making sure the${CRAY_MPICH_DIR}/liblocation is already mounted in the container).If you get an error like
FATAL: While performing build: conveyor failed to get: while fetching library image: cached file hash(sha256:247d71d79a3be5d59c5b83eba3210ebed215fc5da16c556445ffbe797bbe1494) and expected hash(sha256:d0c01238c6c344a460076367063fda56f8fb32569aae782c408f8d20d0920757) does not matchwhen pulling an Apptainer image from an ORAS registry, try passing the flag--disable-cacheflag to theapptainer buildorapptainer pullcommand. You can also set theAPPTAINER_CACHEDIRenvironment variable to a directory in/tmp, which will also solve the problem.