Lux User Guide
System Overview
Lux is an AMD-based supercomputer built on HPE ProLiant XD685 nodes and located at the Oak Ridge Leadership Computing Facility (OLCF). It enables users to dramatically accelerate AI-driven research. Lux consists of 504 nodes and 4,032 GPUs, divided into Slurm (HPC) and Kubernetes partitions.
Lux Compute Nodes
Each Lux compute node contains [2x] 64-core AMD EPYC 9575F CPUs with access to 3 TB of DDR5 memory. Each node also contains [8x] AMD Instinct MI355X GPUs, each with 288 GB of high-bandwidth memory (HBM3E) and 8 Accelerated Compute Dies (XCDs), for a total of 64 XCDs per node. The programmer can think of each MI355X as an individual GPU, with 288 GB of high-bandwidth memory (HBM3E).
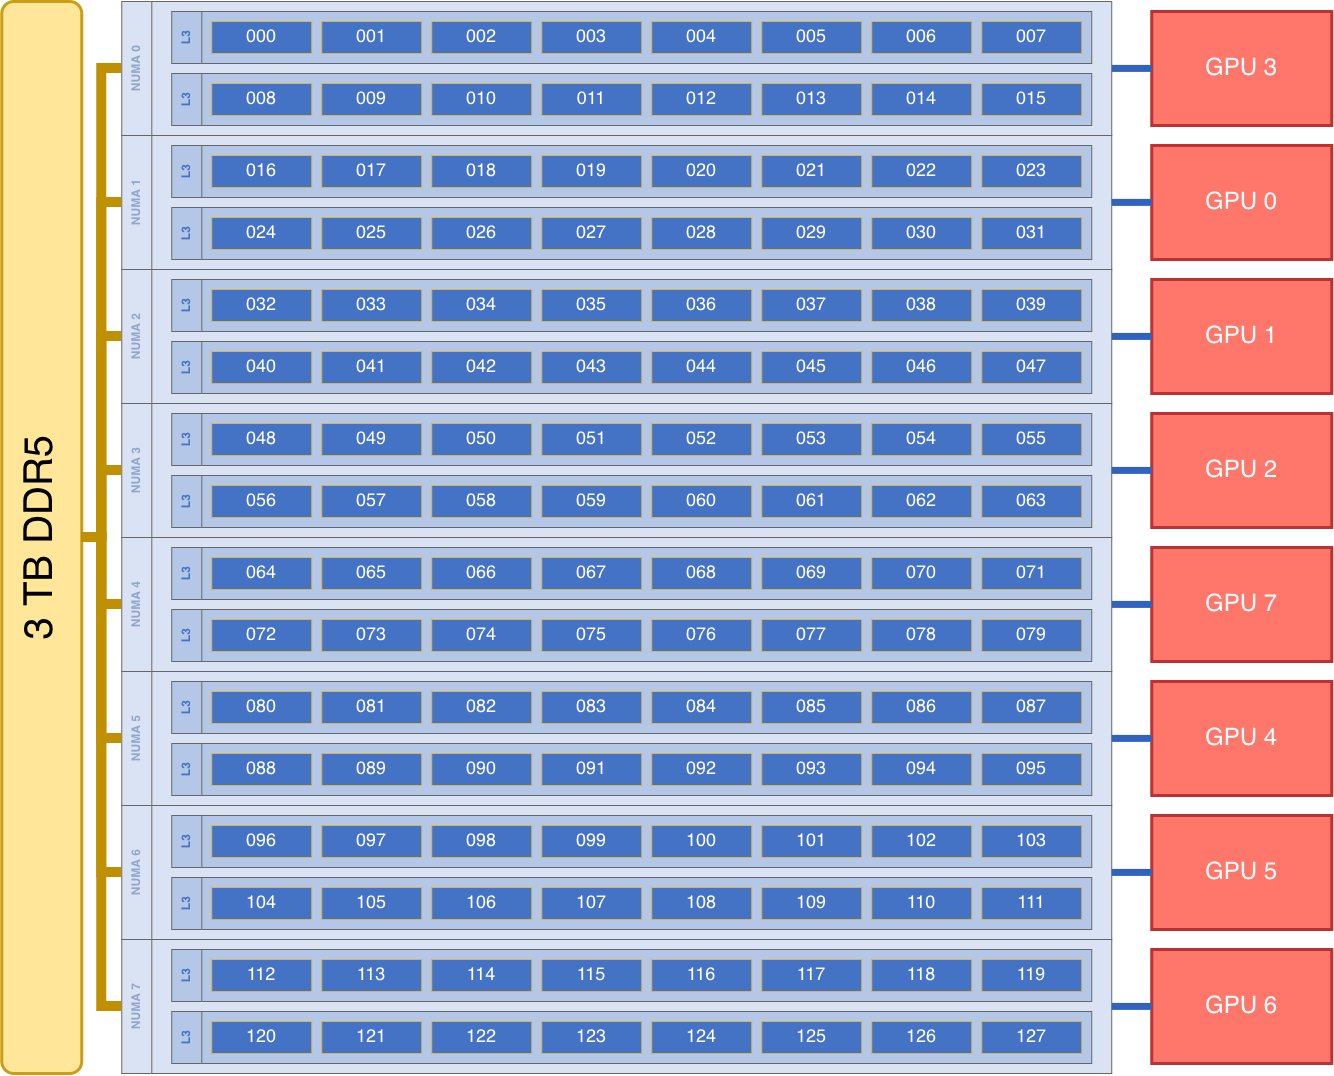
Each MI355X are connected with Infinity Fabric GPU-GPU with a peak bandwidth of 153.6 GB/s. The MI355X GPUs are connected with Infinity Fabric GPU-GPU in the arrangement shown in the Lux Node Diagram below, where the peak bandwidth is a constant 153.6 GB/s because each GPU has a single Infinity Fabric connection to other individual GPUs.
Note
TERMINOLOGY:
Each MI355X will show as a separate GPU according to Slurm, ROCR_VISIBLE_DEVICES, and the ROCr runtime, so from this point forward in the quick-start guide, we will simply refer to the MI355X as a GPU.
Note
There are [8x] NUMA domains per node. The 8 GPUs are each associated with one NUMA domain as follows:
NUMA 0:
hardware threads 000-015 | GPU 3 - Bus 0000:7c:00.0
NUMA 1:
hardware threads 016-031 | GPU 0 - Bus 0000:09:00.0
NUMA 2:
hardware threads 032-047 | GPU 1 - Bus 0000:19:00.0
NUMA 3:
hardware threads 048-063 | GPU 2 - Bus 0000:69:00.0
NUMA 4:
hardware threads 064-079 | GPU 7 - Bus 0000:fb:00.0
NUMA 5:
hardware threads 080-095 | GPU 4 - Bus 0000:86:00.0
NUMA 6:
hardware threads 096-111 | GPU 5 - Bus 0000:99:00.0
NUMA 7:
hardware threads 112-127 | GPU 6 - Bus 0000:e6:00.0
Lux HPC User Guide
HPC Node Overview
Node Types
On Lux, there are two major types of nodes you will encounter: Login and Compute. While these are similar in terms of hardware (see: Lux Compute Nodes), they differ considerably in their intended use.
Node Type |
Description |
|---|---|
Login |
When you connect to Lux, you’re placed on a login node. This is the place to write/edit/compile your code, manage data, submit jobs, etc. You should never launch parallel jobs from a login node nor should you run threaded jobs on a login node. Login nodes are shared resources that are in use by many users simultaneously. |
Compute |
Most of the nodes on Lux are compute nodes. These are where
your parallel job executes. They’re accessed via the |
System Interconnect
File Systems
Lux is connected to Orion, a parallel filesystem based on Lustre and HPE ClusterStor, with a 679 PB usable
namespace (/lustre/orion/). In addition to Lux, Orion is available on Frontier, the OLCF’s data transfer nodes, and on the Andes cluster.
Lux also has access to the center-wide NFS-based filesystem (which provides user and project home areas).
Each compute node has eight 3.2TB Non-Volatile Memory storage devices. See Data and Storage for more information.
Project’s with a Lux allocation also receive an archival storage area on Kronos. For more information on using Kronos, see the Kronos Nearline Archival Storage System section.
Operating System
Lux is running Red Hat Enterprise Linux (RHEL) version 9.8.
GPUs
Each Lux compute node contains eight (8) AMD MI355X. The AMD MI355X has a peak performance of 78.6 TFLOPS in vector-based double-precision for modeling and simulation and 157.3 TFLOPS in vector-based half-precision AI workloads. Each MI355X contains 256 compute units across its 8 XCDs and 288 GB of high-bandwidth memory (HBM3E) which can be accessed at a peak of 8 TB/s. The 8 GPUs on a Lux node are connected with Infinity Fabric with a bandwidth of 153.6 GB/s (in each direction simultaneously).
Connecting
To connect to Lux, ssh to lux.olcf.ornl.gov from either home.ccs.ornl.gov. For example:
# Direct login
$ ssh <username>@lux.olcf.ornl.gov
# Jumping through "home"
$ ssh <username>@home.ccs.ornl.gov
$ ssh lux.olcf.ornl.gov
For more information on connecting to OLCF resources, see Connecting for the first time.
By default, connecting to Lux will automatically place the user on a random login node. If you need to access a specific login node, you can ssh to that Lux node directly.
$ ssh <username>@login2.lux.olcf.ornl.gov
Users can connect to any of the 3 Lux login nodes by replacing login2 with their login node of choice (login1, login2, login3.
Data and Storage
Orion
Lux mounts Orion, a parallel filesystem based on Lustre and HPE ClusterStor, with a 679 PB usable namespace (/lustre/orion/). In addition to Lux, Orion is available on the OLCF’s data transfer nodes.
Orion uses a feature called Progressive File Layout (PFL) that changes the striping of files as they grow. Because of this, we ask users not to manually adjust the file striping. If you feel the default striping behavior of Orion is not meeting your needs, please contact help@olcf.ornl.gov.
Files older than 90 days are purged from Orion. Please plan your data management and lifecycle at OLCF before generating the data.
For more detailed information about center-wide file systems and data archiving available on Lux, please refer to the pages on Data Storage and Transfers. The subsections below give a quick overview of NFS, Lustre, and archival storage spaces as well as the on node NVMe “Burst Buffers” (SSDs).
NFS Filesystem
Area |
Path |
Type |
Permissions |
Quota |
Backups |
Purged |
Retention |
On Compute Nodes |
|---|---|---|---|---|---|---|---|---|
User Home |
|
NFS |
User set |
50 GB |
Yes |
No |
90 days |
Yes |
Project Home |
|
NFS |
770 |
50 GB |
Yes |
No |
90 days |
Yes |
Note
Though the NFS filesystem’s User Home and Project Home areas are read/write from Lux’s compute nodes, we strongly recommend that users launch and run jobs from the Lustre Orion parallel filesystem instead due to its larger storage capacity and superior performance. Please see below for Lustre Orion filesystem storage areas and paths.
Lustre Filesystem
Area |
Path |
Type |
Permissions |
Quota |
Backups |
Purged |
Retention |
On Compute Nodes |
|---|---|---|---|---|---|---|---|---|
Member Work |
|
Lustre HPE ClusterStor |
700 |
50 TB |
No |
90 days |
N/A |
Yes |
Project Work |
|
Lustre HPE ClusterStor |
770 |
50 TB |
No |
90 days |
N/A |
Yes |
World Work |
|
Lustre HPE ClusterStor |
775 |
50 TB |
No |
90 days |
N/A |
Yes |
Warning
Proprietary/Sensitive/Controlled Information Notice
Portions of data and/or software used in your project may require extra protections due to requirements for proprietary, sensitive, or controlled information. It is imperative that filenames, application names, job names, environment variables, batch job scripts, or any other unencrypted text must never contain sensitive or controlled information.
If you have HIPAA or ITAR data, you will need to use our SPI resources. More information about SPI can be found here.
If you have security related questions, contact us via email at: security-admins@ccs.ornl.gov. Other questions can be sent to help@olcf.ornl.gov.
Kronos Archival Storage
Please note that the Kronos is not mounted directly onto Lux nodes. There are two main methods for accessing and moving data to/from Kronos, either with standard cli utilities (scp, rsync, etc.) and via Globus using the “OLCF Kronos” collection. For more information on using Kronos, see the Kronos Nearline Archival Storage System section.
Area |
Path |
Type |
Permissions |
Quota |
Backups |
Purged |
Retention |
On Compute Nodes |
|---|---|---|---|---|---|---|---|---|
Member Archive |
|
Nearline |
700 |
200 TB* |
No |
No |
90 days (after account end) |
No |
Project Archive |
|
Nearline |
770 |
200 TB* |
No |
No |
90 days (after project end) |
No |
World Archive |
|
Nearline |
775 |
200 TB* |
No |
No |
90 days (after project end) |
No |
Note
The three archival storage areas above share a single 200TB per project quota.
NVMe
Each compute node on Lux has [8x] Kioxia CM7 3.2TB Non-Volatile Memory (NVMe) storage devices (SSDs), colloquially known as a “Burst Buffer”. Each SSD has a peak sequential performance of 10,000 MB/s (read) and 4,900 MB/s (write).
The purpose of the Burst Buffer system is to bring improved I/O performance to appropriate workloads. Users are not required to use the NVMes. Data can also be written directly to the parallel filesystem.
NVMe Usage
NVMe devices are automatically allocated when a user requests a GPU, with 12% of the total node NVMe capacity per GPU requested.
(.12 * 3.2TB/NVMe * 8 NVMe/node = 2.8TiB/GPU requested)
The remaining 4% of NVMe capacity is reserved for Kubernetes uses.
Once the NVMe pool slice is allocated to a job, users can access the slice at /mnt/bb/$SLURM_JOBID
Users are responsible for moving data to/from the NVMe before/after their jobs
Example
#!/bin/bash
# hello_nvme.sbatch
#SBATCH --account stf007
#SBATCH --job-name nvme_test
#SBATCH --output %x-%j.out
#SBATCH --time 00:05:00
#SBATCH --partition batch
#SBATCH --nodes 1
#SBATCH --gpus 2

date

echo " "
echo "*****ORIGINAL FILE*****"
cat test.txt
echo "***********************"

# Move file from working directory to SSD
mv test.txt /mnt/bb/$SLURM_JOBID

# Edit file from compute node
srun -n1 hostname >> /mnt/bb/$SLURM_JOBID/test.txt

# Find size of allocation and add to file
srun -n1 df -h /mnt/bb/$SLURM_JOBID >> /mnt/bb/$SLURM_JOBID/test.txt

# Move file from SSD back to working directory
mv /mnt/bb/$SLURM_JOBID/test.txt .

echo " "
echo "*****UPDATED FILE******"
cat test.txt
echo "***********************"
Below is the output:
$ cat nvme_test-<JOB ID>.out

*****ORIGINAL FILE*****
Hello, world from Lux!
***********************

*****UPDATED FILE******
Hello, world from Lux!
lux012
Filesystem                     Size  Used Avail Use% Mounted on
/dev/mapper/nvme-bb--<JOB ID>  5.6T   40G  5.6T   1% /mnt/bb/<JOB ID>
***********************
Using Globus to Move Data to and from Orion
The following example is intended to help users move data to and from the Orion filesystem.
Below is a summary of the steps for data transfer using Globus:
1. Login to globus.org using your globus ID and password. If you do not have a globusID, set one up here: Generate a globusID.
Once you are logged in, Globus will open the “File Manager” page. Click the left side “Collection” text field in the File Manager and type “OLCF DTN (Globus 5)”.
When prompted, authenticate into the OLCF DTN (Globus 5) collection using your OLCF username and PIN followed by your RSA passcode.
Click in the left side “Path” box in the File Manager and enter the path to your data on Orion. For example,`/lustre/orion/stf007/proj-shared/my_orion_data`. You should see a list of your files and folders under the left “Path” Box.
Click on all files or folders that you want to transfer in the list. This will highlight them.
Click on the right side “Collection” box in the File Manager and type the name of a second collection at OLCF or at another institution. You can transfer data between different paths on the Orion filesystem with this method too; Just use the OLCF DTN (Globus 5) collection again in the right side “Collection” box.
Click in the right side “Path” box and enter the path where you want to put your data on the second collection’s filesystem.
Click the left “Start” button.
Click on “Activity“ in the left blue menu bar to monitor your transfer. Globus will send you an email when the transfer is complete.
Globus Warnings:
Globus transfers do not preserve file permissions. Arriving files will have (rw-r–r–) permissions, meaning arriving files will have user read and write permissions and group and world read permissions. Note that the arriving files will not have any execute permissions, so you will need to use chmod to reset execute permissions before running a Globus-transferred executable.
Globus will overwrite files at the destination with identically named source files. This is done without warning.
Globus has restriction of 8 active transfers across all the users. Each user has a limit of 3 active transfers, so it is required to transfer a lot of data on each transfer than less data across many transfers.
If a folder is constituted with mixed files including thousands of small files (less than 1MB each one), it would be better to tar the small files. Otherwise, if the files are larger, Globus will handle them.
AMD GPUs
The AMD Instinct MI355X is built on advanced packaging technologies enabling eight Accelerated Compute Dies (XCDs) to be integrated into a single package in the Open Compute Project (OCP) Accelerator Module (OAM) in the MI355X product. Each XCD is build on the AMD CDNA 4 architecture. A single Lux node contains 8 MI355X OAMs for a total of 64 XCDs.
Note
The Slurm workload manager and the ROCr runtime treat each MI355X as a separate GPU
and visibility can be controlled using the ROCR_VISIBLE_DEVICES environment variable.
Therefore, from this point on, the Lux guide simply refers to a MI355X as a GPU.
Each XCD contains 32 Compute Units (CUs) grouped in 4 Asynchronous Compute Engines (ACEs). Physically, each XCD contains 36 CUs, but four are disabled. A command processor in each GPU receives API commands and transforms them into compute tasks.
Compute tasks are managed by the 4 asynchronous compute engines, which dispatch wavefronts to compute units. All wavefronts from a single workgroup are assigned to the same CU. In CUDA terminology, workgroups are “blocks”, wavefronts are “warps”, and work-items are “threads”. The terms are often used interchangeably.
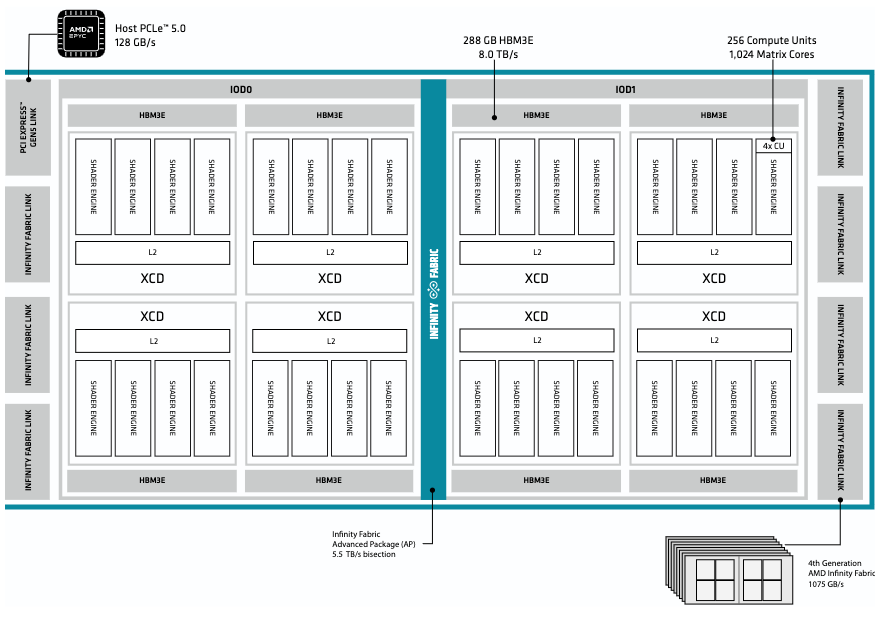
The 256 CUs in each GPU deliver peak performance of 78.6 TFLOPS in double precision on both Vector and specialized Matrix cores. Also, each GPU contains 288 GB of high-bandwidth memory (HBM3E) accessible at a peak bandwidth of 8.0 TB/s. The 8 GPUs in an Lux node are connected with [1x] GPU-to-GPU Infinity Fabric links providing 76.8+76.8 GB/s of bandwidth. Consult the diagram in the Lux Compute Nodes section for information on how the accelerators are connected to each other, to the CPU, and to the network.
Note
The X+X GB/s notation describes bidirectional bandwidth, meaning X GB/s in each direction.
The Compute Unit
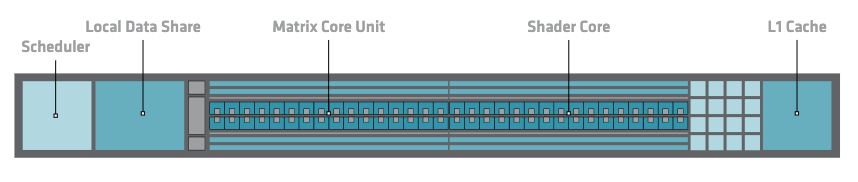
Each CU has 4 Matrix Core Units (the equivalent of NVIDIA’s Tensor core units) and 4 16-wide SIMD units. For a vector instruction that uses the SIMD units, each wavefront (which has 64 threads) is assigned to a single 16-wide SIMD unit such that the wavefront as a whole executes the instruction over 4 cycles, 16 threads per cycle. Since other wavefronts occupy the other three SIMD units at the same time, the total throughput still remains 1 instruction per cycle. Each CU maintains an instructions buffer for 8 wavefronts and also maintains 256 registers where each register is 64 4-byte wide entries.
HIP
The Heterogeneous Interface for Portability (HIP) is AMD’s dedicated GPU programming environment for designing high performance kernels on GPU hardware. HIP is a C++ runtime API and programming language that allows developers to create portable applications on different platforms, including the AMD MI355X. This means that developers can write their GPU applications and with very minimal changes be able to run their code in any environment. The API is very similar to CUDA, so if you’re already familiar with CUDA there is almost no additional work to learn HIP. See here for a series of tutorials on programming with HIP and also converting existing CUDA code to HIP with the hipify tools .
See the Compiling section for information on compiling for AMD GPUs, and see the Tips and Tricks section for some detailed information to keep in mind to run more efficiently on AMD GPUs.
Programming Environment
Lux users are provided with many pre-installed software packages and scientific libraries. To facilitate this, environment management tools are used to handle necessary changes to the shell.
Environment Modules (Lmod)
Environment modules are provided through Lmod, a Lua-based module system for dynamically altering shell environments.
By managing changes to the shell’s environment variables (such as PATH, LD_LIBRARY_PATH, and PKG_CONFIG_PATH), Lmod allows you to alter the software available in your shell environment without the risk of creating package and version combinations that cannot coexist in a single environment.
General Usage
The interface to Lmod is provided by the module command:
Command |
Description |
|---|---|
|
Shows a terse list of the currently loaded modules |
|
Shows a table of the currently available modules |
|
Shows help information about |
|
Shows the environment changes made by the |
|
Searches all possible modules according to |
|
Loads the given |
|
Adds |
|
Removes |
|
Unloads all modules |
|
Resets loaded modules to system defaults |
|
Reloads all currently loaded modules |
Searching for Modules
Modules with dependencies are only available when the underlying dependencies, such as compiler families, are loaded. Thus, module avail will only display modules that are compatible with the current state of the environment. To search the entire hierarchy across all possible dependencies, the spider sub-command can be used as summarized in the following table.
Command |
Description |
|---|---|
|
Shows the entire possible graph of modules |
|
Searches for modules named |
|
Searches for a specific version of |
|
Searches for modulefiles containing |
Python
Information about using Python on OLCF systems, including virtual environments and package installation guidance, is maintained on the dedicated Python documentation page in the Software Section.
Compilers
AMD and GCC compilers are provided through modules on Lux.
The AMD compilers are both based on LLVM/Clang.
There is also a system/OS versions of GCC available in /usr/bin.
The table below lists details about each of the module-provided compilers.
Please see the following Compiling section for more detailed information on how to compile using these modules.
MPI
The MPI implementations available on Lux are OpenMPI and MPICH, which are “GPU-aware” so GPU buffers can be passed directly to MPI calls.
Lux is primarily a RCCL-centric machine utilizing AMD Pensando Pollara 400GbE AI NICs on each compute node. MPI is not yet officially verified.
Due to tested scaling limitations, OLCF strongly recommends your MPI workloads are limited to 16 nodes.
RCCL
The ROCm Collective Communication Library (RCCL) is installed with ROCm and can be accessed by loading a rocm module.
Lux is primarily a RCCL-centric machine utilizing AMD Pensando Pollara 400GbE AI NICs on each compute node.
Compiling
Compilers
AMD and GCC compilers are provided through modules on Lux.
The AMD compilers are based on LLVM/Clang.
There is also a system/OS versions of GCC available in /usr/bin.
The table below lists details about each of the module-provided compilers.
Vendor |
Compiler Module |
Language |
Compiler |
|---|---|---|---|
AMD |
|
C |
|
AMD |
|
C++ |
|
AMD |
|
Fortran |
|
GNU |
|
C |
|
GNU |
|
C++ |
|
GNU |
|
Fortran |
|
Programming Environment
Programming environments consist of a compiler and some basic dependencies, such as MPI and ROCm.
You can find existing programming environments on Lux utilizing the Lmod command module avail.
You will see an output like the following:
 ------------------------------------------------------------------------------- [ amd-llvm/7.2.4, mpich/5.0.1 ] --------------------------------------------------------------------------------
amdfftw/5.3    amdscalapack/5.3    hdf5/1.14.6    netcdf-c/4.10.0    netcdf-fortran/4.6.2
The delimiter row is your “programming environment” as a list of modules and the modules underneath are optional modules that are managed by the programming environment.
Below is an example of how this functions:
1$ module load amd-llvm mpich
2$ module load amdfftw
3$ module unload mpich
4
5Inactive Modules:
6  1) amdfftw
Explanation:
Loading the programming environment by loading the requisite modules
Loading the optional dependency for AMD Fast Fourier Transforms
Unload part of the programming environment.
If the criteria for a programming environment are no longer met, any listed modules will then be inactive. Modules will also be reloaded if their dependent module is swapped for a valid alternative provider such as swapping MPI implementations.
Exposing The ROCm Toolchain to your Programming Environment
If you need to add the tools and libraries related to ROCm, the framework for targeting AMD GPUs, to your path, you will need to use a version of ROCm that is compatible with your programming environment.
ROCm can be loaded with: module load rocm/X.Y.Z, or to load the default ROCm version, module load rocm.
MPI
The MPI implementations available on Lux are OpenMPI (default) and MPICH, which are “GPU-aware” so GPU buffers can be passed directly to MPI calls.
Implementation |
Module |
Compiler |
Header Files & Linking |
|---|---|---|---|
OpenMPI |
|
|
-I${MPI_DIR}/include-L${MPI_DIR}/lib -lmpi |
|
-I${MPI_DIR}/include-L${MPI_DIR}/lib -lmpi |
||
MPICH |
|
|
-I${MPICH_DIR}/include-L${MPICH_DIR}/lib -lmpi |
|
-I${MPICH_DIR}/include-L${MPICH_DIR}/lib -lmpi |
Note
hipcc requires the ROCm Toolclain, See Exposing The ROCm Toolchain to your Programming Environment
Warning
You may not be able to load an MPI implementation without first loading a correctly versioned compiler.
For example:
module load rocm/7.14.0

Inactive Modules:
  1) openmpi

...
module load mpich
Lmod has detected the following error:  The following module(s) are unknown: "mpich"
...
module load amd-llvm/7.14.0
...
module load mpich

Lmod is automatically replacing "openmpi/5.0.10" with "mpich/5.0.1".
GPU-Aware MPI
To use GPU-aware MPI, users must load a ROCm module, its corresponding AMD Compiler module, and an MPI-providing module:
gpu-aware.cpp
#include <stdio.h>
#include <hip/hip_runtime.h>
#include <mpi.h>

int main(int argc, char **argv) {
  int i,rank,size,bufsize;
  int *h_buf;
  int *d_buf;
  MPI_Status status;

  bufsize=100;

  MPI_Init(&argc,&argv);
  MPI_Comm_rank(MPI_COMM_WORLD, &rank);
  MPI_Comm_size(MPI_COMM_WORLD, &size);

  //allocate buffers
  h_buf=(int*) malloc(sizeof(int)*bufsize);
  hipMalloc(&d_buf, bufsize*sizeof(int));

  //initialize buffers
  if(rank==0) {
    for(i=0;i<bufsize;i++)
      h_buf[i]=i*i;
  }

  if(rank==1) {
    for(i=0;i<bufsize;i++)
      h_buf[i]=-1;
  }

  hipMemcpy(d_buf, h_buf, bufsize*sizeof(int), hipMemcpyHostToDevice);

  //communication
  if(rank==0)
    MPI_Send(d_buf, bufsize, MPI_INT, 1, 123, MPI_COMM_WORLD);

  if(rank==1)
    MPI_Recv(d_buf, bufsize, MPI_INT, 0, 123, MPI_COMM_WORLD, &status);

  //validate results
  if(rank==1) {
    hipMemcpy(h_buf, d_buf, bufsize*sizeof(int), hipMemcpyDeviceToHost);
    for(i=0;i<bufsize;i++) {
      if(h_buf[i] != i*i)
        printf("Error: buffer[%d]=%d but expected %d\n", i, h_buf[i], i);
      }
    fflush(stdout);
  }

  //free buffers
  free(h_buf);
  hipFree(d_buf);

  MPI_Finalize();
}
Using hipcc
module load rocm/7.2.4
module load amd-llvm/7.2.4
module load openmpi

hipcc -std=c++11 --offload-arch=gfx950 -I${ROCM_PATH}/include -I${MPI_DIR}/include -c gpu-aware.cpp
hipcc -L${ROCM_PATH}/lib -lamdhip64 -L${MPI_DIR}/lib -lmpi gpu-aware.o -o gpu-aware
MPICH Example
module load rocm/7.2.4
module load amd-llvm/7.2.4
module load mpich

hipcc -std=c++11 --offload-arch=gfx950 -I${ROCM_PATH}/include -I${MPICH_DIR}/include -c gpu-aware.cpp
hipcc -L${ROCM_PATH}/lib -lamdhip64 -L${MPICH_DIR}/lib -lmpi gpu-aware.o -o gpu-aware
Using amdclang
module load rocm/7.2.4
module load amd-llvm/7.2.4
module load openmpi

amdclang++ -D__HIP_ROCclr__ -D__HIP_ARCH_GFX950__=1 -std=c++11 --rocm-path=${ROCM_PATH} --offload-arch=gfx950 -x hip -I${ROCM_PATH}/include -I${MPI_DIR}/include -c gpu-aware.cpp
amdclang++ --rocm-path=${ROCM_PATH} -L${ROCM_PATH}/lib -lamdhip64 -L${MPI_DIR}/lib -lmpi gpu-aware.o -o gpu-aware
MPICH Example
module load rocm/7.2.4
module load amd-llvm/7.2.4
module load mpich

amdclang++ -D__HIP_ROCclr__ -D__HIP_ARCH_GFX950__=1 -std=c++11 --rocm-path=${ROCM_PATH} --offload-arch=gfx950 -x hip -I${ROCM_PATH}/include -I${MPICH_DIR}/include -c gpu-aware.cpp
amdclang++ --rocm-path=${ROCM_PATH} -L${ROCM_PATH}/lib -lamdhip64 -L${MPICH_DIR}/lib -lmpi gpu-aware.o -o gpu-aware
Note
The primary required steps for GPU-aware MPI apply to both the amdclang and hipcc compilers, and those are:
Specify the ROCm and MPI include path at compile time
-I${ROCM_PATH}/include -I${MPI_DIR}/includeSpecify the ROCm and MPI library path and libraries at link time
-L${ROCM_PATH}/lib -lamdhip64 -L${MPI_DIR}/lib
MPICH_DIR can be substituted for MPI_DIR in order to use MPICH with PMI2.
Warning
You may not be able to load an MPI implementation without first loading a correctly versioned compiler.
For example:
module load rocm/7.14.0

Inactive Modules:
  1) openmpi

...
module load mpich
Lmod has detected the following error:  The following module(s) are unknown: "mpich"
...
module load amd-llvm/7.14.0
...
module load mpich

Lmod is automatically replacing "openmpi/5.0.10" with "mpich/5.0.1".
Understanding the Compatibility of Compilers, ROCm, MPI, and RCCL
Lux’s AMD Compilers, ROCm, MPI, and RCCL compatibilities are represented in Lmod.
In general, if you can module load a version, it should be compatible.
GNU compilers cannot compile HIP code, but CPU code should be ABI compatible. AMD compilers can link in compiled GNU CPU applications and libraries, even when generating GPU code.
Compatibility between MPI implementations and ROCm is required in order to use GPU-aware MPI. MPI installations on Lux are built to target specific versions of ROCm, and compatibility across multiple versions are not guaranteed. OLCF will maintain compatible default modules when possible.
RCCL is installed as part of the ROCm package/module, and the compatible version should always be included with the ROCm installation.
MPI Module |
Compatible ROCm Versions |
|---|---|
|
|
|
|
OpenMP
This section shows how to compile with OpenMP using the different compilers covered above.
Vendor |
Module |
Language |
Compiler |
OpenMP flag (CPU thread) |
|---|---|---|---|---|
AMD |
|
C
C++
Fortran
|
amdclangamdclang++amdflang |
|
GNU |
|
C
C++
Fortran
|
gccg++gfortran |
|
OpenMP GPU Offload
This section shows how to compile with OpenMP Offload using the different compilers covered above.
Vendor |
Module |
Language |
Compiler |
OpenMP flag (GPU) |
|---|---|---|---|---|
AMD |
|
C
C++
Fortran
|
amdclangamdclang++amdflang |
|
HIP
This section shows how to compile HIP codes using the AMD compilers and hipcc compiler driver.
Compiler |
Compile/Link Flags, Header Files, and Libraries |
|---|---|
|
CFLAGS = -std=c++11 -D__HIP_ROCclr__ -D__HIP_ARCH_GFX950__=1 --rocm-path=${ROCM_PATH} --offload-arch=gfx950 -x hip-I${ROCM_PATH}/includeLFLAGS = --rocm-path=${ROCM_PATH}-L${ROCM_PATH}/lib -lamdhip64 |
|
Can be used directly to compile HIP source files.
To see what is being invoked within this compiler driver, issue the command
hipcc --verboseTo explicitly target AMD MI355X, use
--offload-arch=gfx950 |
Note
hipcc requires the ROCm Toolclain, See Exposing The ROCm Toolchain to your Programming Environment
HIP + OpenMP CPU Threading
This section shows how to compile HIP + OpenMP CPU threading hybrid codes.
Vendor |
Compiler |
Compile/Link Flags, Header Files, and Libraries |
|---|---|---|
AMD |
|
CFLAGS = -std=c++11 -D__HIP_ROCclr__ -D__HIP_ARCH_GFX950__=1 --rocm-path=${ROCM_PATH} --offload-arch=gfx950 -x hip -fopenmp-I${ROCM_PATH}/includeLFLAGS = --rocm-path=${ROCM_PATH} -fopenmp-L${ROCM_PATH}/lib -lamdhip64 |
|
Can be used to directly compile HIP source files, add
-fopenmp flag to enable OpenMP threadingTo explicitly target AMD MI355X, use
--offload-arch=gfx950 |
Note
hipcc requires the ROCm Toolclain, See Exposing The ROCm Toolchain to your Programming Environment
Running Jobs
Computational work on Lux is performed by jobs. Jobs typically consist of several components:
A batch submission script
A binary executable
A set of input files for the executable
A set of output files created by the executable
In general, the process for running a job is to:
Prepare executables and input files.
Write a batch script.
Submit the batch script to the batch scheduler.
Optionally monitor the job before and during execution.
The following sections describe in detail how to create, submit, and manage jobs for execution on Lux. Lux uses SchedMD’s Slurm Workload Manager as the batch scheduling system.
Login vs Compute Nodes
Recall from the System Overview that Lux contains two node types: Login and Compute. When you connect to the system, you are placed on a login node. Login nodes are used for tasks such as code editing, compiling, etc. They are shared among all users of the system, so it is not appropriate to run tasks that are long/computationally intensive on login nodes. Users should also limit the number of simultaneous tasks on login nodes (e.g., concurrent tar commands, parallel make).
Compute nodes are the appropriate place for long-running, computationally-intensive tasks. When you start a batch job, your batch script (or interactive shell for batch-interactive jobs) runs on one of your allocated compute nodes.
Warning
Compute-intensive, memory-intensive, or other disruptive processes running on login nodes may be killed without warning.
Slurm
Lux uses SchedMD’s Slurm Workload Manager for scheduling and managing jobs. Slurm maintains similar functionality to other schedulers such as IBM’s LSF, but provides unique control of Lux’s resources through custom commands and options specific to Slurm. A few important commands can be found in the conversion table below, but please visit SchedMD’s Rosetta Stone of Workload Managers for a more complete conversion reference.
Slurm documentation for each command is available via the man utility, and on the web at https://slurm.schedmd.com/man_index.html.
Additional documentation is available at https://slurm.schedmd.com/documentation.html.
Some common Slurm commands are summarized in the table below. More complete examples are given in the Monitoring and Modifying Batch Jobs section of this guide.
Command |
Action/Task |
|---|---|
|
Show the current queue |
|
Submit a batch script to allocate a Slurm job allocation. The script contains options preceded with |
|
Submit an interactive job, where one or more job steps (i.e., |
|
Launch a parallel jobon resources allocated with
sbatch or salloc.If necessary,
srun will first create a resource |
|
Show node/partition info |
|
View accounting information for jobs/job steps |
|
Cancel a job or job step |
|
View or modify job configuration. |
General information for Node-sharing on Lux
Lux is a node-shared Slurm cluster: multiple users may run on the same physical node at the same time, as long as their resource requests do not overlap. Node sharing on Lux is facilitated through Slurm allocations of CPU cores, memory, and GPUs.
Allocations on Lux are handled in quantized pieces per GPU, where each GPU receives its closest CPUs in the nearest NUMA domain. Additionally, 375GB of memory is allocated for each GPU + NUMA.
When constructing a job on Lux, please be aware of the two-phase resource allocation steps within Slurm.
Phase |
Location |
Description |
|---|---|---|
Allocation |
Login |
Request resources with This is where you should request what you need:
|
Delegation |
Compute |
Launch work with This is where you “hand out” the resources you already requested to the actual processes (potentially with multiple |
If a job requires all the resources on a node, users can use the –exclusive flag to disable node-sharing functionality and give the job sole access to the nodes in that allocation.
Sharing Compute nodes
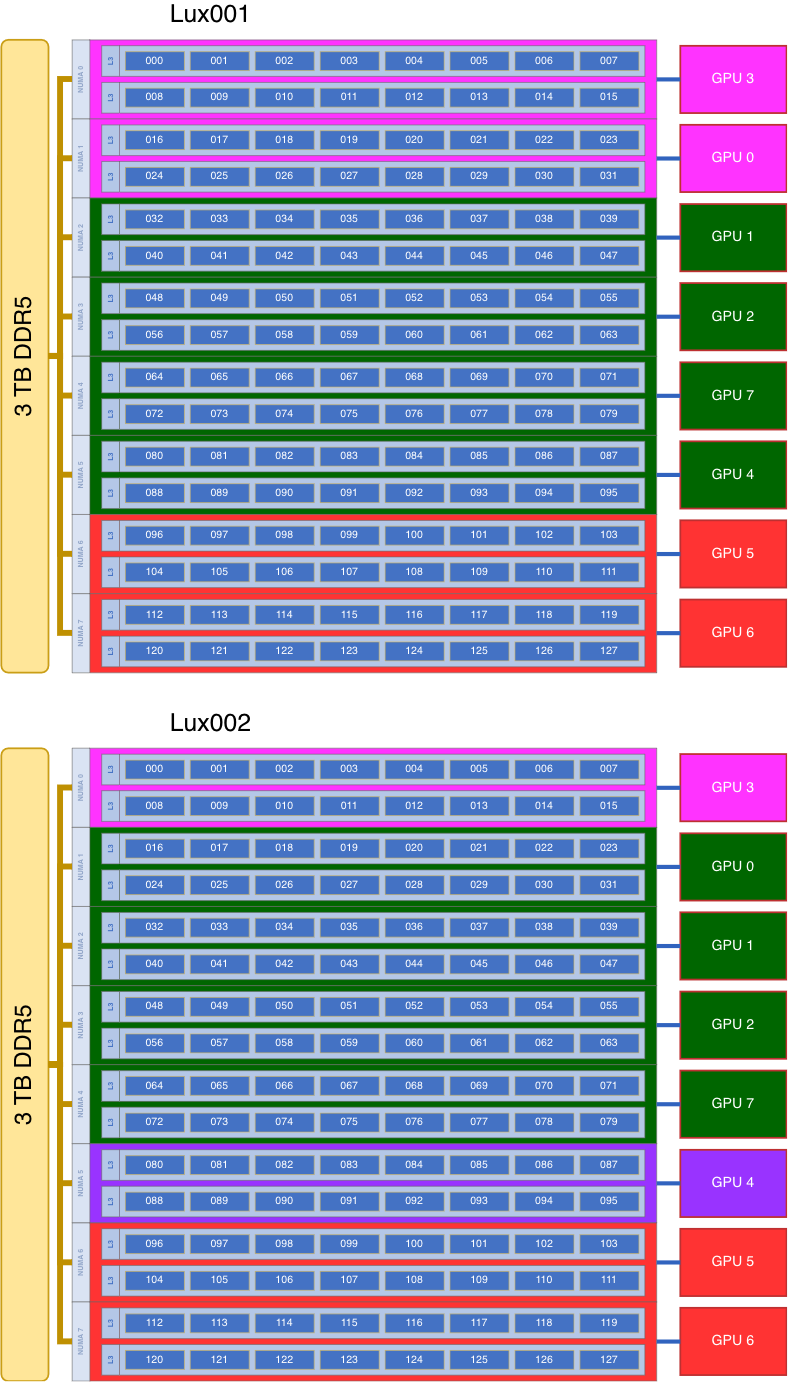
Each batch partition (compute) node has 128 cores that are allocated and quantized per GPU, 3TB of memory that is allocated and quantized per core, and 8 GPUs that can be allocated on a 1-GPU basis.
So, each GPU a user requests with --gpus will include an allocation of 16 cores and 375GB of memory.
This is functionally 1/8 of the compute node.
Example: Let us assume there are three users already running on two Lux nodes. Pink User has 3 GPUs allocated across Lux[001-002], Green User has 8 GPUs allocated across Lux[001-002], and Purple User has 1 GPU allocated on Lux002. The following job script would result in the Red User slotting into the last two GPUs on each node.
#!/bin/bash
## ALLOCATION TIME RESOURCE REQUESTS ##
#SBATCH --account <project>
#SBATCH --time 24:00:00
#SBATCH --partition batch
#SBATCH --nodes 2
#SBATCH --gpus 4

## RUNTIME RESOURCE DELEGATION ##
srun -N2 -n2 --gpus 4 --gpus-per-task=2 ./a.out
Queues on Lux
The compute nodes on Lux are in a single partition, the “batch partition” of compute nodes as described in Lux Compute Nodes.
The scheduling policies for the batch partition are described below.
Users may have up to 200 jobs queued at any time.
Batch Partition Policy (default)
Bin |
Node Count [1] |
Duration |
Policy |
|---|---|---|---|
A |
1-484 Nodes |
Duration 0-48 hr |
Max 4 jobs eligible to run (queued, accumulating priority) per user |
Warning
Node counts for HPC and Kubernetes on Lux depend on current machine split. Displayed value is the theoretical maximum.
Job Limit
Entity Level |
Max Jobs in Queue |
|---|---|
User |
200 |
Node-Hour Calculation
Jobs on Lux are scheduled in partial-node increments. The OLCF charges based on what a job makes unavailable to other users, so users are encouraged to only use what their job requires. Allocations on Lux are separate from those on Frontier and other OLCF resources.
The node-hour charge for each job will be calculated as follows:
node-hours = ({weight for resource} * {Resource used}) * ( batch job endtime - batch job starttime )
Lux weighs GPUs as 100% of the node, and each GPU comes with a quantized portion of cores (16) and RAM (375GB). The node-hour calculation is as follows:
node-hours = ( .125 * {Number of GPUs} ) * ( batch job endtime - batch job starttime )
Where batch job starttime is the time the job moves into a running state, and batch job endtime is the time the job exits a running state.
A batch job’s usage is calculated solely on requested resources, calculated after quantization, and the batch job’s start and end time. The number of CPUs or GPUs actually used within any particular allocation is not used in the calculation. For example, if a job requests 6 GPUs through the batch script, runs for (1) hour, uses only (8) CPU cores, and (1) GPU, the job will still be charged for .75 node-hours. Similarly, if a job requests (1) hour, but exits after (0.5) hours, then the job will only be charged for the (0.5) hours.
e.g. node-hours = ( .125 * 6 ) * ( .5 ) = .375
Batch Scripts
The most common way to interact with the batch system is via batch scripts. A batch script is simply a shell script with added directives to request various resources from or provide certain information to the scheduling system. Aside from these directives, the batch script is simply the series of commands needed to set up and run your job.
To submit a batch script, use the command sbatch myjob.sl
Consider the following batch script:
 1#!/bin/bash
 2#SBATCH -A ABC123
 3#SBATCH -J RunSim123
 4#SBATCH -o %x-%j.out
 5#SBATCH -t 1:00:00
 6#SBATCH -p batch
 7#SBATCH -N 4
 8#SBATCH --gpus 4
 9
10cd $MEMBERWORK/abc123/Run.456
11cp $PROJWORK/abc123/RunData/Input.456 ./Input.456
12srun ...
13cp my_output_file $PROJWORK/abc123/RunData/Output.456
In the script, Slurm directives are preceded by #SBATCH, making them appear as comments to the shell. Slurm looks for these directives through the first non-comment, non-whitespace line. Options after that will be ignored by Slurm (and the shell).
Line |
Description |
|---|---|
1 |
Shell interpreter line |
2 |
OLCF project to charge |
3 |
Job name |
4 |
Job standard output file ( |
5 |
Walltime requested (in |
6 |
Partition (queue) to use |
7 |
Number of compute nodes requested |
8 |
Number of GPUs requested |
9 |
Blank line |
10 |
Change into the run directory |
11 |
Copy the input file into place |
12 |
Run the job ( add layout details ) |
13 |
Copy the output file to an appropriate location. |
Example Compile and Run
The following will compile the hello_jobstep application found on ORNL’s GitLab.
module load rocm/7.2.4
module load amd-llvm/7.2.4
module load openmpi

hipcc -std=c++11 -fopenmp --offload-arch=gfx950 -I${ROCM_PATH}/include -I${MPI_DIR}/include -c hello_jobstep.cpp
hipcc -fopenmp -L${ROCM_PATH}/lib -lamdhip64 -L${MPI_DIR}/lib -lmpi hello_jobstep.o -o hello_jobstep
The following can run hello_jobstep:
#!/bin/bash
#SBATCH --account stf007
#SBATCH --time 05:00
#SBATCH --partition batch
#SBATCH --nodes 1
#SBATCH --gpus 8
#SBATCH --job-name hello_jobstep
#SBATCH --output %j-%x.out
#SBATCH --error %j-%x.err

module load rocm
module load openmpi

OMP_NUM_THREADS=1 srun -N1 -n4 -c32 -G8 --gpu-bind=closest ./hello_jobstep
Interactive Jobs
Most users will find batch jobs an easy way to use the system, as they allow you to “hand off” a job to the scheduler, allowing them to focus on other tasks while their job waits in the queue and eventually runs. Occasionally, it is necessary to run interactively, especially when developing, testing, modifying or debugging a code.
Since all compute resources are managed and scheduled by Slurm, it is not possible to simply log into the system and immediately begin running parallel codes interactively.
Rather, you must request the appropriate resources from Slurm and, if necessary, wait for them to become available. This is done through an “interactive batch” job.
Interactive batch jobs are submitted with the salloc command. Resources are requested via the same options that are passed via #SBATCH in a regular batch script (but without the #SBATCH prefix).
For example, to request an interactive batch job with the same resources that the batch script above requests, you would use salloc -A ABC123 -J RunSim123 -t 1:00:00 -p batch -N 4 --gpus 8.
Note there is no option for an output file…you are running interactively, so standard output and standard error will be displayed to the terminal.
Warning
Indicating your shell in your salloc command is NOT recommended (e.g., salloc ... /bin/bash). Doing so causes your compute job to start on a login node by default rather than automatically moving you to a compute node.
Common Slurm Options
The table below summarizes options for submitted jobs.
Unless otherwise noted, they can be used for either batch scripts or interactive batch jobs.
For scripts, they can be added on the sbatch command line or as a #SBATCH directive in the batch script.
(If they’re specified in both places, the command line takes precedence.)
This is only a subset of all available options.
Check the Slurm Man Pages for a more complete list.
Option |
Example Usage |
Description |
|---|---|---|
|
|
Specifies the project to which the job should be charged. |
|
|
Request 128 nodes for the job. |
|
|
Specify the default number of tasks in each |
|
|
Requests 8 GPUs (total) for the job. |
|
|
Requests 1 GPU per task. |
|
|
Request a walltime of 4 hours. A walltime request is the maximum amount of time a job will run and can be specified as minutes, hours:minutes, hours:minutes:seconds, days-hours, days-hours:minutes, or days-hours:minutes:seconds |
|
|
Specify job dependency (in this example, this job cannot start until job 12345 exits with an exit code of 0. See the Job Dependency section for more information) |
|
|
Specify the job name. (this will show up in queue listings) |
|
|
File where job STDOUT will be directed (%j will be replaced with the job ID). If no |
|
|
File where job STDERR will be directed (%j will be replaced with the job ID). If no |
|
|
Send email for certain job actions. Can be a comma-separated list. Actions include BEGIN, END, FAIL, REQUEUE, INVALID_DEPEND, STAGE_OUT, ALL, and more. |
|
|
Email address to be used for notifications. |
|
|
Instructs Slurm to run a job on nodes that are part of the specified reservation. |
|
|
Send the given signal to a job the specified time (in seconds) seconds before the job reaches its walltime. The signal can be by name or by number (i.e. both 10 and USR1 would send SIGUSR1). Signaling a job can be used, for example, to force a job to write a checkpoint just before Slurm kills the job (note that this option only sends the signal; the user must still make sure their job script traps the signal and handles it in the desired manner). When used with |
|
|
Request a specific compute partition for the job. (default is |
|
|
Request a “Quality of Service” (QOS) for the job. (default is |
Warning
Setting --threads-per-core > 1 on Lux will not have an effect and will result in submissions being rejected.
The default is --threads-per-core=1 because Lux does not have simultaneous multithreading (SMT) enabled, and values greater than 1 are invalid.
Slurm Environment Variables
Slurm reads a number of environment variables, many of which can provide the same information as the job options noted above. We recommend using the job options rather than environment variables to specify job options, as it allows you to have everything self-contained within the job submission script (rather than having to remember what options you set for a given job).
Slurm also provides a number of environment variables within your running job. The following table summarizes those that may be particularly useful within your job (e.g., for naming output log files):
Variable |
Description |
|---|---|
|
The directory from which the batch job was submitted. By default, a new job starts
in your home directory. You can get back to the directory of job submission with
|
|
The job’s full identifier. A common use for |
|
The number of nodes requested. |
|
The job name supplied by the user. |
|
The list of nodes assigned to the job. |
Job States
A job will transition through several states during its lifetime. Common ones include:
State Code |
State |
Description |
|---|---|---|
CA |
Canceled |
The job was canceled (could’ve been by the user or an administrator) |
CD |
Completed |
The job completed successfully (exit code 0) |
CG |
Completing |
The job is in the process of completing (some processes may still be running) |
PD |
Pending |
The job is waiting for resources to be allocated |
R |
Running |
The job is currently running |
Job Reason Codes
In addition to state codes, jobs that are pending will have a “reason code” to explain why the job is pending. Completed jobs will have a reason describing how the job ended. Some codes you might see include:
Reason |
Meaning |
|---|---|
Dependency |
Job has dependencies that have not been met |
JobHeldUser |
Job is held at user’s request |
JobHeldAdmin |
Job is held at system administrator’s request |
Priority |
Other jobs with higher priority exist for the partition/reservation |
Reservation |
The job is waiting for its reservation to become available |
AssocMaxJobsLimit |
The job is being held because the user/project has hit the limit on running jobs |
ReqNodeNotAvail |
The requested a particular node, but it’s currently unavailable (it’s in use, reserved, down, draining, etc.) |
JobLaunchFailure |
Job failed to launch (could due to system problems, invalid program name, etc.) |
NonZeroExitCode |
The job exited with some code other than 0 |
Many other states and job reason codes exist.
For a more complete description, see the squeue man page (either on the system or online).
System Reservation Policy
Projects may request to reserve a set of nodes for a period of time by contacting help@olcf.ornl.gov. If the reservation is granted, the reserved nodes will be blocked from general use for a given period of time. Only users that have been authorized to use the reservation can utilize those resources. Since no other users can access the reserved resources, it is crucial that groups given reservations take care to ensure the utilization on those resources remains high. To prevent reserved resources from remaining idle for an extended period of time, reservations are monitored for inactivity.
The requesting project’s allocation is charged according to the time window granted, regardless of actual utilization. For example, an 8-hour, 200 node reservation on Lux would be equivalent to using 1,600 Lux node-hours of a project’s allocation.
Note
Reservations should not be confused with priority requests. If quick turnaround is needed for a few jobs or for a period of time, a priority boost should be requested. A reservation should only be requested if users need to guarantee availability of a set of nodes at a given time, such as for a live demonstration at a conference.
Job Dependencies
Oftentimes, a job will need data from some other job in the queue, but it’s nonetheless convenient to submit the second job before the first finishes.
Slurm allows you to submit a job with constraints that will keep it from running until these dependencies are met.
These are specified with the -d option to Slurm.
Common dependency flags are summarized below.
In each of these examples, only a single jobid is shown but you can specify multiple job IDs as a colon-delimited list (i.e. #SBATCH -d afterok:12345:12346:12346).
For the after dependency, you can optionally specify a +time value for each jobid.
Flag |
Meaning (for the dependent job) |
|---|---|
|
The job can start after the specified jobs start or are canceled.
The optional |
|
The job can start after the specified jobs have ended (regardless of exit state) |
|
The job can start after the specified jobs terminate in a failed (non-zero) state |
|
The job can start after the specified jobs complete successfully (i.e. zero exit code) |
|
Job can begin after any previously-launched job with the same name and from the same user have completed. In other words, serialize the running jobs based on username+jobname pairs. |
Monitoring and Modifying Batch Jobs
scontrol hold and scontrol release: Holding and Releasing Jobs
Sometimes you may need to place a hold on a job to keep it from starting.
For example, you may have submitted it assuming some needed data was in place but later realized that data is not yet available.
This can be done with the scontrol hold command.
Later, when the data is ready, you can release the job (i.e. tell the system that it’s now OK to run the job) with the scontrol release command.
For example:
|
Place job 12345 on hold |
|
Release job 12345 (i.e. tell the system it’s OK to run it) |
scontrol update: Changing Job Parameters
There may also be occasions where you want to modify a job that’s waiting in the queue.
For example, perhaps you requested 200 nodes but later realized this is a different data set and only needs 100 nodes.
You can use the scontrol update command for this.
For example:
|
Change job 12345’s node request to 100 nodes |
|
Change job 12345’s max walltime to 4 hours |
scancel: Cancel or Signal a Job
In addition to the --signal option for the sbatch/salloc commands described above, the scancel command can be used to manually signal a job.
Typically, this is used to remove a job from the queue.
In this use case, you do not need to specify a signal and can simply provide the jobid (i.e. scancel 12345).
If you want to send some other signal to the job, use scancel the with the -s option.
The -s option allows signals to be specified either by number or by name.
Thus, if you want to send SIGUSR1 to a job, you would use scancel -s 10 12345 or scancel -s USR1 12345.
squeue: View the Queue
The squeue command is used to show the batch queue.
You can filter the level of detail through several command-line options.
For example:
|
Show all jobs currently in the queue |
|
Show all of your jobs currently in the queue |
sacct: Get Job Accounting Information
The sacct command gives detailed information about jobs currently in the queue and recently-completed jobs.
You can also use it to see the various steps within a batch jobs.
|
Show all jobs ( |
|
Show all of your jobs, and show the individual steps (since there was no |
|
Show all job steps that are part of job 12345 |
|
Show all of your jobs since 1 PM on October 1, 2026 using a particular output format |
scontrol show job: Get Detailed Job Information
In addition to holding, releasing, and updating the job, the scontrol command can show detailed job information via the show job subcommand.
For example, scontrol show job 12345.
srun: Run Jobs/Steps
The default job launcher for Lux is srun .
The srun command is used to execute an MPI or RCCL-enabled binary on one or more compute nodes in parallel.
Srun Format
srun [OPTIONS... [executable [args...]]]
Single Command (non-interactive)
$ srun --account <project_id> --time 00:05:00 --partition <partition> --nodes 2 --ntasks 4 --ntasks-per-node=2 --gpus-per-task=1 ./a.out
<output printed to terminal>
The job name and output options have been removed since stdout/stderr are typically desired in the terminal window in this usage mode.
srun accepts the following common options:
|
Number of nodes |
|
Total number of MPI tasks (default is 1) |
|
Logical cores per MPI task (default is 1)
This is equivalent to physical cores per task
By default, when
-c > 1, additional cores per task are distributed within one L3 region first before filling a different L3 region. |
|
Bind tasks to CPUs.
cores - Automatically generate masks binding tasks to physical cores. |
|
Specifies the distribution of MPI ranks across compute nodes, sockets (L3 regions), and cores, respectively.
The default values are
block:cyclic:cyclic, see man srun for more information.Currently, the distribution setting for cores (the third “<value>” entry) has no effect on Lux.
|
|
If used without
-n: requests that a specific number of tasks be invoked on each node.If used with
-n: treated as a maximum count of tasks per node. |
|
Specify the number of GPUs required for the job (total GPUs across all nodes). |
|
Specify the number of GPUs per task required for the job. Requires an explicit task count ( |
|
Binds each task to the GPU which is on the same NUMA domain as the CPU core the MPI rank is running on. |
|
Bind tasks to specific GPUs by setting GPU masks on tasks (or ranks) as specified where |
|
Request that there are ntasks tasks invoked for every GPU. |
|
Enable tasks sharing GPU resources. This reduces overhead in GPU-GPU, process-process communications.
This setting may lead to drastically improved performance.
|
Process and Thread Mapping Examples
This section describes how to map processes (e.g., MPI ranks) and process threads (e.g., OpenMP threads) to the CPUs, GPUs, and NICs on Lux.
Users are highly encouraged to use the CPU- and GPU-mapping programs used in
the following sections to check their understanding of the job steps (i.e.,
srun commands) they intend to use in their actual jobs.
For the CPU Mapping, Multithreading, and GPU Mapping sections:
An MPI+OpenMP+HIP “Hello, World” program (hello_jobstep) will be used to clarify the GPU and CPU mappings.
Additionally, it may be helpful to cross reference the Lux node diagram
hello_jobstep output
Before jumping into the examples, it is helpful to understand the output from the hello_jobstep program:
ID |
Description |
|---|---|
|
MPI rank ID |
|
OpenMP thread ID |
|
CPU hardware thread the MPI rank or OpenMP thread ran on |
|
Compute node the MPI rank or OpenMP thread ran on |
|
GPU ID the MPI rank or OpenMP thread had access to (This is the node-level, or global, GPU ID as shown in the Lux node diagram)
NOTE: This is read from
ROCR_VISIBLE_DEVICES. If this variable is not set, the value of GPU_ID will be set to N/A by the programNOTE: On Lux, this currently reads the same as
RT_GPU_ID |
|
The runtime GPU ID (This is the GPU ID as seen from the HIP runtime - e.g., as reported by
hipGetDevice)NOTE: The HIP runtime relabels the GPUs each rank can access starting at 0
|
|
The physical Bus ID associated with a GPU
(The Bus ID can be used to e.g., confirm unique GPUs are being used)
|
CPU Mapping
This subsection covers how to map tasks to the CPU without the presence of additional threads (i.e., solely MPI tasks – no additional OpenMP threads).
The intent with both of the following examples is to launch 8 MPI ranks across
the node where each rank is assigned its own logical (and, in this case,
physical) core. Using the -m distribution flag, we will cover two common
approaches to assign the MPI ranks – in a “round-robin” (cyclic)
configuration and in a “packed” (block) configuration. Slurm’s
Interactive Jobs method was used to request an allocation of 1
compute node with 2 GPUs for these examples: salloc -A <project_id> -t 30 -p <parition>
-N 1 --gpus 2
Note
There are many different ways users might choose to perform these mappings,
so users are encouraged to clone the hello_jobstep program and test whether
or not processes and threads are running where intended.
8 MPI Ranks (round-robin)
Assigning MPI ranks in a “round-robin” (cyclic) manner across NUMA
domains (sockets) is the default behavior on Lux. This mode will assign
consecutive MPI tasks to different sockets before it tries to “fill up” a
socket.
Recall that the -m flag behaves like: -m <node distribution>:<socket
distribution>. Hence, the key setting to achieving the round-robin nature is
the -m block:cyclic flag, specifically the cyclic setting provided for
the “socket distribution”. This ensures that the MPI tasks will be distributed
across sockets in a cyclic (round-robin) manner.
The below srun command will achieve the intended 8 MPI “round-robin” layout:
$ export OMP_NUM_THREADS=1
$ srun -N1 -n8 -c1 --cpu-bind=threads -m block:cyclic ./hello_jobstep | sort | cut -d "-" -f 1-4
MPI 000 - OMP 000 - HWT 000 - Node lux089
MPI 001 - OMP 000 - HWT 016 - Node lux089
MPI 002 - OMP 000 - HWT 001 - Node lux089
MPI 003 - OMP 000 - HWT 017 - Node lux089
MPI 004 - OMP 000 - HWT 002 - Node lux089
MPI 005 - OMP 000 - HWT 018 - Node lux089
MPI 006 - OMP 000 - HWT 003 - Node lux089
MPI 007 - OMP 000 - HWT 019 - Node lux089
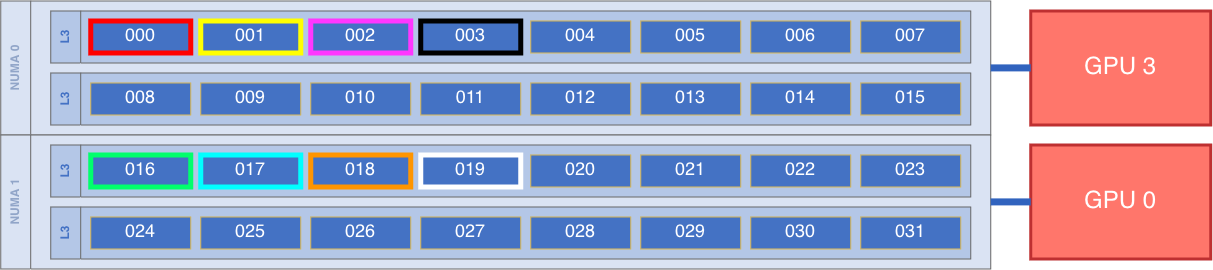
Breaking down the srun command, we have:
-N1: indicates we are using 1 node-n8: indicates we are launching 8 MPI tasks-c1: indicates we are assigning 1 logical core per MPI task. In this case, because of--threads-per-core=1, this also means 1 physical core per MPI task.--cpu-bind=threads: binds tasks to threads--threads-per-core=1: use a maximum of 1 hardware thread per physical core (i.e., only use 1 logical core per physical core)-m block:cyclic: distribute the tasks in a block layout across nodes (default), and in a cyclic (round-robin) layout across L3 sockets./hello_jobstep: launches the “hello_jobstep” executable| sort: sorts the output| cut ...: gets only output we care about for CPU tasks
Note
Although the above command used the default settings -c1,
--cpu-bind=threads, --threads-per-core=1 and -m block:cyclic, it is
always better to be explicit with your srun command to have more control
over your node layout. The above command is equivalent to srun -N1 -n8.
As you can see in the node diagram above, this results in the 8 MPI tasks (outlined in different colors) being distributed “vertically” across NUMA sockets initially, then “horizontally” across cores.
7 MPI Ranks (packed)
Instead, you can assign MPI ranks so that the L3 regions are filled in a
“packed” (block) manner. This mode will assign consecutive MPI tasks to
the same L3 region (socket) until it is “filled up” or “packed” before
assigning a task to a different socket.
Recall that the -m flag behaves like: -m <node distribution>:<socket
distribution>. Hence, the key setting to achieving the round-robin nature is
the -m block:block flag, specifically the block setting provided for
the “socket distribution”. This ensures that the MPI tasks will be distributed
in a packed manner.
The below srun command will achieve the intended 7 MPI “packed” layout:
$ export OMP_NUM_THREADS=1
$ srun -N1 -n7 -c1 --cpu-bind=threads -m block:block ./hello_jobstep | sort | cut -d "-" -f 1-4
MPI 000 - OMP 000 - HWT 000 - Node lux089
MPI 001 - OMP 000 - HWT 001 - Node lux089
MPI 002 - OMP 000 - HWT 002 - Node lux089
MPI 003 - OMP 000 - HWT 003 - Node lux089
MPI 004 - OMP 000 - HWT 004 - Node lux089
MPI 005 - OMP 000 - HWT 005 - Node lux089
MPI 006 - OMP 000 - HWT 006 - Node lux089
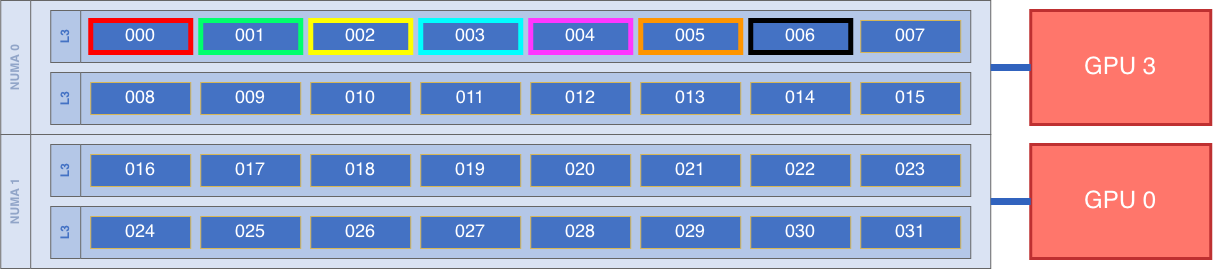
Breaking down the srun command, the only difference than the previous example is:
-m block:block: distribute the tasks in a block layout across nodes (default), and in a block (packed) socket layout
As you can see in the node diagram above, this results in the 7 MPI tasks (outlined in different colors) being distributed “horizontally” within a socket, rather than being spread across different L3 sockets like with the previous example.
Multithreading
Because a Lux compute node has one hardware thread available per core (1 logical cores per physical core), multithreaded applications (e.g., with OpenMP threads) will run on individual cores assigned to a task.
The following examples cover multithreading with hybrid MPI+OpenMP applications.
In these examples, Slurm’s Interactive Jobs method was used to request an allocation of 1 compute node:
salloc -A <project_id> -t 30 -p <parition>
-N 1 --gpus 2
Note
There are many different ways users might choose to perform these mappings,
so users are encouraged to clone the hello_jobstep program and test whether
or not processes and threads are running where intended.
2 MPI ranks - each with 2 OpenMP threads
In this example, the intent is to launch 2 MPI ranks, each of which spawn 2 OpenMP threads, and have all of the 4 OpenMP threads run on different physical CPU cores.
First (INCORRECT) attempt
To set the number of OpenMP threads spawned per MPI rank, the
OMP_NUM_THREADS environment variable can be used. To set the number of MPI
ranks launched, the srun flag -n can be used.
$ export OMP_NUM_THREADS=2
$ srun -N1 -n2 ./hello_jobstep | sort | cut -d "-" -f 1-4

MPI 000 - OMP 000 - HWT 015 - Node lux089
MPI 000 - OMP 001 - HWT 007 - Node lux089
MPI 001 - OMP 000 - HWT 031 - Node lux089
MPI 001 - OMP 001 - HWT 017 - Node lux089
The most notable features are the placement of the jobs at the end of their respective NUMA sockets, and multithreaded cores landing in non-determined locations.
The problem here arises from two default settings; 1) each MPI rank is only
allocated 1 core (-c 1) and, 2) only 1 hardware thread per physical CPU core is enabled (--threads-per-core=1).
When using --threads-per-core=1 and --cpu-bind=threads (the default setting), 1 logical core in -c is equivalent to 1 physical core.
So in this case, each MPI rank only has 1 physical core (with 1 hardware thread) to run on -
including any threads the process spawns - hence the undesired behavior.
Second (CORRECT) attempt
Recall that in this scenario, because of the --threads-per-core=1 setting, 1 logical core is equivalent to 1 physical core when using -c.
Therefore, in order for each OpenMP thread to run on its own physical CPU core, each MPI rank should be given 2 physical CPU cores (-c 2).
Now the OpenMP threads will be mapped to unique hardware threads on separate physical CPU cores.
$ export OMP_NUM_THREADS=2
$ srun -N1 -n2 -c2 ./hello_jobstep | sort | cut -d "-" -f 1-4

MPI 000 - OMP 000 - HWT 001 - Node lux089
MPI 000 - OMP 001 - HWT 000 - Node lux089
MPI 001 - OMP 000 - HWT 017 - Node lux089
MPI 001 - OMP 001 - HWT 016 - Node lux089
Now the output shows that each OpenMP thread ran on its own physical CPU core. More specifically (see the Lux Compute Node diagram), OpenMP thread 000 of MPI rank 000 ran on logical core 001 (i.e., physical CPU core 01), OpenMP thread 001 of MPI rank 000 ran on logical core 000 (i.e., physical CPU core 00), OpenMP thread 000 of MPI rank 001 ran on logical core 017 (i.e., physical CPU core 17), and OpenMP thread 001 of MPI rank 001 ran on logical core 016 (i.e., physical CPU core 16) - as intended.
GPU Mapping
In this sub-section, an MPI+OpenMP+HIP “Hello, World” program (hello_jobstep)
will be used to show how to make only specific GPUs available to processes - which we will refer to as “GPU mapping”.
This time, Slurm’s Interactive Jobs method was used to request an allocation of 2 compute nodes for these examples:
salloc -A <project_id> -t 30 -p <parition> -N 2 --gpus 16.
The CPU mapping part of this example is very similar to the example used above in the Multithreading sub-section, so the
focus here will be on the GPU mapping part.
In general, GPU mapping can be accomplished in different ways.
For example, an application might map GPUs to MPI ranks programmatically within the code using, say, hipSetDevice.
In this case, there might not be a need to map GPUs using Slurm (since it can be done in the code itself).
However, many applications expect only 1 GPU to be available to each rank.
It is this latter case that the following examples refer to.
Additionally, this section is only relevant when requesting more than one GPU.
If your job allocation requests a single GPU, Slurm will automatically allocate the nearest NUMA region.
Also, recall that the CPU cores in a given NUMA region are connected to a specific GPU (see the Lux Node Diagram and subsequent Note on NUMA domains for more information). In the examples below, knowledge of these details will be assumed.
Note
There are many different ways users might choose to perform these mappings,
so users are encouraged to clone the hello_jobstep program and test whether
processes and threads are mapped to the CPU cores and GPUs as intended..
Warning
Due to the unique architecture of Lux compute nodes and the way that Slurm currently allocates GPUs and CPU cores to job steps, it is suggested that all GPUs on an allocated node are allocated to the job step to ensure that optimal bindings are possible.
Mapping 1 GPU per task
In the following examples, 1 GPU will be mapped to each MPI rank (and any OpenMP threads it might spawn).
The relevant srun options for GPU mapping used in these examples are:
Slurm Option |
Description |
|---|---|
|
Specify the number of GPUs required for the job on each task. This option requires an explicit task count, e.g. -n |
|
Bind each task to the GPU(s) which are closest. Here, closest refers to the GPU connected to the NUMA where the MPI rank is mapped to. |
8 MPI ranks - each with 8 CPU cores and 1 GPU (single-node)
The most common use case for running on Lux is to run with 8 MPI ranks per node, where each rank has access to 16 physical CPU cores and 1 GPU. The MPI rank can use the 16 CPU cores to e.g., spawn OpenMP threads on (if OpenMP CPU threading is available in the application). Here is an example of such a job step on a single node (limited to 8 cores per task):
$ OMP_NUM_THREADS=8 srun -N1 -n8 -c8 --gpus 8 --gpus-per-task=1 --gpu-bind=closest ./hello_jobstep | sort
MPI 000 - OMP 000 - HWT 007 - Node lux001 - RT_GPU_ID 0 - GPU_ID 0 - Bus_ID 7c
MPI 000 - OMP 001 - HWT 000 - Node lux001 - RT_GPU_ID 0 - GPU_ID 0 - Bus_ID 7c
MPI 000 - OMP 002 - HWT 001 - Node lux001 - RT_GPU_ID 0 - GPU_ID 0 - Bus_ID 7c
MPI 000 - OMP 003 - HWT 002 - Node lux001 - RT_GPU_ID 0 - GPU_ID 0 - Bus_ID 7c
MPI 000 - OMP 004 - HWT 003 - Node lux001 - RT_GPU_ID 0 - GPU_ID 0 - Bus_ID 7c
MPI 000 - OMP 005 - HWT 005 - Node lux001 - RT_GPU_ID 0 - GPU_ID 0 - Bus_ID 7c
MPI 000 - OMP 006 - HWT 006 - Node lux001 - RT_GPU_ID 0 - GPU_ID 0 - Bus_ID 7c
MPI 000 - OMP 007 - HWT 004 - Node lux001 - RT_GPU_ID 0 - GPU_ID 0 - Bus_ID 7c
MPI 001 - OMP 000 - HWT 023 - Node lux001 - RT_GPU_ID 0 - GPU_ID 0 - Bus_ID 09
MPI 001 - OMP 001 - HWT 016 - Node lux001 - RT_GPU_ID 0 - GPU_ID 0 - Bus_ID 09
MPI 001 - OMP 002 - HWT 017 - Node lux001 - RT_GPU_ID 0 - GPU_ID 0 - Bus_ID 09
MPI 001 - OMP 003 - HWT 018 - Node lux001 - RT_GPU_ID 0 - GPU_ID 0 - Bus_ID 09
MPI 001 - OMP 004 - HWT 020 - Node lux001 - RT_GPU_ID 0 - GPU_ID 0 - Bus_ID 09
MPI 001 - OMP 005 - HWT 021 - Node lux001 - RT_GPU_ID 0 - GPU_ID 0 - Bus_ID 09
MPI 001 - OMP 006 - HWT 022 - Node lux001 - RT_GPU_ID 0 - GPU_ID 0 - Bus_ID 09
MPI 001 - OMP 007 - HWT 019 - Node lux001 - RT_GPU_ID 0 - GPU_ID 0 - Bus_ID 09
MPI 002 - OMP 000 - HWT 039 - Node lux001 - RT_GPU_ID 0 - GPU_ID 0 - Bus_ID 19
MPI 002 - OMP 001 - HWT 032 - Node lux001 - RT_GPU_ID 0 - GPU_ID 0 - Bus_ID 19
MPI 002 - OMP 002 - HWT 033 - Node lux001 - RT_GPU_ID 0 - GPU_ID 0 - Bus_ID 19
MPI 002 - OMP 003 - HWT 034 - Node lux001 - RT_GPU_ID 0 - GPU_ID 0 - Bus_ID 19
MPI 002 - OMP 004 - HWT 035 - Node lux001 - RT_GPU_ID 0 - GPU_ID 0 - Bus_ID 19
MPI 002 - OMP 005 - HWT 036 - Node lux001 - RT_GPU_ID 0 - GPU_ID 0 - Bus_ID 19
MPI 002 - OMP 006 - HWT 037 - Node lux001 - RT_GPU_ID 0 - GPU_ID 0 - Bus_ID 19
MPI 002 - OMP 007 - HWT 038 - Node lux001 - RT_GPU_ID 0 - GPU_ID 0 - Bus_ID 19
MPI 003 - OMP 000 - HWT 055 - Node lux001 - RT_GPU_ID 0 - GPU_ID 0 - Bus_ID 69
MPI 003 - OMP 001 - HWT 048 - Node lux001 - RT_GPU_ID 0 - GPU_ID 0 - Bus_ID 69
MPI 003 - OMP 002 - HWT 049 - Node lux001 - RT_GPU_ID 0 - GPU_ID 0 - Bus_ID 69
MPI 003 - OMP 003 - HWT 050 - Node lux001 - RT_GPU_ID 0 - GPU_ID 0 - Bus_ID 69
MPI 003 - OMP 004 - HWT 051 - Node lux001 - RT_GPU_ID 0 - GPU_ID 0 - Bus_ID 69
MPI 003 - OMP 005 - HWT 052 - Node lux001 - RT_GPU_ID 0 - GPU_ID 0 - Bus_ID 69
MPI 003 - OMP 006 - HWT 053 - Node lux001 - RT_GPU_ID 0 - GPU_ID 0 - Bus_ID 69
MPI 003 - OMP 007 - HWT 054 - Node lux001 - RT_GPU_ID 0 - GPU_ID 0 - Bus_ID 69
MPI 004 - OMP 000 - HWT 071 - Node lux001 - RT_GPU_ID 0 - GPU_ID 0 - Bus_ID fb
MPI 004 - OMP 001 - HWT 064 - Node lux001 - RT_GPU_ID 0 - GPU_ID 0 - Bus_ID fb
MPI 004 - OMP 002 - HWT 065 - Node lux001 - RT_GPU_ID 0 - GPU_ID 0 - Bus_ID fb
MPI 004 - OMP 003 - HWT 066 - Node lux001 - RT_GPU_ID 0 - GPU_ID 0 - Bus_ID fb
MPI 004 - OMP 004 - HWT 068 - Node lux001 - RT_GPU_ID 0 - GPU_ID 0 - Bus_ID fb
MPI 004 - OMP 005 - HWT 069 - Node lux001 - RT_GPU_ID 0 - GPU_ID 0 - Bus_ID fb
MPI 004 - OMP 006 - HWT 070 - Node lux001 - RT_GPU_ID 0 - GPU_ID 0 - Bus_ID fb
MPI 004 - OMP 007 - HWT 067 - Node lux001 - RT_GPU_ID 0 - GPU_ID 0 - Bus_ID fb
MPI 005 - OMP 000 - HWT 087 - Node lux001 - RT_GPU_ID 0 - GPU_ID 0 - Bus_ID 86
MPI 005 - OMP 001 - HWT 080 - Node lux001 - RT_GPU_ID 0 - GPU_ID 0 - Bus_ID 86
MPI 005 - OMP 002 - HWT 081 - Node lux001 - RT_GPU_ID 0 - GPU_ID 0 - Bus_ID 86
MPI 005 - OMP 003 - HWT 082 - Node lux001 - RT_GPU_ID 0 - GPU_ID 0 - Bus_ID 86
MPI 005 - OMP 004 - HWT 083 - Node lux001 - RT_GPU_ID 0 - GPU_ID 0 - Bus_ID 86
MPI 005 - OMP 005 - HWT 084 - Node lux001 - RT_GPU_ID 0 - GPU_ID 0 - Bus_ID 86
MPI 005 - OMP 006 - HWT 085 - Node lux001 - RT_GPU_ID 0 - GPU_ID 0 - Bus_ID 86
MPI 005 - OMP 007 - HWT 086 - Node lux001 - RT_GPU_ID 0 - GPU_ID 0 - Bus_ID 86
MPI 006 - OMP 000 - HWT 103 - Node lux001 - RT_GPU_ID 0 - GPU_ID 0 - Bus_ID 99
MPI 006 - OMP 001 - HWT 096 - Node lux001 - RT_GPU_ID 0 - GPU_ID 0 - Bus_ID 99
MPI 006 - OMP 002 - HWT 097 - Node lux001 - RT_GPU_ID 0 - GPU_ID 0 - Bus_ID 99
MPI 006 - OMP 003 - HWT 098 - Node lux001 - RT_GPU_ID 0 - GPU_ID 0 - Bus_ID 99
MPI 006 - OMP 004 - HWT 099 - Node lux001 - RT_GPU_ID 0 - GPU_ID 0 - Bus_ID 99
MPI 006 - OMP 005 - HWT 100 - Node lux001 - RT_GPU_ID 0 - GPU_ID 0 - Bus_ID 99
MPI 006 - OMP 006 - HWT 101 - Node lux001 - RT_GPU_ID 0 - GPU_ID 0 - Bus_ID 99
MPI 006 - OMP 007 - HWT 102 - Node lux001 - RT_GPU_ID 0 - GPU_ID 0 - Bus_ID 99
MPI 007 - OMP 000 - HWT 119 - Node lux001 - RT_GPU_ID 0 - GPU_ID 0 - Bus_ID e6
MPI 007 - OMP 001 - HWT 112 - Node lux001 - RT_GPU_ID 0 - GPU_ID 0 - Bus_ID e6
MPI 007 - OMP 002 - HWT 113 - Node lux001 - RT_GPU_ID 0 - GPU_ID 0 - Bus_ID e6
MPI 007 - OMP 003 - HWT 114 - Node lux001 - RT_GPU_ID 0 - GPU_ID 0 - Bus_ID e6
MPI 007 - OMP 004 - HWT 115 - Node lux001 - RT_GPU_ID 0 - GPU_ID 0 - Bus_ID e6
MPI 007 - OMP 005 - HWT 116 - Node lux001 - RT_GPU_ID 0 - GPU_ID 0 - Bus_ID e6
MPI 007 - OMP 006 - HWT 117 - Node lux001 - RT_GPU_ID 0 - GPU_ID 0 - Bus_ID e6
MPI 007 - OMP 007 - HWT 118 - Node lux001 - RT_GPU_ID 0 - GPU_ID 0 - Bus_ID e6
As has been pointed out previously in the Lux documentation, notice that GPUs are NOT mapped to MPI ranks in sequential order
(e.g., MPI rank 0 is mapped to physical CPU cores 0-15 and GPU 3 - bus 7c, MPI rank 1 is mapped to physical CPU cores 16-31 and GPU 0 - bus 09),
but this IS expected behavior.
It is simply a consequence of the Lux node architectures as shown in the Lux Node Diagram
and subsequent Note on NUMA domains.
1 MPI rank with 8 CPU cores and 1 GPU (single-node)
When new users first attempt to run their application on Lux, they often want to test with 1 MPI rank that has access to 8 CPU cores and 1 GPU. Although the job step used here is very similar to the first example, the behavior is different:
$ OMP_NUM_THREADS=8 srun -N1 -n1 -c8 --gpus 1 --gpus-per-task=1 --gpu-bind=closest ./hello_jobstep | sort
MPI 000 - OMP 000 - HWT 023 - Node lux002 - RT_GPU_ID 0 - GPU_ID 0 - Bus_ID 09
MPI 000 - OMP 001 - HWT 016 - Node lux002 - RT_GPU_ID 0 - GPU_ID 0 - Bus_ID 09
MPI 000 - OMP 002 - HWT 017 - Node lux002 - RT_GPU_ID 0 - GPU_ID 0 - Bus_ID 09
MPI 000 - OMP 003 - HWT 018 - Node lux002 - RT_GPU_ID 0 - GPU_ID 0 - Bus_ID 09
MPI 000 - OMP 004 - HWT 020 - Node lux002 - RT_GPU_ID 0 - GPU_ID 0 - Bus_ID 09
MPI 000 - OMP 005 - HWT 022 - Node lux002 - RT_GPU_ID 0 - GPU_ID 0 - Bus_ID 09
MPI 000 - OMP 006 - HWT 019 - Node lux002 - RT_GPU_ID 0 - GPU_ID 0 - Bus_ID 09
MPI 000 - OMP 007 - HWT 021 - Node lux002 - RT_GPU_ID 0 - GPU_ID 0 - Bus_ID 09
Notice that our MPI rank did not get mapped to CPU cores 0-15 and GPU 3 (bus 7c), but instead to GPU 0 (bus 09) and CPU cores 16-31.
The apparent reason for this can be found in the --gpu-bind section in the srun man page: GPU binding is ignored if there is only one task..
Here, Slurm appears to give the first GPU it sees and maps it to the CPU cores that are closest.
So although the mapping doesn’t occur as expected, the rank is still mapped to the correct GPU given the CPU cores it ran on.
16 MPI ranks - each with 8 CPU cores and 1 GPU (multi-node)
This example simply extends the first example to run on 2 nodes,
which simply requires changing the number of nodes to 2 (-N2), the number of MPI ranks to 16 (-n16), and our number of GPUs to match (--gpus 16).
$ OMP_NUM_THREADS=8 srun -N2 -n16 -c8 --gpus 16 --gpus-per-task=1 --gpu-bind=closest ./hello_jobstep | sort
MPI 000 - OMP 000 - HWT 007 - Node lux001 - RT_GPU_ID 0 - GPU_ID 0 - Bus_ID 7c
MPI 000 - OMP 001 - HWT 000 - Node lux001 - RT_GPU_ID 0 - GPU_ID 0 - Bus_ID 7c
MPI 000 - OMP 002 - HWT 001 - Node lux001 - RT_GPU_ID 0 - GPU_ID 0 - Bus_ID 7c
MPI 000 - OMP 003 - HWT 002 - Node lux001 - RT_GPU_ID 0 - GPU_ID 0 - Bus_ID 7c
MPI 000 - OMP 004 - HWT 003 - Node lux001 - RT_GPU_ID 0 - GPU_ID 0 - Bus_ID 7c
MPI 000 - OMP 005 - HWT 004 - Node lux001 - RT_GPU_ID 0 - GPU_ID 0 - Bus_ID 7c
MPI 000 - OMP 006 - HWT 005 - Node lux001 - RT_GPU_ID 0 - GPU_ID 0 - Bus_ID 7c
MPI 000 - OMP 007 - HWT 006 - Node lux001 - RT_GPU_ID 0 - GPU_ID 0 - Bus_ID 7c
MPI 001 - OMP 000 - HWT 023 - Node lux001 - RT_GPU_ID 0 - GPU_ID 0 - Bus_ID 09
MPI 001 - OMP 001 - HWT 016 - Node lux001 - RT_GPU_ID 0 - GPU_ID 0 - Bus_ID 09
MPI 001 - OMP 002 - HWT 017 - Node lux001 - RT_GPU_ID 0 - GPU_ID 0 - Bus_ID 09
MPI 001 - OMP 003 - HWT 019 - Node lux001 - RT_GPU_ID 0 - GPU_ID 0 - Bus_ID 09
MPI 001 - OMP 004 - HWT 020 - Node lux001 - RT_GPU_ID 0 - GPU_ID 0 - Bus_ID 09
MPI 001 - OMP 005 - HWT 021 - Node lux001 - RT_GPU_ID 0 - GPU_ID 0 - Bus_ID 09
MPI 001 - OMP 006 - HWT 022 - Node lux001 - RT_GPU_ID 0 - GPU_ID 0 - Bus_ID 09
MPI 001 - OMP 007 - HWT 018 - Node lux001 - RT_GPU_ID 0 - GPU_ID 0 - Bus_ID 09
MPI 002 - OMP 000 - HWT 039 - Node lux001 - RT_GPU_ID 0 - GPU_ID 0 - Bus_ID 19
MPI 002 - OMP 001 - HWT 032 - Node lux001 - RT_GPU_ID 0 - GPU_ID 0 - Bus_ID 19
MPI 002 - OMP 002 - HWT 033 - Node lux001 - RT_GPU_ID 0 - GPU_ID 0 - Bus_ID 19
MPI 002 - OMP 003 - HWT 035 - Node lux001 - RT_GPU_ID 0 - GPU_ID 0 - Bus_ID 19
MPI 002 - OMP 004 - HWT 036 - Node lux001 - RT_GPU_ID 0 - GPU_ID 0 - Bus_ID 19
MPI 002 - OMP 005 - HWT 037 - Node lux001 - RT_GPU_ID 0 - GPU_ID 0 - Bus_ID 19
MPI 002 - OMP 006 - HWT 038 - Node lux001 - RT_GPU_ID 0 - GPU_ID 0 - Bus_ID 19
MPI 002 - OMP 007 - HWT 034 - Node lux001 - RT_GPU_ID 0 - GPU_ID 0 - Bus_ID 19
MPI 003 - OMP 000 - HWT 055 - Node lux001 - RT_GPU_ID 0 - GPU_ID 0 - Bus_ID 69
MPI 003 - OMP 001 - HWT 048 - Node lux001 - RT_GPU_ID 0 - GPU_ID 0 - Bus_ID 69
MPI 003 - OMP 002 - HWT 049 - Node lux001 - RT_GPU_ID 0 - GPU_ID 0 - Bus_ID 69
MPI 003 - OMP 003 - HWT 050 - Node lux001 - RT_GPU_ID 0 - GPU_ID 0 - Bus_ID 69
MPI 003 - OMP 004 - HWT 051 - Node lux001 - RT_GPU_ID 0 - GPU_ID 0 - Bus_ID 69
MPI 003 - OMP 005 - HWT 052 - Node lux001 - RT_GPU_ID 0 - GPU_ID 0 - Bus_ID 69
MPI 003 - OMP 006 - HWT 053 - Node lux001 - RT_GPU_ID 0 - GPU_ID 0 - Bus_ID 69
MPI 003 - OMP 007 - HWT 054 - Node lux001 - RT_GPU_ID 0 - GPU_ID 0 - Bus_ID 69
MPI 004 - OMP 000 - HWT 071 - Node lux001 - RT_GPU_ID 0 - GPU_ID 0 - Bus_ID fb
MPI 004 - OMP 001 - HWT 064 - Node lux001 - RT_GPU_ID 0 - GPU_ID 0 - Bus_ID fb
MPI 004 - OMP 002 - HWT 065 - Node lux001 - RT_GPU_ID 0 - GPU_ID 0 - Bus_ID fb
MPI 004 - OMP 003 - HWT 066 - Node lux001 - RT_GPU_ID 0 - GPU_ID 0 - Bus_ID fb
MPI 004 - OMP 004 - HWT 067 - Node lux001 - RT_GPU_ID 0 - GPU_ID 0 - Bus_ID fb
MPI 004 - OMP 005 - HWT 068 - Node lux001 - RT_GPU_ID 0 - GPU_ID 0 - Bus_ID fb
MPI 004 - OMP 006 - HWT 070 - Node lux001 - RT_GPU_ID 0 - GPU_ID 0 - Bus_ID fb
MPI 004 - OMP 007 - HWT 069 - Node lux001 - RT_GPU_ID 0 - GPU_ID 0 - Bus_ID fb
MPI 005 - OMP 000 - HWT 087 - Node lux001 - RT_GPU_ID 0 - GPU_ID 0 - Bus_ID 86
MPI 005 - OMP 001 - HWT 080 - Node lux001 - RT_GPU_ID 0 - GPU_ID 0 - Bus_ID 86
MPI 005 - OMP 002 - HWT 081 - Node lux001 - RT_GPU_ID 0 - GPU_ID 0 - Bus_ID 86
MPI 005 - OMP 003 - HWT 082 - Node lux001 - RT_GPU_ID 0 - GPU_ID 0 - Bus_ID 86
MPI 005 - OMP 004 - HWT 083 - Node lux001 - RT_GPU_ID 0 - GPU_ID 0 - Bus_ID 86
MPI 005 - OMP 005 - HWT 084 - Node lux001 - RT_GPU_ID 0 - GPU_ID 0 - Bus_ID 86
MPI 005 - OMP 006 - HWT 085 - Node lux001 - RT_GPU_ID 0 - GPU_ID 0 - Bus_ID 86
MPI 005 - OMP 007 - HWT 086 - Node lux001 - RT_GPU_ID 0 - GPU_ID 0 - Bus_ID 86
MPI 006 - OMP 000 - HWT 103 - Node lux001 - RT_GPU_ID 0 - GPU_ID 0 - Bus_ID 99
MPI 006 - OMP 001 - HWT 096 - Node lux001 - RT_GPU_ID 0 - GPU_ID 0 - Bus_ID 99
MPI 006 - OMP 002 - HWT 097 - Node lux001 - RT_GPU_ID 0 - GPU_ID 0 - Bus_ID 99
MPI 006 - OMP 003 - HWT 098 - Node lux001 - RT_GPU_ID 0 - GPU_ID 0 - Bus_ID 99
MPI 006 - OMP 004 - HWT 099 - Node lux001 - RT_GPU_ID 0 - GPU_ID 0 - Bus_ID 99
MPI 006 - OMP 005 - HWT 100 - Node lux001 - RT_GPU_ID 0 - GPU_ID 0 - Bus_ID 99
MPI 006 - OMP 006 - HWT 101 - Node lux001 - RT_GPU_ID 0 - GPU_ID 0 - Bus_ID 99
MPI 006 - OMP 007 - HWT 102 - Node lux001 - RT_GPU_ID 0 - GPU_ID 0 - Bus_ID 99
MPI 007 - OMP 000 - HWT 119 - Node lux001 - RT_GPU_ID 0 - GPU_ID 0 - Bus_ID e6
MPI 007 - OMP 001 - HWT 112 - Node lux001 - RT_GPU_ID 0 - GPU_ID 0 - Bus_ID e6
MPI 007 - OMP 002 - HWT 113 - Node lux001 - RT_GPU_ID 0 - GPU_ID 0 - Bus_ID e6
MPI 007 - OMP 003 - HWT 114 - Node lux001 - RT_GPU_ID 0 - GPU_ID 0 - Bus_ID e6
MPI 007 - OMP 004 - HWT 115 - Node lux001 - RT_GPU_ID 0 - GPU_ID 0 - Bus_ID e6
MPI 007 - OMP 005 - HWT 116 - Node lux001 - RT_GPU_ID 0 - GPU_ID 0 - Bus_ID e6
MPI 007 - OMP 006 - HWT 117 - Node lux001 - RT_GPU_ID 0 - GPU_ID 0 - Bus_ID e6
MPI 007 - OMP 007 - HWT 118 - Node lux001 - RT_GPU_ID 0 - GPU_ID 0 - Bus_ID e6
MPI 008 - OMP 000 - HWT 007 - Node lux002 - RT_GPU_ID 0 - GPU_ID 0 - Bus_ID 7c
MPI 008 - OMP 001 - HWT 001 - Node lux002 - RT_GPU_ID 0 - GPU_ID 0 - Bus_ID 7c
MPI 008 - OMP 002 - HWT 002 - Node lux002 - RT_GPU_ID 0 - GPU_ID 0 - Bus_ID 7c
MPI 008 - OMP 003 - HWT 003 - Node lux002 - RT_GPU_ID 0 - GPU_ID 0 - Bus_ID 7c
MPI 008 - OMP 004 - HWT 004 - Node lux002 - RT_GPU_ID 0 - GPU_ID 0 - Bus_ID 7c
MPI 008 - OMP 005 - HWT 005 - Node lux002 - RT_GPU_ID 0 - GPU_ID 0 - Bus_ID 7c
MPI 008 - OMP 006 - HWT 006 - Node lux002 - RT_GPU_ID 0 - GPU_ID 0 - Bus_ID 7c
MPI 008 - OMP 007 - HWT 000 - Node lux002 - RT_GPU_ID 0 - GPU_ID 0 - Bus_ID 7c
MPI 009 - OMP 000 - HWT 023 - Node lux002 - RT_GPU_ID 0 - GPU_ID 0 - Bus_ID 09
MPI 009 - OMP 001 - HWT 016 - Node lux002 - RT_GPU_ID 0 - GPU_ID 0 - Bus_ID 09
MPI 009 - OMP 002 - HWT 017 - Node lux002 - RT_GPU_ID 0 - GPU_ID 0 - Bus_ID 09
MPI 009 - OMP 003 - HWT 018 - Node lux002 - RT_GPU_ID 0 - GPU_ID 0 - Bus_ID 09
MPI 009 - OMP 004 - HWT 019 - Node lux002 - RT_GPU_ID 0 - GPU_ID 0 - Bus_ID 09
MPI 009 - OMP 005 - HWT 020 - Node lux002 - RT_GPU_ID 0 - GPU_ID 0 - Bus_ID 09
MPI 009 - OMP 006 - HWT 021 - Node lux002 - RT_GPU_ID 0 - GPU_ID 0 - Bus_ID 09
MPI 009 - OMP 007 - HWT 022 - Node lux002 - RT_GPU_ID 0 - GPU_ID 0 - Bus_ID 09
MPI 010 - OMP 000 - HWT 039 - Node lux002 - RT_GPU_ID 0 - GPU_ID 0 - Bus_ID 19
MPI 010 - OMP 001 - HWT 032 - Node lux002 - RT_GPU_ID 0 - GPU_ID 0 - Bus_ID 19
MPI 010 - OMP 002 - HWT 033 - Node lux002 - RT_GPU_ID 0 - GPU_ID 0 - Bus_ID 19
MPI 010 - OMP 003 - HWT 034 - Node lux002 - RT_GPU_ID 0 - GPU_ID 0 - Bus_ID 19
MPI 010 - OMP 004 - HWT 035 - Node lux002 - RT_GPU_ID 0 - GPU_ID 0 - Bus_ID 19
MPI 010 - OMP 005 - HWT 036 - Node lux002 - RT_GPU_ID 0 - GPU_ID 0 - Bus_ID 19
MPI 010 - OMP 006 - HWT 037 - Node lux002 - RT_GPU_ID 0 - GPU_ID 0 - Bus_ID 19
MPI 010 - OMP 007 - HWT 038 - Node lux002 - RT_GPU_ID 0 - GPU_ID 0 - Bus_ID 19
MPI 011 - OMP 000 - HWT 055 - Node lux002 - RT_GPU_ID 0 - GPU_ID 0 - Bus_ID 69
MPI 011 - OMP 001 - HWT 050 - Node lux002 - RT_GPU_ID 0 - GPU_ID 0 - Bus_ID 69
MPI 011 - OMP 002 - HWT 051 - Node lux002 - RT_GPU_ID 0 - GPU_ID 0 - Bus_ID 69
MPI 011 - OMP 003 - HWT 052 - Node lux002 - RT_GPU_ID 0 - GPU_ID 0 - Bus_ID 69
MPI 011 - OMP 004 - HWT 053 - Node lux002 - RT_GPU_ID 0 - GPU_ID 0 - Bus_ID 69
MPI 011 - OMP 005 - HWT 054 - Node lux002 - RT_GPU_ID 0 - GPU_ID 0 - Bus_ID 69
MPI 011 - OMP 006 - HWT 048 - Node lux002 - RT_GPU_ID 0 - GPU_ID 0 - Bus_ID 69
MPI 011 - OMP 007 - HWT 049 - Node lux002 - RT_GPU_ID 0 - GPU_ID 0 - Bus_ID 69
MPI 012 - OMP 000 - HWT 071 - Node lux002 - RT_GPU_ID 0 - GPU_ID 0 - Bus_ID fb
MPI 012 - OMP 001 - HWT 064 - Node lux002 - RT_GPU_ID 0 - GPU_ID 0 - Bus_ID fb
MPI 012 - OMP 002 - HWT 065 - Node lux002 - RT_GPU_ID 0 - GPU_ID 0 - Bus_ID fb
MPI 012 - OMP 003 - HWT 066 - Node lux002 - RT_GPU_ID 0 - GPU_ID 0 - Bus_ID fb
MPI 012 - OMP 004 - HWT 067 - Node lux002 - RT_GPU_ID 0 - GPU_ID 0 - Bus_ID fb
MPI 012 - OMP 005 - HWT 068 - Node lux002 - RT_GPU_ID 0 - GPU_ID 0 - Bus_ID fb
MPI 012 - OMP 006 - HWT 069 - Node lux002 - RT_GPU_ID 0 - GPU_ID 0 - Bus_ID fb
MPI 012 - OMP 007 - HWT 070 - Node lux002 - RT_GPU_ID 0 - GPU_ID 0 - Bus_ID fb
MPI 013 - OMP 000 - HWT 087 - Node lux002 - RT_GPU_ID 0 - GPU_ID 0 - Bus_ID 86
MPI 013 - OMP 001 - HWT 080 - Node lux002 - RT_GPU_ID 0 - GPU_ID 0 - Bus_ID 86
MPI 013 - OMP 002 - HWT 081 - Node lux002 - RT_GPU_ID 0 - GPU_ID 0 - Bus_ID 86
MPI 013 - OMP 003 - HWT 082 - Node lux002 - RT_GPU_ID 0 - GPU_ID 0 - Bus_ID 86
MPI 013 - OMP 004 - HWT 083 - Node lux002 - RT_GPU_ID 0 - GPU_ID 0 - Bus_ID 86
MPI 013 - OMP 005 - HWT 084 - Node lux002 - RT_GPU_ID 0 - GPU_ID 0 - Bus_ID 86
MPI 013 - OMP 006 - HWT 085 - Node lux002 - RT_GPU_ID 0 - GPU_ID 0 - Bus_ID 86
MPI 013 - OMP 007 - HWT 086 - Node lux002 - RT_GPU_ID 0 - GPU_ID 0 - Bus_ID 86
MPI 014 - OMP 000 - HWT 103 - Node lux002 - RT_GPU_ID 0 - GPU_ID 0 - Bus_ID 99
MPI 014 - OMP 001 - HWT 096 - Node lux002 - RT_GPU_ID 0 - GPU_ID 0 - Bus_ID 99
MPI 014 - OMP 002 - HWT 097 - Node lux002 - RT_GPU_ID 0 - GPU_ID 0 - Bus_ID 99
MPI 014 - OMP 003 - HWT 098 - Node lux002 - RT_GPU_ID 0 - GPU_ID 0 - Bus_ID 99
MPI 014 - OMP 004 - HWT 099 - Node lux002 - RT_GPU_ID 0 - GPU_ID 0 - Bus_ID 99
MPI 014 - OMP 005 - HWT 100 - Node lux002 - RT_GPU_ID 0 - GPU_ID 0 - Bus_ID 99
MPI 014 - OMP 006 - HWT 101 - Node lux002 - RT_GPU_ID 0 - GPU_ID 0 - Bus_ID 99
MPI 014 - OMP 007 - HWT 102 - Node lux002 - RT_GPU_ID 0 - GPU_ID 0 - Bus_ID 99
MPI 015 - OMP 000 - HWT 119 - Node lux002 - RT_GPU_ID 0 - GPU_ID 0 - Bus_ID e6
MPI 015 - OMP 001 - HWT 112 - Node lux002 - RT_GPU_ID 0 - GPU_ID 0 - Bus_ID e6
MPI 015 - OMP 002 - HWT 113 - Node lux002 - RT_GPU_ID 0 - GPU_ID 0 - Bus_ID e6
MPI 015 - OMP 003 - HWT 114 - Node lux002 - RT_GPU_ID 0 - GPU_ID 0 - Bus_ID e6
MPI 015 - OMP 004 - HWT 115 - Node lux002 - RT_GPU_ID 0 - GPU_ID 0 - Bus_ID e6
MPI 015 - OMP 005 - HWT 116 - Node lux002 - RT_GPU_ID 0 - GPU_ID 0 - Bus_ID e6
MPI 015 - OMP 006 - HWT 117 - Node lux002 - RT_GPU_ID 0 - GPU_ID 0 - Bus_ID e6
MPI 015 - OMP 007 - HWT 118 - Node lux002 - RT_GPU_ID 0 - GPU_ID 0 - Bus_ID e6
Mapping multiple MPI ranks to a single GPU
In the following examples, 2 MPI ranks will be mapped to 1 GPU.
For brevity, OMP_NUM_THREADS will be set to 1, so -c1 will be used unless otherwise specified.
A new srun option will also be introduced to accomplish the new mapping:
Slurm Option |
Description |
|---|---|
|
Specifies the number of MPI ranks that will share access to a GPU. |
Note
On AMD’s MI355X, multi-process service (MPS) is not needed since multiple MPI ranks per GPU is supported natively.
16 MPI ranks - where 2 ranks share a GPU (round-robin, single-node)
This example launches 16 MPI ranks (-n16), each with 1 physical CPU core (-c1) to launch 1 OpenMP thread (OMP_NUM_THREADS=1) on.
The MPI ranks will be assigned to GPUs in a round-robin fashion so that each of the 8 GPUs on the node are shared by 2 MPI ranks.
$ OMP_NUM_THREADS=1 srun -N1 -n16 -c1 --gpus 8 --ntasks-per-gpu=2 --gpu-bind=closest ./hello_jobstep | sort
MPI 000 - OMP 000 - HWT 000 - Node lux001 - RT_GPU_ID 0 - GPU_ID 0 - Bus_ID 7c
MPI 001 - OMP 000 - HWT 016 - Node lux001 - RT_GPU_ID 0 - GPU_ID 0 - Bus_ID 09
MPI 002 - OMP 000 - HWT 032 - Node lux001 - RT_GPU_ID 0 - GPU_ID 0 - Bus_ID 19
MPI 003 - OMP 000 - HWT 048 - Node lux001 - RT_GPU_ID 0 - GPU_ID 0 - Bus_ID 69
MPI 004 - OMP 000 - HWT 064 - Node lux001 - RT_GPU_ID 0 - GPU_ID 0 - Bus_ID fb
MPI 005 - OMP 000 - HWT 080 - Node lux001 - RT_GPU_ID 0 - GPU_ID 0 - Bus_ID 86
MPI 006 - OMP 000 - HWT 096 - Node lux001 - RT_GPU_ID 0 - GPU_ID 0 - Bus_ID 99
MPI 007 - OMP 000 - HWT 112 - Node lux001 - RT_GPU_ID 0 - GPU_ID 0 - Bus_ID e6
MPI 008 - OMP 000 - HWT 001 - Node lux001 - RT_GPU_ID 0 - GPU_ID 0 - Bus_ID 7c
MPI 009 - OMP 000 - HWT 017 - Node lux001 - RT_GPU_ID 0 - GPU_ID 0 - Bus_ID 09
MPI 010 - OMP 000 - HWT 033 - Node lux001 - RT_GPU_ID 0 - GPU_ID 0 - Bus_ID 19
MPI 011 - OMP 000 - HWT 049 - Node lux001 - RT_GPU_ID 0 - GPU_ID 0 - Bus_ID 69
MPI 012 - OMP 000 - HWT 065 - Node lux001 - RT_GPU_ID 0 - GPU_ID 0 - Bus_ID fb
MPI 013 - OMP 000 - HWT 081 - Node lux001 - RT_GPU_ID 0 - GPU_ID 0 - Bus_ID 86
MPI 014 - OMP 000 - HWT 097 - Node lux001 - RT_GPU_ID 0 - GPU_ID 0 - Bus_ID 99
MPI 015 - OMP 000 - HWT 113 - Node lux001 - RT_GPU_ID 0 - GPU_ID 0 - Bus_ID e6
The output shows the round-robin (cyclic) distribution of MPI ranks to GPUs.
In fact, it is a round-robin distribution of MPI ranks to NUMA domains (the default distribution).
The GPU mapping is a consequence of where the MPI ranks are distributed;
--gpu-bind=closest simply maps the GPU in an NUMA domain to the MPI ranks in the same NUMA domain.
32 MPI ranks - where 2 ranks share a GPU (round-robin, multi-node)
This example is an extension of the previous example to run on 2 nodes.
$ OMP_NUM_THREADS=1 srun -N2 -n32 -c1 --gpus 16 --ntasks-per-gpu=2 --gpu-bind=closest ./hello_jobstep | sort
MPI 000 - OMP 000 - HWT 000 - Node lux001 - RT_GPU_ID 0 - GPU_ID 0 - Bus_ID 7c
MPI 001 - OMP 000 - HWT 016 - Node lux001 - RT_GPU_ID 0 - GPU_ID 0 - Bus_ID 09
MPI 002 - OMP 000 - HWT 032 - Node lux001 - RT_GPU_ID 0 - GPU_ID 0 - Bus_ID 19
MPI 003 - OMP 000 - HWT 048 - Node lux001 - RT_GPU_ID 0 - GPU_ID 0 - Bus_ID 69
MPI 004 - OMP 000 - HWT 064 - Node lux001 - RT_GPU_ID 0 - GPU_ID 0 - Bus_ID fb
MPI 005 - OMP 000 - HWT 080 - Node lux001 - RT_GPU_ID 0 - GPU_ID 0 - Bus_ID 86
MPI 006 - OMP 000 - HWT 096 - Node lux001 - RT_GPU_ID 0 - GPU_ID 0 - Bus_ID 99
MPI 007 - OMP 000 - HWT 112 - Node lux001 - RT_GPU_ID 0 - GPU_ID 0 - Bus_ID e6
MPI 008 - OMP 000 - HWT 001 - Node lux001 - RT_GPU_ID 0 - GPU_ID 0 - Bus_ID 7c
MPI 009 - OMP 000 - HWT 017 - Node lux001 - RT_GPU_ID 0 - GPU_ID 0 - Bus_ID 09
MPI 010 - OMP 000 - HWT 033 - Node lux001 - RT_GPU_ID 0 - GPU_ID 0 - Bus_ID 19
MPI 011 - OMP 000 - HWT 049 - Node lux001 - RT_GPU_ID 0 - GPU_ID 0 - Bus_ID 69
MPI 012 - OMP 000 - HWT 065 - Node lux001 - RT_GPU_ID 0 - GPU_ID 0 - Bus_ID fb
MPI 013 - OMP 000 - HWT 081 - Node lux001 - RT_GPU_ID 0 - GPU_ID 0 - Bus_ID 86
MPI 014 - OMP 000 - HWT 097 - Node lux001 - RT_GPU_ID 0 - GPU_ID 0 - Bus_ID 99
MPI 015 - OMP 000 - HWT 113 - Node lux001 - RT_GPU_ID 0 - GPU_ID 0 - Bus_ID e6
MPI 016 - OMP 000 - HWT 000 - Node lux002 - RT_GPU_ID 0 - GPU_ID 0 - Bus_ID 7c
MPI 017 - OMP 000 - HWT 016 - Node lux002 - RT_GPU_ID 0 - GPU_ID 0 - Bus_ID 09
MPI 018 - OMP 000 - HWT 032 - Node lux002 - RT_GPU_ID 0 - GPU_ID 0 - Bus_ID 19
MPI 019 - OMP 000 - HWT 048 - Node lux002 - RT_GPU_ID 0 - GPU_ID 0 - Bus_ID 69
MPI 020 - OMP 000 - HWT 064 - Node lux002 - RT_GPU_ID 0 - GPU_ID 0 - Bus_ID fb
MPI 021 - OMP 000 - HWT 080 - Node lux002 - RT_GPU_ID 0 - GPU_ID 0 - Bus_ID 86
MPI 022 - OMP 000 - HWT 096 - Node lux002 - RT_GPU_ID 0 - GPU_ID 0 - Bus_ID 99
MPI 023 - OMP 000 - HWT 112 - Node lux002 - RT_GPU_ID 0 - GPU_ID 0 - Bus_ID e6
MPI 024 - OMP 000 - HWT 001 - Node lux002 - RT_GPU_ID 0 - GPU_ID 0 - Bus_ID 7c
MPI 025 - OMP 000 - HWT 017 - Node lux002 - RT_GPU_ID 0 - GPU_ID 0 - Bus_ID 09
MPI 026 - OMP 000 - HWT 033 - Node lux002 - RT_GPU_ID 0 - GPU_ID 0 - Bus_ID 19
MPI 027 - OMP 000 - HWT 049 - Node lux002 - RT_GPU_ID 0 - GPU_ID 0 - Bus_ID 69
MPI 028 - OMP 000 - HWT 065 - Node lux002 - RT_GPU_ID 0 - GPU_ID 0 - Bus_ID fb
MPI 029 - OMP 000 - HWT 081 - Node lux002 - RT_GPU_ID 0 - GPU_ID 0 - Bus_ID 86
MPI 030 - OMP 000 - HWT 097 - Node lux002 - RT_GPU_ID 0 - GPU_ID 0 - Bus_ID 99
MPI 031 - OMP 000 - HWT 113 - Node lux002 - RT_GPU_ID 0 - GPU_ID 0 - Bus_ID e6
16 MPI ranks - where 2 ranks share a GPU (packed, single-node)”
This example launches 16 MPI ranks (-n16), each with 8 physical CPU cores (-c8) to launch 1 OpenMP thread (OMP_NUM_THREADS=1) on.
The MPI ranks will be assigned to GPUs in a packed fashion so that each of the 8 GPUs on the node are shared by 2 MPI ranks.
Similar to previous examples, -ntasks-per-gpu=2 will be used,
but a new srun flag will be used to change the default round-robin (cyclic) distribution of MPI ranks across NUMA domains:
Slurm Option |
Description |
|---|---|
|
Specifies the distribution of MPI ranks across compute nodes, sockets (NUMA domains on Lux), and cores, respectively.
The default values are
block:cyclic:cyclic, which is where the cyclic assignment comes from in the previous examples. |
Note
In the job step for this example, --distribution=*:block is used,
where * represents the default value of block for the distribution of MPI
ranks across compute nodes and the distribution of MPI ranks across NUMA domains
has been changed to block from its default value of cyclic.
Note
Because the distribution across NUMA domains has been changed to a “packed” (block) configuration,
caution must be taken to ensure MPI ranks end up in the NUMA domains where the GPUs they intend to be mapped to are located.
To accomplish this, the number of physical CPU cores assigned to an MPI rank was increased - in this case to 8.
Doing so ensures that only 2 MPI ranks can fit into a single NUMA domain.
If the value of -c was left at 1, all 16 MPI ranks would be “packed” into the first NUMA domain,
where the “closest” GPU would be GPU 3 (bus 7c) - the only GPU in that NUMA domain.
$ OMP_NUM_THREADS=1 srun -N1 -n16 -c8 --gpus 8 --ntasks-per-gpu=2 --gpu-bind=closest --distribution=*:block ./hello_jobstep | sort
MPI 000 - OMP 000 - HWT 007 - Node lux002 - RT_GPU_ID 0 - GPU_ID 0 - Bus_ID 7c
MPI 001 - OMP 000 - HWT 015 - Node lux002 - RT_GPU_ID 0 - GPU_ID 0 - Bus_ID 7c
MPI 002 - OMP 000 - HWT 023 - Node lux002 - RT_GPU_ID 0 - GPU_ID 0 - Bus_ID 09
MPI 003 - OMP 000 - HWT 031 - Node lux002 - RT_GPU_ID 0 - GPU_ID 0 - Bus_ID 09
MPI 004 - OMP 000 - HWT 039 - Node lux002 - RT_GPU_ID 0 - GPU_ID 0 - Bus_ID 19
MPI 005 - OMP 000 - HWT 047 - Node lux002 - RT_GPU_ID 0 - GPU_ID 0 - Bus_ID 19
MPI 006 - OMP 000 - HWT 055 - Node lux002 - RT_GPU_ID 0 - GPU_ID 0 - Bus_ID 69
MPI 007 - OMP 000 - HWT 063 - Node lux002 - RT_GPU_ID 0 - GPU_ID 0 - Bus_ID 69
MPI 008 - OMP 000 - HWT 071 - Node lux002 - RT_GPU_ID 0 - GPU_ID 0 - Bus_ID fb
MPI 009 - OMP 000 - HWT 079 - Node lux002 - RT_GPU_ID 0 - GPU_ID 0 - Bus_ID fb
MPI 010 - OMP 000 - HWT 087 - Node lux002 - RT_GPU_ID 0 - GPU_ID 0 - Bus_ID 86
MPI 011 - OMP 000 - HWT 095 - Node lux002 - RT_GPU_ID 0 - GPU_ID 0 - Bus_ID 86
MPI 012 - OMP 000 - HWT 103 - Node lux002 - RT_GPU_ID 0 - GPU_ID 0 - Bus_ID 99
MPI 013 - OMP 000 - HWT 111 - Node lux002 - RT_GPU_ID 0 - GPU_ID 0 - Bus_ID 99
MPI 014 - OMP 000 - HWT 119 - Node lux002 - RT_GPU_ID 0 - GPU_ID 0 - Bus_ID e6
MPI 015 - OMP 000 - HWT 127 - Node lux002 - RT_GPU_ID 0 - GPU_ID 0 - Bus_ID e6
The overall effect of using --distribution=*:block and increasing the number of physical CPU cores available to each MPI rank is to place the first two MPI ranks in the first NUMA domain with GPU 3 (bus 7c),
the next two MPI ranks in the NUMA domain with GPU 0 (bus 09), and so on.
32 MPI ranks - where 2 ranks share a GPU (packed, multi-node)
This example is an extension of the previous example to use 2 compute nodes.
With the appropriate changes put in place in previous example, it is a straightforward exercise to change to using 2 nodes (-N2), 32 MPI ranks (-n32), and 16 GPUs (--gpus 16).
$ OMP_NUM_THREADS=1 srun -N2 -n32 -c8 --gpus 16 --ntasks-per-gpu=2 --gpu-bind=closest --distribution=*:block ./hello_jobstep | sort
MPI 000 - OMP 000 - HWT 007 - Node lux001 - RT_GPU_ID 0 - GPU_ID 0 - Bus_ID 7c
MPI 001 - OMP 000 - HWT 015 - Node lux001 - RT_GPU_ID 0 - GPU_ID 0 - Bus_ID 7c
MPI 002 - OMP 000 - HWT 023 - Node lux001 - RT_GPU_ID 0 - GPU_ID 0 - Bus_ID 09
MPI 003 - OMP 000 - HWT 031 - Node lux001 - RT_GPU_ID 0 - GPU_ID 0 - Bus_ID 09
MPI 004 - OMP 000 - HWT 039 - Node lux001 - RT_GPU_ID 0 - GPU_ID 0 - Bus_ID 19
MPI 005 - OMP 000 - HWT 047 - Node lux001 - RT_GPU_ID 0 - GPU_ID 0 - Bus_ID 19
MPI 006 - OMP 000 - HWT 055 - Node lux001 - RT_GPU_ID 0 - GPU_ID 0 - Bus_ID 69
MPI 007 - OMP 000 - HWT 063 - Node lux001 - RT_GPU_ID 0 - GPU_ID 0 - Bus_ID 69
MPI 008 - OMP 000 - HWT 071 - Node lux001 - RT_GPU_ID 0 - GPU_ID 0 - Bus_ID fb
MPI 009 - OMP 000 - HWT 079 - Node lux001 - RT_GPU_ID 0 - GPU_ID 0 - Bus_ID fb
MPI 010 - OMP 000 - HWT 087 - Node lux001 - RT_GPU_ID 0 - GPU_ID 0 - Bus_ID 86
MPI 011 - OMP 000 - HWT 095 - Node lux001 - RT_GPU_ID 0 - GPU_ID 0 - Bus_ID 86
MPI 012 - OMP 000 - HWT 103 - Node lux001 - RT_GPU_ID 0 - GPU_ID 0 - Bus_ID 99
MPI 013 - OMP 000 - HWT 111 - Node lux001 - RT_GPU_ID 0 - GPU_ID 0 - Bus_ID 99
MPI 014 - OMP 000 - HWT 119 - Node lux001 - RT_GPU_ID 0 - GPU_ID 0 - Bus_ID e6
MPI 015 - OMP 000 - HWT 127 - Node lux001 - RT_GPU_ID 0 - GPU_ID 0 - Bus_ID e6
MPI 016 - OMP 000 - HWT 007 - Node lux002 - RT_GPU_ID 0 - GPU_ID 0 - Bus_ID 7c
MPI 017 - OMP 000 - HWT 015 - Node lux002 - RT_GPU_ID 0 - GPU_ID 0 - Bus_ID 7c
MPI 018 - OMP 000 - HWT 023 - Node lux002 - RT_GPU_ID 0 - GPU_ID 0 - Bus_ID 09
MPI 019 - OMP 000 - HWT 031 - Node lux002 - RT_GPU_ID 0 - GPU_ID 0 - Bus_ID 09
MPI 020 - OMP 000 - HWT 039 - Node lux002 - RT_GPU_ID 0 - GPU_ID 0 - Bus_ID 19
MPI 021 - OMP 000 - HWT 047 - Node lux002 - RT_GPU_ID 0 - GPU_ID 0 - Bus_ID 19
MPI 022 - OMP 000 - HWT 055 - Node lux002 - RT_GPU_ID 0 - GPU_ID 0 - Bus_ID 69
MPI 023 - OMP 000 - HWT 063 - Node lux002 - RT_GPU_ID 0 - GPU_ID 0 - Bus_ID 69
MPI 024 - OMP 000 - HWT 071 - Node lux002 - RT_GPU_ID 0 - GPU_ID 0 - Bus_ID fb
MPI 025 - OMP 000 - HWT 079 - Node lux002 - RT_GPU_ID 0 - GPU_ID 0 - Bus_ID fb
MPI 026 - OMP 000 - HWT 087 - Node lux002 - RT_GPU_ID 0 - GPU_ID 0 - Bus_ID 86
MPI 027 - OMP 000 - HWT 095 - Node lux002 - RT_GPU_ID 0 - GPU_ID 0 - Bus_ID 86
MPI 028 - OMP 000 - HWT 103 - Node lux002 - RT_GPU_ID 0 - GPU_ID 0 - Bus_ID 99
MPI 029 - OMP 000 - HWT 111 - Node lux002 - RT_GPU_ID 0 - GPU_ID 0 - Bus_ID 99
MPI 030 - OMP 000 - HWT 119 - Node lux002 - RT_GPU_ID 0 - GPU_ID 0 - Bus_ID e6
MPI 031 - OMP 000 - HWT 127 - Node lux002 - RT_GPU_ID 0 - GPU_ID 0 - Bus_ID e6
Multiple Independent Job Steps
8 independent and simultaneous job steps running on a single node
This example shows how to run multiple independent, simultaneous job steps on a single compute node.
Specifically, it shows how to run 8 independent hello_jobstep programs running on their own CPU core and GPU.
Submission script:
#!/bin/bash
#SBATCH --account <project>
#SBATCH --partition batch
#SBATCH --time 5:00
#SBATCH --nodes 1
#SBATCH --gpus 8


for idx in {1..8};

    do
        date

        OMP_NUM_THREADS=1 srun -u --gpus 1 --gpus-per-task=1 --gpu-bind=closest -N1 -n1 -c1 ./hello_jobstep_sleep &

        sleep 3
    done

wait
Output:
Mon Oct 12 03:27:23 PM EDT 2026
MPI 000 - OMP 000 - HWT 016 - Node lux001 - RT_GPU_ID 0 - GPU_ID 0 - Bus_ID 09
Mon Oct 12 03:27:26 PM EDT 2026
MPI 000 - OMP 000 - HWT 032 - Node lux001 - RT_GPU_ID 0 - GPU_ID 0 - Bus_ID 19
Mon Oct 12 03:27:29 PM EDT 2026
MPI 000 - OMP 000 - HWT 048 - Node lux001 - RT_GPU_ID 0 - GPU_ID 0 - Bus_ID 69
Mon Oct 12 03:27:33 PM EDT 2026
MPI 000 - OMP 000 - HWT 000 - Node lux001 - RT_GPU_ID 0 - GPU_ID 0 - Bus_ID 7c
Mon Oct 12 03:27:36 PM EDT 2026
MPI 000 - OMP 000 - HWT 080 - Node lux001 - RT_GPU_ID 0 - GPU_ID 0 - Bus_ID 86
Mon Oct 12 03:27:39 PM EDT 2026
MPI 000 - OMP 000 - HWT 096 - Node lux001 - RT_GPU_ID 0 - GPU_ID 0 - Bus_ID 99
Mon Oct 12 03:27:42 PM EDT 2026
MPI 000 - OMP 000 - HWT 112 - Node lux001 - RT_GPU_ID 0 - GPU_ID 0 - Bus_ID e6
Mon Oct 12 03:27:45 PM EDT 2026
MPI 000 - OMP 000 - HWT 064 - Node lux001 - RT_GPU_ID 0 - GPU_ID 0 - Bus_ID fb
The output shows that each independent process ran on its own CPU core and GPU on the same single node.
To show that the ranks ran simultaneously, date was called before each job step and a 20 second sleep was added to the end of the hello_jobstep program.
So the output also shows that the first job step was submitted at :23 and the subsequent job steps were all submitted between :26 and :45.
But because each hello_jobstep sleeps for 20 seconds, the subsequent job steps must have all been running while the first job step was still sleeping (and holding up its resources).
And the same argument can be made for the other job steps.
Note
The wait command is needed so the job script (and allocation) do not immediately end after launching the job steps in the background.
The sleep 3 is needed to give Slurm sufficient time to launch each job step.
Ensemble Jobs
For many applications and use cases, the ability to launch many copies of the same binary in an independent context is needed. This section highlights a few recommended solutions to launching ensemble runs on Lux.
Before covering the tools that can be useful for this, be advised that the most reliable solution to this problem will be the use of MPI sub-communicators by your application.
For example, the LAMMPS Molecular Dynamics software supports a partition command, which can create many independent simulations from a single srun launch.
Single-process ensemble members
If you are able to fit each ensemble member onto a single MPI rank and single AMD Instinct MI355X GPU (8 GPU’s per node), the most reliable solution is to use a single srun as follows:
srun -N $SLURM_NNODES -n $((SLURM_NNODES*8)) --gpus $((SLURM_NNODES*8)) -c 16 --gpus-per-task=1 --gpu-bind=closest ./wrapper.sh
Where wrapper.sh is a shell script that launches your application.
This shell script is simply for convenience, in case you wish to vary the parameters to your application based on MPI rank.
Using multiple simultaneous srun’s
If you are not able to fit each ensemble member onto a single MPI rank and GPU, a common approach is to launch multiple srun processes in the background simultaneously.
For example:
for node in $(scontrol show hostnames); do
    srun -N 1 -n 8 -c 16 --gpus 8 --gpus-per-task=1 --gpu-bind=closest <executable> &
done
# Wait for srun's to all finish
wait
Each srun communicates to the Slurm controller node (which is shared among all users) when it is launched.
Large amounts of srun processes can temporarily overwhelm the Slurm controller, making commands like sbatch and squeue hang.
This approach can be fast, but is unreliable and does not scale, and potentially overloads the Slurm controller.
We do not yet recommend this approach beyond 100 simultaneous srun’s.
Slurm version 26.05 includes the --stepmgr flag for sbatch, which uses the first node in the allocation to manage job steps instead of the Slurm controller.
This feature may substantially improve the ability to run many simultaneous srun’s.
Tips for Launching at Scale
Slurm GRES Task Sharing
Lux node sharing, by default, isolates resources for each task. This means that GPU-GPU and process<=>process communication performance has additional overhead, and may have a performance impact. If you find that inter-process communication for your jobs are slower than expected, or you are experiencing jobs failing with a segmentation fault and an error such as:
rocm_ipc_cache.c:144 Fatal: dest:182: failed to open ipc mem handle.
then you should run your tasks with the following flag at the srun/task level:
--gres-flags=allow-task-sharing
Example:
#!/bin/bash
#SBATCH --account <account>
#SBATCH --partition batch
#SBATCH --time 25:00
#SBATCH --nodes 1
#SBATCH --gpus 8

module load rocm/7.2.4
module load amd-llvm/7.2.4
module load openmpi

srun --nodes 2 --ntasks 16 --gres-flags=allow-task-sharing --gpus-per-task=1 --gpu-bind=closest ./hello_jobstep
Note
--gres-flags=allow-task-sharing only works at the srun/task level, not allocation level (salloc, sbatch).
Debugging
GDB
GDB, the GNU Project Debugger, is a command-line debugger useful for traditional debugging and investigating code crashes. GDB lets you debug programs written in Ada, C, C++, Objective-C, Pascal (and many other languages).
GDB is available on Lux installed by default to:
/usr/bin/gdb
To use GDB to debug your application run:
gdb ./path_to_executable
Additional information about GDB usage can befound on the GDB Documentation Page.
Profiling
Getting Started with the ROCm Profiler
Rocprof v3
rocprof gathers metrics on kernels run on AMD GPU architectures. The profiler works for HIP kernels, as well as offloaded kernels from OpenMP target offloading, OpenCL, and abstraction layers such as Kokkos.
rocprofv3 was introduced in ROCm/6.2 and utilizes the new rocprofiler API in ROCm.
The same information can be queried as with rocprof, but the command-line flags for rocprofv3 are slightly different than rocprof.
For example, to get a simple view of kernels being run, you will want to use rocprofv3 --kernel-trace --stats -- ./myexecutable instead of rocprof --stats ./myexecutable.
rocprofv3 will default output to files named based on the process ID of the profiled run.
In the previous kernel tracing command, the stats will be found in a file named <somePID>_kernel_stats.csv.
You can use the --output flag to override the resulting CSV file name.
More detailed infromation on rocprof profiling modes can be found at ROCm Profiler documentation.
Tips and Tricks
Running with MPI
MPI on Lux is currently best supported up to 16 nodes.
OLCF strongly recommends your MPI workloads are limited to 16 nodes.
The following environment variable can help maximize performance when scaling MPI on Lux:
UCX_TLS=sm,self,rocm_copy,rocm_ipc,cma,rc_verbs,tcp:aux
Lux Kubernetes User Guide
Kubernetes on Lux is administered through Rancher. You can access the dashboard here .
Warning
The Lux Kubernetes nodes don’t have internet access. So either include your data as part of your container or replace or set the following environment variables in your container
export all_proxy=socks://proxy.ccs.ornl.gov:3128/
export ftp_proxy=ftp://proxy.ccs.ornl.gov:3128/
export http_proxy=http://proxy.ccs.ornl.gov:3128/
export https_proxy=http://proxy.ccs.ornl.gov:3128/
export no_proxy='localhost,127.0.0.0/8,*.ccs.ornl.gov'
Note
We will be referencing the olcf_kubernetes_examples repository throughout this page. Make sure you have that repository cloned on your laptop and workstation so you can reference it.
Using kubectl
Setting up the kubectl commandline tool
Warning
Due to network restrictions, you should install and use kubectl from home.ccs.ornl.gov. SSH to
that system first before continuing the below steps.
Follow the steps from kubectl docs that is most appropriate to install kubectl on your laptop or workstation.
Then navigate to the Lux Rancher dashboard (remember to open the dashboard as described in Navigating to the Rancher Dashboard).
On the Rancher dashboard, click on the button in the top navbar that says ‘Copy KubeConfig to Clipboard’. This copies the configuration into your clipboard.
On your laptop or workstation, create a file named ~/.kube/config and paste the contents into the file.
You should now be able to use kubectl to perform operations on Kubernetes on Lux.
Note
The KubeConfig credentials expires every 24 hours and kubectl commands will start to error
out. You will need to do the above steps again
after a 24 hour period.
kubectl overview
Below you will find a subset of the key kubectl commands and a description of their function.
This section is not exhaustive, and if you find yourself looking for more information you can refer to the kubectl reference docs for a more exhaustive list.
Command |
Explanation |
Docs link |
|---|---|---|
|
“Applies” the resource, which can be a creation or update function. |
|
|
Fetches basic information on one or more resources.
Output can be modified with
--output to many formats, including json and yaml. |
|
|
More detailed information than |
|
|
Executes commands within a given resource.
Can be used with e.g.
<job/name> -it -- sh to get an interactive shell. |
|
|
Deletes a resource. This can be used to cancel running tasks. |
Below you can find a list of flags that can be useful for day-to-day operations
Flag |
Explanation |
|---|---|
|
Namespace specification. Useful when multiple namespaces can be searched. |
|
Specify path to custom kubeconfig. Useful if you use |
Create a new namespace
OLCF User Assistance will help you create or use a namespace for your project. Please contact User Assistance at help@olcf.ornl.gov
Some Kubernetes Basics
Kubernetes is an open-source workload manager primarily used for automating deployment, scaling, and management of containerized applications. It provides a rich API and workload primitives that allows users to manage the application deployments of long running services such as web servers and databases.
This documentation will focus on using the kubectl command line tool for creating and
manipulating resources on Kubernetes. The Rancher dashboard can also be used to do the same things,
but here we will use it mainly for viewing the status of resources and some limited interactions.
Workloads are defined as YAML file(s)
The most basic form of workload is a pod.
Setting the default namespace
You can set the default namespace for the operations you want to run with kubectl
with
kubectl config set-context --current --namespace=<your namespace>
Without this, you will need to pass a --namespace <your namespace> flag to any commands you run.
Note
You may need to do the above every time you set up new KubeConfig credentials in ~/.kube/config
Pods
A pod is the most basic and fundamental workload in Kubernetes, and consists of one or more containers. See an example below:
apiVersion: v1
kind: Pod
metadata:
  namespace: <namespace>
  name: hello-pod
  labels:
    app: hello-pod
spec:
  containers:
    - image: rancher/hello-world
      name: hello-pod
      ports:
        - containerPort: 80
  restartPolicy: Never
Save the above in a file named pod.yaml. Create this pod with kubectl apply -f pod.yaml. You
can view the status of the pod by running kubectl get pods.
You can open a shell into the container in the running pod with:
kubectl exec -it hello-pod -- /bin/sh
Deployment
A deployment is a simple and common representation of managing multiple replicated Pods. Deployments facilitate easy scaling of pods to adjust to load.
See an example below:
apiVersion: apps/v1
kind: Deployment
metadata:
  namespace: <namespace>
  name: recreate-example
spec:
  replicas: 2
  selector:
    matchLabels:
      deployment: recreate-example
  strategy:
    # We set the type of strategy to Recreate, which means that it will be scaled down prior to being scaled up
    type: Recreate
  template:
    metadata:
      labels:
        deployment: recreate-example
    spec:
      containers:
      - image: rancher/hello-world
        name: deployment-example
Run kubectl apply -f deployment.yaml to create the Deployment.
An explanation:
replicas- the number of replicas Podsselector- the selector to determine which Pods are managed by the Deployment and underlying ReplicaSet.template- the Pod specification/definition. This must include the label specified by theselectorundermetadata.labels.
Services
Services allow your Pods to communicate with one-another.
The below example will create a Service listening on port 9376 pointing to our Pod above:
apiVersion: v1
kind: Service
metadata:
  namespace: <namespace>
  name: hello-service
  labels:
    app: hello-pod
spec:
  selector:
    app: hello-pod
  ports:
    - protocol: TCP
      port: 8080
      targetPort: 80
You can then connect to the Pod from another pod by using
curl hello-service:8080
You can also create a service that refers to a Deployment
apiVersion: v1
kind: Service
metadata:
  namespace: <namespace>
  name: hello-service
  labels:
    deployment: recreate-example
spec:
  selector:
    deployment: recreate-example
  ports:
    - protocol: TCP
      port: 8080
      targetPort: 80
Run kubectl apply -f service.yaml to create the service.
Jobs
Jobs allow you to create and run a one off task or set of tasks that will run to completion and exit. if it exits It still starts and runs a Pod underneath, with some additional facilities to control the number of concurrent pods and number of successful completions expected. A Pod will be restarted on failure to try again (up to a limit you can specify). Successful completions don’t count against the limit.
Note
Jobs are important because this is the only way Lux GPUs can be used on Kubernetes. Support for GPUs on other Workloads like Pods and Deployments is still in the works.
As a simple example, lets create a Job that runs an echo “hello world” 7 times.
apiVersion: batch/v1
kind: Job
metadata:
  name: hello-job
  labels:
    app: hello-job
spec:
  completions: 7 # The job completes when it records 7 successful completions
  parallelism: 3 # this allows up to 3 pods to run in parallel at a time
  template: # this is the template for the Pod that will be run by the Job
    spec:
      containers:
        - image: rancher/hello-world
          name: hello-job
          command: ["/bin/bash"]
          args: ["-c", "echo hello world; sleep 10"]
      restartPolicy: Never
Port Forwarding (To View Your Application’s Output)
If you wish to view the output of your application you deployed on your browser, you can do so by
port forwarding to the port set up by the Service with the kubectl port-forward command.
# Format: kubectl port-forward <object type>/<object name> <local port>:<remote port>
kubectl port-forward service/hello-service 8080:8080

# you can also port forward directly to the pod or deployment. The remote port will be 80 since that is
# where the web app is being served for rancher/hello-world
kubectl port-forward pod/hello-pod 8080:80
You can now open your browser and navigate to localhost:8080 to see the webpage being served by
Pod behind the Service.
Example Application
The lux/guestbook example in the olcf_kubernetes_examples repository
demonstrates the above concepts together in a simple web application with a frontend and Redis.
CPU-Only Workloads on Kubernetes
If you would like to run CPU-only workloads, you are free to use the existing <proj>-gpu namespace described in GPU Usage on Kubernetes.
If you want to run CPU-only jobs in your designated <proj> (non -gpu) namespace, please contact User Assistance at help@olcf.ornl.gov
GPU Usage on Kubernetes
Note
GPUs are time limited use and cannot be used for persistent services. They can only be used in Jobs.
Running with GPUs
In order to use GPU resources on the Lux Kubernetes system, you must submit a Job workload type with the following information:
metadata:
  namespace: <proj>-gpu
  annotations:
    lux.olcf.ornl.gov/walltime:   # your requested time, max of 48h
spec:
  template:
    spec:
      containers:
        resources:
          limits:
            amd.com/gpu:          # desired GPUs
          requests:
            amd.com/gpu:          # desired GPUs
Specification |
Explanation |
|---|---|
|
Your allocated
<proj>-gpu namespace must be used for GPU jobs on Kubernetes.Other namespaces will reject GPU jobs.
Additionally, it is safe to run all workloads on the
<proj>-gpu.
Non-GPU jobs will be pushed to CPU-only nodes and not burn allocation.GPU accounting is only measured against tasks run in this namespace requesting GPU resources.
|
|
This is your requested walltime in hours, minutes, and/or seconds.
E.g.
2h, 60m, 30s, 1h30mThis is compared against your remaining allocation to ensure your allocation is not exceeded.
Refer to Run Policy for maximum run time.
|
|
This is the maximum amount of GPU resources you will need; this must be equal to |
|
This is the minimum amount of GPU resources you will need; this must be omitted, or equal to |
Warning
If you specify requests: amd.com/gpu:, it must be equal to limits: amd.com/gpu:.
Otherwise, your job will be rejected.
Under spec.containers in your deployment or pod configuration, you can include the GPU resource requests
for your container as fields under the .resources field. For example:
apiVersion: batch/v1
kind: Job
metadata:
  namespace: <proj>-gpu
  annotations:
    lux.olcf.ornl.gov/walltime: 60m
  name: torch-pod
spec:
  backoffLimit: 0
  template:
    spec:
      containers:
        - image: "docker.io/subilabrahamornl/sampletorch:latest"
          name: gpu-pod
          command: ["python3"]
          args: ["/root/sampletorch.py"]
          resources:
            limits:
              amd.com/gpu: 1
            requests:
              amd.com/gpu: 1
      restartPolicy: Never
Note
Currently, only one container in your Job may request GPUs.
See the torch_simple example on how to run a pod with Pytorch running an MNIST example.
Requesting and Using Multiple GPUs
You can request up to 8 GPUs in your request in the limits and requests fields. A Lux node has 8
GPUs so that is the maximum you can request in a single Pod.
resources:
  limits:
    amd.com/gpu: 8
  requests:
    amd.com/gpu: 8
Cancelling Jobs
In the case of GPU jobs, it is important to have the ability to cancel in various situations to preserve your allocation.
It is simple to cancel or remove Jobs, simply delete the Job from the same file. Example:
$ kubectl delete -f gpu-job.yaml
job.batch "gpu-job" deleted from <proj>-gpu namespace
Checking a Project Allocation
Warning
For all fields, in the case of values ending in m, this is an amount in milli-GPU hours.
In order to check your project’s allocation, you can use the kubectl command line tool.
To find your existing allocation(s) for a project, you can use the following command:
kubectl get projectallocations -n <proj>-gpu
Below is an example:
$ kubectl get alloc -n <proj>-gpu
NAME             ALLOCATED   CONSUMED   RESERVED   AVAILABLE   WINDOW END             ACTIVE   EXHAUSTED
<proj>-2026-q4   1000        0          0          1k          2027-01-01T00:00:00Z   True     False
Below you can see an explanation of the fields:
Field |
Definition |
|---|---|
NAME |
The name of the allocation |
ALLOCATED |
This is the number of allocated GPU-hours as a decimal. |
CONSUMED |
This is the number of GPU hours consumed.
In the case of values ending in
m, this is milli-GPU hours |
RESERVED |
This is the number of GPU hours for jobs that have passed budget check (admitted or running) and haven’t been charged yet.
Each hold is the Job’s full maximum (GPUs × walltime); the unused part is returned when the Job ends.
In the case of values ending in
m, this is milli-GPU hours. |
AVAILABLE |
This is the number of GPU hours currently available to be reserved at admission.
This is equal to
ALLOCATION - CONSUMED - RESERVED.In the case of values ending in
m, this is milli-GPU hours. |
WINDOW END |
This shows the end time of your allocation. |
ACTIVE |
This value is “True” or “False” and tells you whether the allocation is currently active. |
EXHAUSTED |
This value is “True” or “False” and tells you whether your allocation has been used entirely. |
Detailed Project Allocation
A detailed view of your project allocation can be viewed with the following command:
kubectl describe alloc <NAME> -n proj-gpu
or
kubectl describe projectallocation <NAME> -n proj-gpu
Checking Workload Allocation Usage
Warning
For all fields, in the case of values ending in m, this is an amount in milli-GPU hours.
The kubectl command line tool can be used to check a workload/Job’s allocation burn.
See a list of workload usages, you can run
kubectl get budgetcharges -n <proj>-gpu
Below is an example:
$ kubectl get budgetcharges -n stf007-gpu
NAME                                                                            ALLOCATION       SUBJECT   GPUS   OUTCOME                        GPU HOURS   FINISHED
budgetcharge-4b41302cadafa29b6f23e8799a5ee6c2e0291d690647820aa7c3d93233cf3e7e   <proj>-2026-q4   gpu-job   1      Succeeded                      35m         2026-10-15T20:39:56Z
budgetcharge-682c0b27b866976f9774d892434877cc03a3f23277fe34eb69c848cf9cdc5afe   <proj>-2026-q4   gpu-job   1      MaximumExecutionTimeExceeded   167m        2026-10-15T20:55:33Z
Below is an explanation of the fields:
Field |
Definition |
|---|---|
NAME |
Unique name of the |
ALLOCATION |
Name of the allocation in which the |
SUBJECT |
Name of the workload allocation.
This is the same as the |
GPUS |
The number of GPUs requested. |
OUTCOME |
Final workload status. |
GPU HOURS |
Number of GPU hours burned by the workload.
In the case of values ending in
m, this is milli-GPU hours. |
FINISHED |
Timestamp of workload termination. |
Detailed Workload Allocation Usage
A detailed view of your workload’s allocation burn can be viewed with the following command:
kubectl describe budgetcharge <NAME> -n <proj>-gpu
Run Policy
Namespace |
Node Count [1] |
Duration |
Policy |
|---|---|---|---|
|
1-484 Nodes |
Duration 0-48h |
FIFO - Global, backfill enabled |
Warning
Node counts for HPC and Kubernetes on Lux depend on current machine split. Displayed value is the theoretical maximum.
Storage
Pods are ephemeral and any data written within a Pod is lost when the Pod is restarted or deleted. Kubernetes provides options for ways to store data persistently.
Using PersistentVolumeClaims (PVCs) for Persistent Storage
A PersistentVolumeClaim (PVC) lets you request an amount of storage that you can then mount into your Pods. The below example creates a PVC that requests 5GB of storage.
apiVersion: v1
kind: PersistentVolumeClaim
metadata:
  name: storage-1
spec:
  accessModes:
    - ReadWriteOnce
  resources:
    requests:
      storage: 5Gi
Run kubectl apply -f pvc.yaml to create this PVC.
With this created, we can mount this PVC to a Pod. Below example creates a Pod with this PVC
apiVersion: v1
kind: Pod
metadata:
  namespace: <namespace>
  name: hello-pod
  labels:
    app: hello-pod
spec:
  containers:
    - image: rancher/hello-world
      name: hello-pod
      ports:
        - containerPort: 80
      volumeMount:
        mountPath: /data
        name: pvol
  restartPolicy: Never
  volumes:
    name: pvol
    PersistentVolumeClaim:
      claimName: storage-1
There are two available storage classes: netapp-file and netapp-block for PVCs.
netapp-file is the default and is probably what you need for most of your use cases.
netapp-block is useful when you need a persistent backing store for a database.
Temporary Storage
PVCs are the right option if you want to make sure your data sticks around between Pod restarts. If you would like to have some additional storage that doesn’t need to be persisted between Pod restarts (like a scratch space or a file cache), there are a couple of options.
One is emptyDir which lets you set up a cache on the node’s local storage with a size limit so
you cannot write to it beyond what is allocated. For example, with our hell
apiVersion: v1
kind: Pod
metadata:
  namespace: <namespace>
  name: hello-pod
  labels:
    app: hello-pod
spec:
  containers:
    - image: rancher/hello-world
      name: hello-pod
      ports:
        - containerPort: 80
      volumeMounts:
      - mountPath: /cache
        name: cache-emptydir
  restartPolicy: Never
  volumes:
  - name: cache-emptydir
    emptyDir:
      sizeLimit: 500Mi
Another option is ephemeral, which allocates storage in the same way as PVCs and on the same hardware, and is thus
not limited by what is available on the node’s local storage. Unlike PVCs, this gets deleted when
the Pod is deleted. It uses as the same parameters as PersistentVolumeClaims.
apiVersion: v1
kind: Pod
metadata:
  name: hello-pod
  labels:
    app: hello-pod
spec:
  containers:
    - image: rancher/hello-world
      name: hello-pod
      ports:
        - containerPort: 80
      volumeMounts:
      - mountPath: /cache
        name: cache-ephemeral
  restartPolicy: Never
  volumes:
  - name: cache-ephemeral
    ephemeral:
      volumeClaimTemplate:
        metadata:
          labels:
            name: my-cache-ephemeral
        spec:
          storageClassName: netapp-file
          accessModes:
            - ReadWriteOnce
          resources:
            requests:
              storage: 5Gi
You will see that this creates a pod as well as automatically create a PVC named <pod name>-<volume name>. See it
with kubectl get pvc.
Note
Unlike PVCs, you will not specify a .metadata.name in the volumeClaimTemplate for
ephemeral storage. The name is automatically determined.
Accessing your Application
HTTPRoutes for Accessing your App via the Browser
HTTPRoutes allow you to set up a way to access your Service via a URL. This is useful if you want to create a web application to interact with on the browser that you would like other people to access.
Note
Right now, this type of access is automatically gated behind an OLCF login i.e. anyone trying to access a url set up by an HTTPRoute will be redirected to an OLCF login page first. This is not publicly visible on the internet without authentication. Reach out to help@olcf.ornl.gov if you want to setup a publicly accessible service that runs on OLCF hardware.
To setup an HTTPRoute for the hello-service Service we set up for the hello-pod Pod:
apiVersion: gateway.networking.k8s.io/v1
kind: HTTPRoute
metadata:
  name: hellogateway
  namespace: <namespace>
  labels:
    app: hello-pod
spec:
  hostnames:
    - <name of your app>.apps.lux.olcf.ornl.gov
  parentRefs:
    - group: gateway.networking.k8s.io
      kind: Gateway
      name: cluster-ingress-gateway
      namespace: istio-gateway
  rules:
    - backendRefs:
        - kind: Service
          name: hello-service
          port: 8080
      matches:
        - path:
            type: PathPrefix
            value: /
Then run kubectl apply -f gateway.yaml.
As of right now, trying to reach this via a browser directly will not work as it is only accessible from within the Lux network. You will need to access it through setting up an ssh proxy and using a browser extension like Foxyproxy .
In your terminal, set up port forwarding with the following ssh command.
ssh -N -J your_username@home.ccs.ornl.gov your_username@login1.lux.olcf.ornl.gov -D 127.0.0.1:10000
In your browser, install Foxyproxy, and add a proxy named ‘Lux’ with Type SOCKS5, Hostname
127.0.0.1 and Port 10000.
Now select ‘Lux’ as the active proxy in Foxyproxy and point your browser to <name of your app>.apps.lux.olcf.ornl.gov.
Note
If you open the page on the browser and you see a page that says “No healthy upstream”, then
check to make sure that you have .metadata.labels entry set up for your Service that the
HTTPRoute is pointing to. HTTPRoute needs a label to be present for its service.
Pull Secret Creation for Kubernetes
Dockerhub can be used as a storage location for any container images you create that you want to use on Lux Kubernetes. Here is how to configure setting up secrets to authenticate pulling images from Dockerhub from Kubernetes.
0. Creating a Personal Access Token on Dockerhub
Login to Dockerhub.
Click on your user icon on the top right, and navigate to Account Settings->Personal Access Tokens.
Click on the “Generate new token” button.
In the ‘Create access token” page that opens, enter the name, select the expiry for the token, and select the appropriate permissions you want from the ‘Repository permissions’ dropdown.
You will probably want ‘Repo read-only’ if you want to pull images from your private repositories.
Click ‘Generate’ and save the token displayed somewhere.
1. Create the Secret
Via the Rancher Dashboard (See Navigating to the Rancher Dashboard):
Navigate to your
Cluster > Projects/Namespacesand select your target Namespace.In the left menu, go to
Storage > Secrets.Click
Createand selectRegistry.Verify that the appropriate namespace is selected in the top-left “Namespace” box.
Name the secret (for example,
docker-pull-secret).Select
DockerHubfor the registry type under “Data” and enter your username and the token you created earlier as the password.Click
Create.
2. Use the Secret in your Manifest
Once the secret exists in the target namespace, you must explicitly tell your Pods or Deployments or Jobs to use it by adding the imagePullSecrets array to your manifest specification.
apiVersion: apps/v1
kind: Deployment
metadata:
  name: my-app-deployment
  namespace: your-namespace
spec:
  replicas: 1
  selector:
    matchLabels:
      app: my-app
  template:
    metadata:
      labels:
        app: my-app
    spec:
      containers:
        - name: my-app
          image: <USERNAME>/<image:tag>
      imagePullSecrets:
        - name: docker-pull-secret