Riker User Guide
Note
OLCF is pleased to announce Riker, our new data analysis and visualization cluster, which will replace the existing Andes system.
Riker is a 136-node system with 128 AMD EPYC CPU-only nodes and 8 hybrid AMD EPYC CPU + NVIDIA L40S GPU nodes. The new system will provide OLCF users with upgraded capabilities for data analysis and visualization workflows.
Riker mounts the same user and project filesystems as Andes (/ccs/home, /ccs/proj, and /lustre/orion) so you will not need to migrate any data stored in those filesystems.
However, it is required to recompile programs and rebuild Python environments prior to running on Riker.
All current Andes users will gain access to Riker on September 10th. Once user access begins, Riker and Andes will operate in parallel for approximately six weeks to provide users time to transition their workflows. At the end of this transition period, Andes will be decommissioned.
Notable Differences to Andes:
Andes has 704 CPU nodes (32 cores, 256 GB RAM) with 9 NVIDIA K80 GPU nodes (28 cores, 2 GPUs per node, 1TB RAM).
Riker has 128 CPU nodes (128 cores, 2.2 TB RAM) with 8 NVIDIA L40S GPU nodes (64 cores, 2 GPUs per node, 1.5 TB RAM).
Andes allocates whole nodes only, while Riker allows partial node allocations. On Riker you can allocate a subset of a node’s CPU cores, memory, and GPUs. Consequently, more explicit resource requests are required on Riker. More information in the General information for Node-sharing on Riker section.
Riker uses newer compiler/MPI environments (notably MPICH and CUDA 13-era GPU support).
Node-hour charging based on weighted percentage of a node used. More information about the weights in Job Accounting on Riker.
System Overview
Riker is the new pre-processing/post-processing and visualization cluster for the OLCF aimed to further large-scale scientific discovery alongside Frontier. Replacing our Andes cluster, Riker consists of 128 CPU-only nodes and 8 Hybrid CPU+GPU nodes. These nodes are configured to allow multiple users to securely share the same node through core-level resource requests.
Riker Nodes
The system consists of 128 CPU nodes and 8 GPU nodes.
GPU Compute Nodes
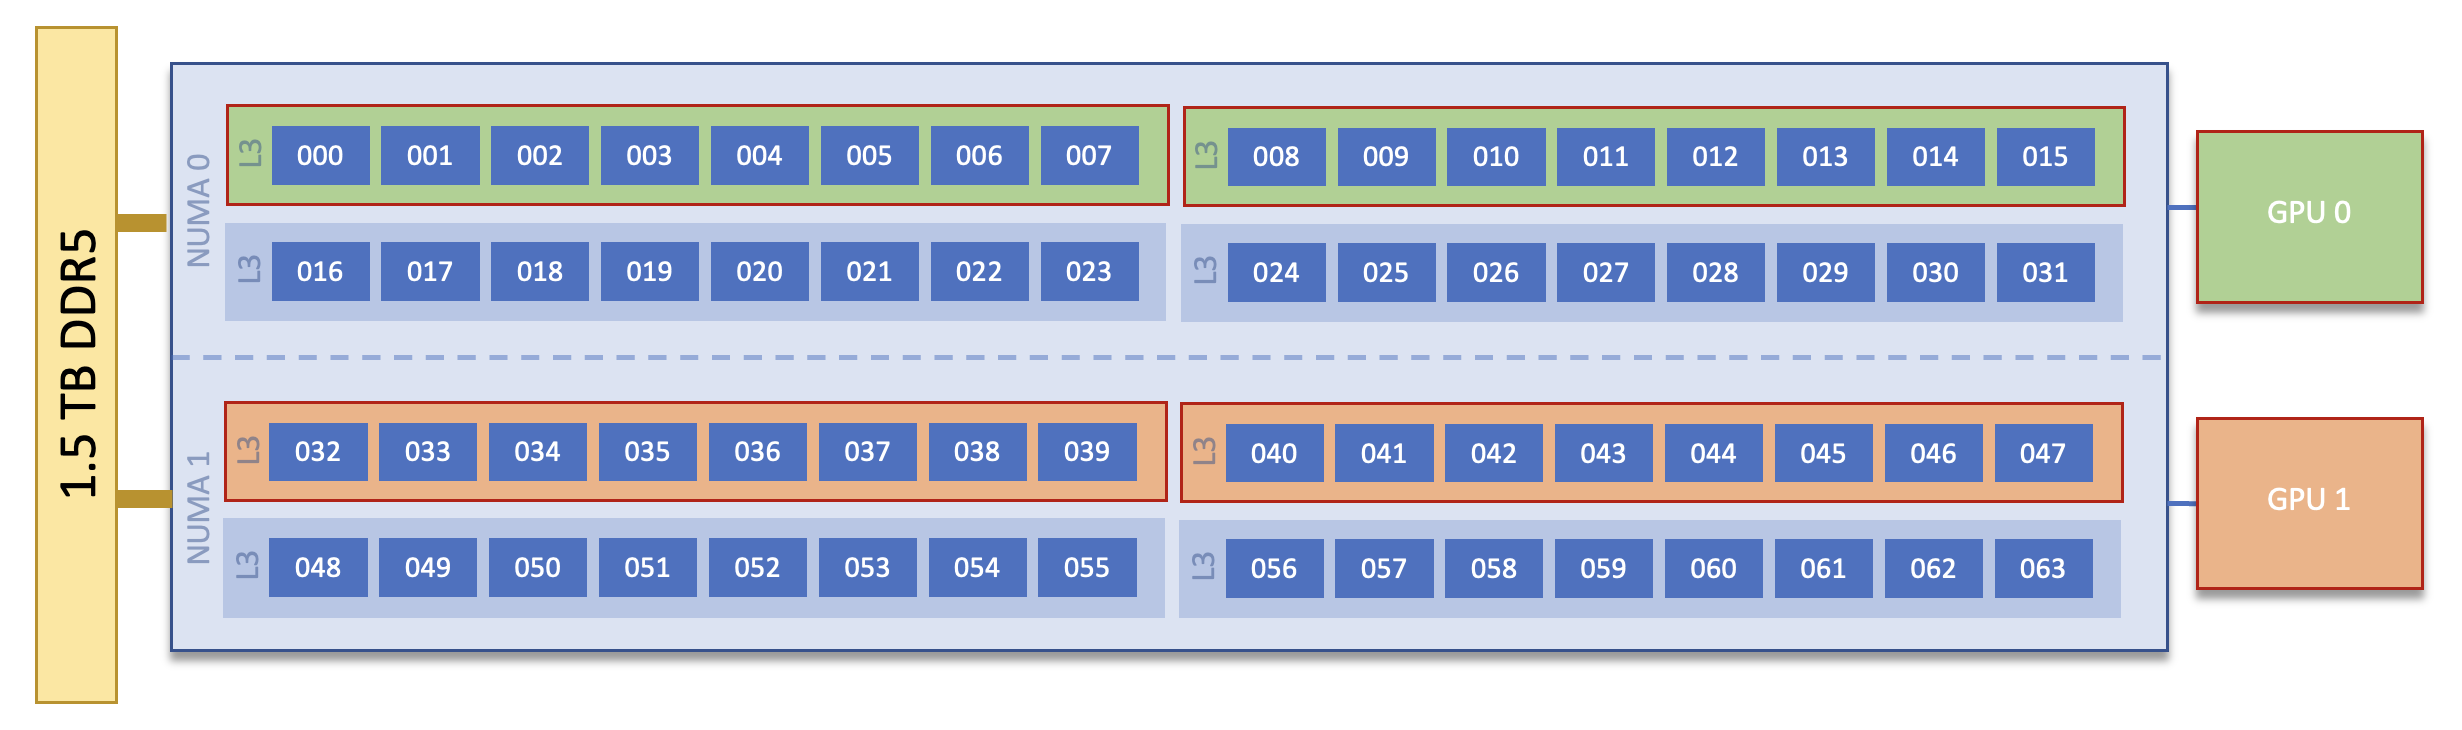
Each Riker GPU node consists of [1x] 64-core AMD EPYC 9575F CPU. The CPU has access to 1.5TB of memory and [2x] 48GB NVIDIA L40S GPUs.
Note
There is 2 NUMA domain per node, that are defined as follows:
NUMA 0: CPU(s) 0-31
NUMA 1: CPU(s) 32-63
CPU Compute Nodes
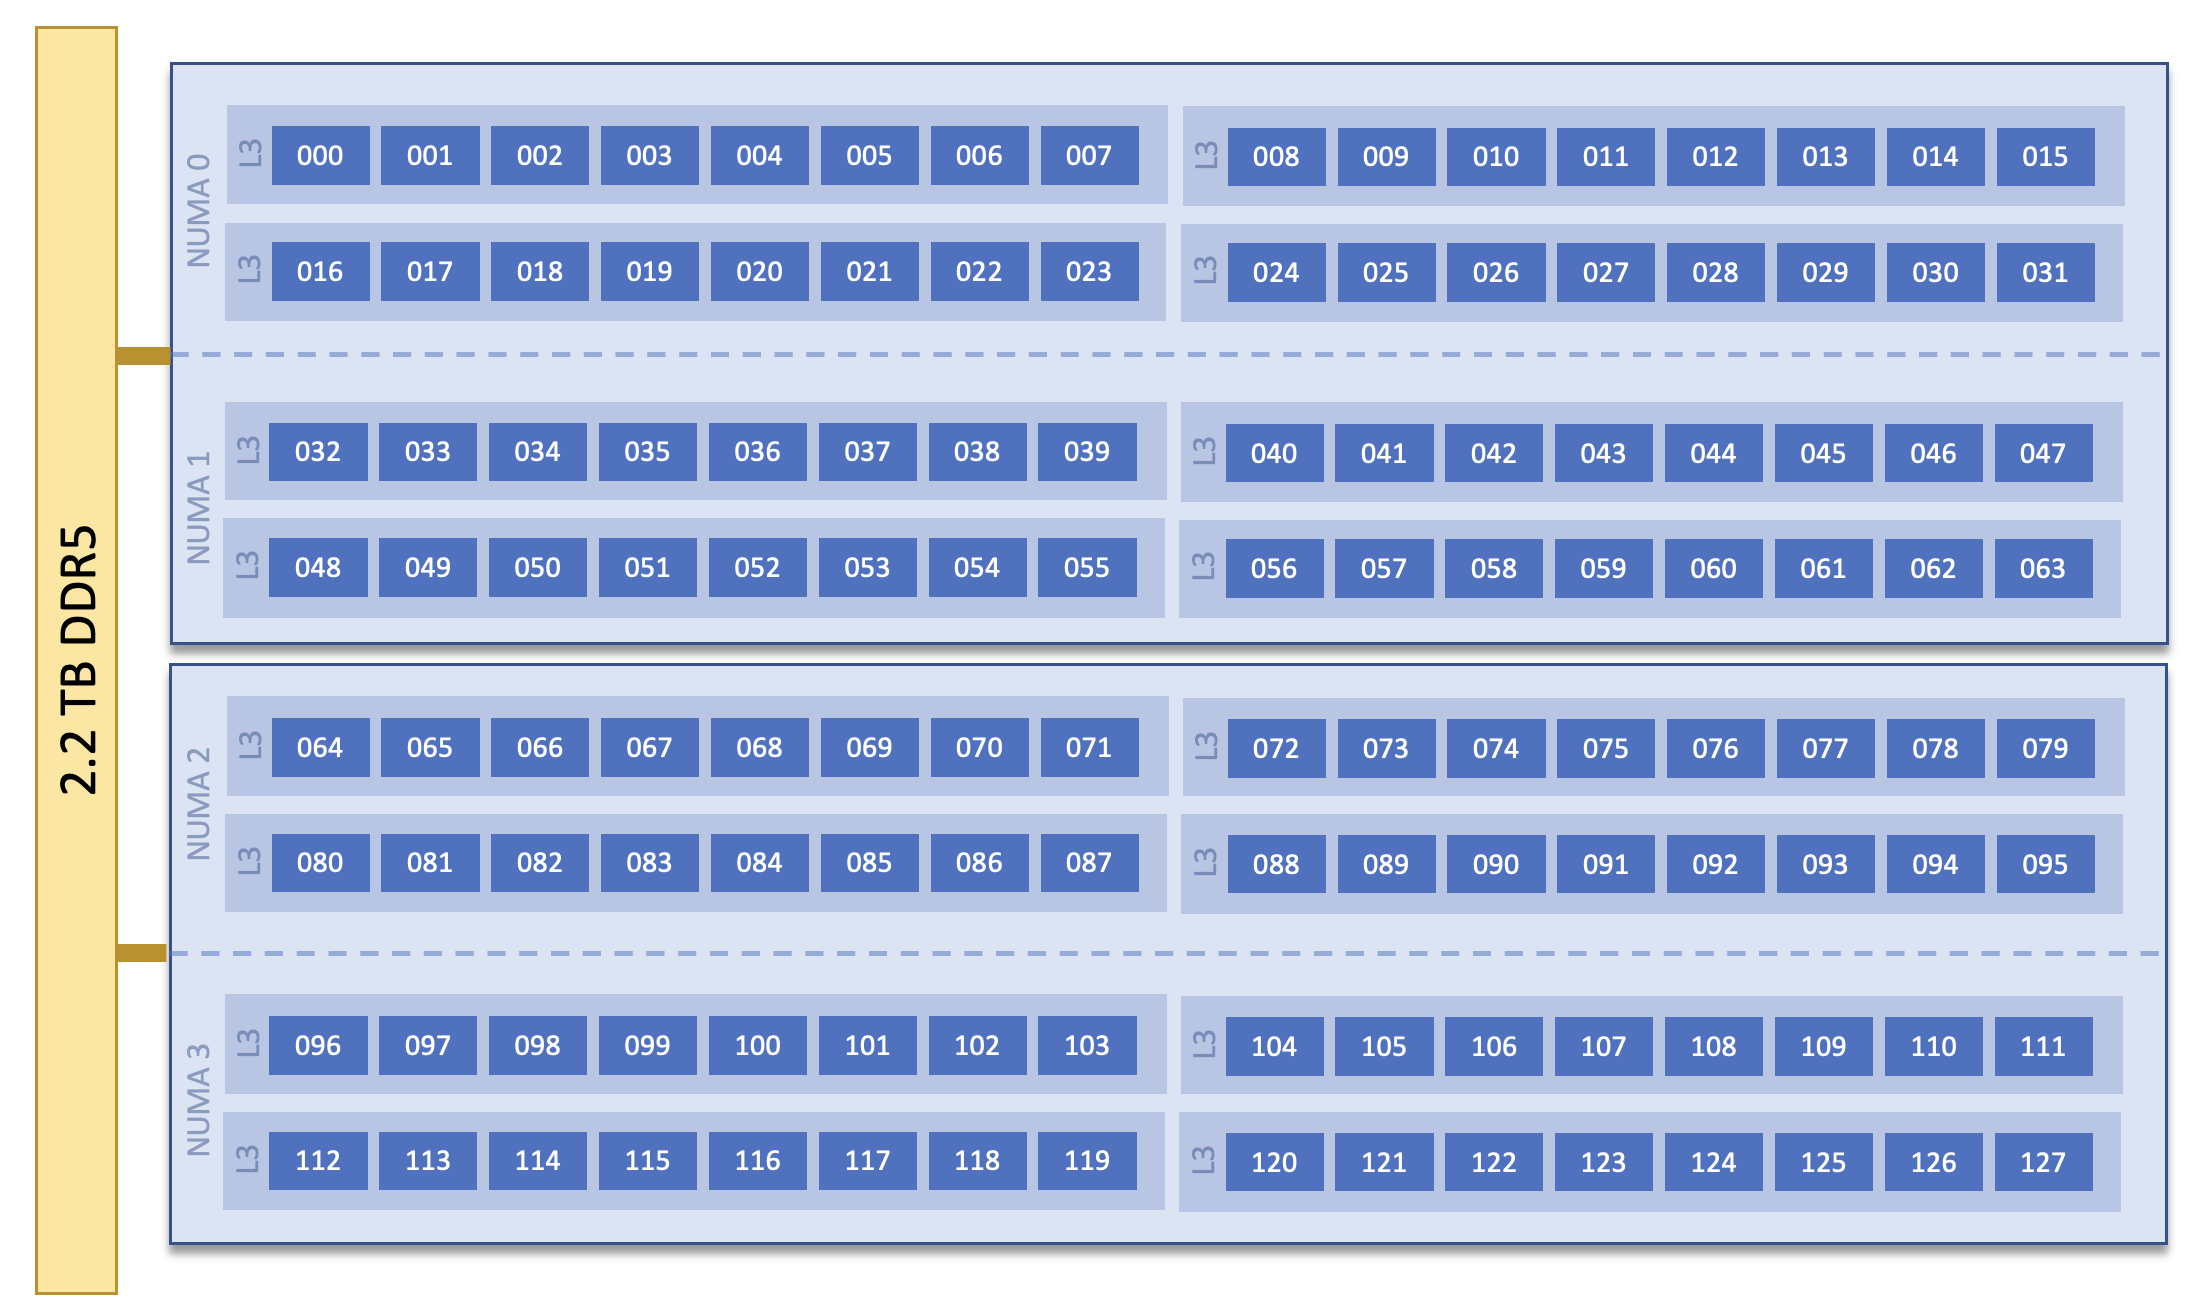
Each Riker CPU node consists of [2x] 64-core AMD EPYC 9534 CPUs. Both CPUs have access to 2.2TB of memory.
Note
There are 4 NUMA domains per node, that are defined as follows:
NUMA node0 CPU(s): 0-31
NUMA node1 CPU(s): 32-63
NUMA node2 CPU(s): 64-95
NUMA node3 CPU(s): 96-127
Login Node
The Riker login node consists of [2x] 64-core AMD EPYC 9534 CPUs with access to 2.2TB of memory. This is the place to write/edit/compile your code, manage data, submit jobs, etc. You should never launch parallel jobs from a login node nor should you run threaded jobs on a login node. Login nodes are shared resources that are in use by many users simultaneously.
System Interconnect
The Riker nodes are connected with Infiniband interconnects in a Leaf & Spine configuration.
File Systems
Riker is connected to the Lustre Orion filesystem providing 679 PB of usable namespace (/lustre/orion/).
Riker also has access to the center-wide NFS-based filesystem in /ccs/home/<username> that provides the user & project home areas.
Note
While Riker does not have direct access to the center’s nearline storage system, Kronos, for user and project archival storage - users can log in to the Data Transfer Nodes (DTNs) to move data to/from Kronos.
GPUs
Riker contains a total of 16 NVIDIA L40S GPUs. Based on the Ada Lovelace Architecture, the NVIDIA L40S GPU has a peak performance of up to 91.6 TFLOPS in single-precision performance. Each GPU contains 48 GB GDDR6 Memory which can be accessed at speeds of 864 GB/s.
Connecting
To connect to Riker, ssh into the load-balancer riker.olcf.ornl.gov:
$ ssh username@riker.olcf.ornl.gov
or direct connect to a specific login node (login1 for example):
$ ssh username@riker-login1.olcf.ornl.gov
Data and Storage
For more detailed information about center-wide file systems and data archiving available on Riker, please refer to the pages on Data Storage and Transfers, but the two subsections below give a quick overview of NFS and Lustre storage spaces.
NFS Filesystem
Area |
Path |
Type |
Permissions |
Quota |
Backups |
Purged |
Retention |
On Compute Nodes |
|---|---|---|---|---|---|---|---|---|
User Home |
|
NFS |
User set |
50 GB |
Yes |
No |
90 days |
Yes |
Project Home |
|
NFS |
770 |
50 GB |
Yes |
No |
90 days |
Yes |
Note
Though the NFS filesystem’s User Home and Project Home areas are read/write from Riker’s compute nodes, we strongly recommend that users launch and run jobs from the Lustre Orion parallel filesystem instead due to its larger storage capacity and superior performance. Please see below for Lustre Orion filesystem storage areas and paths.
Lustre Filesystem
Area |
Path |
Type |
Permissions |
Quota |
Backups |
Purged |
Retention |
On Compute Nodes |
|---|---|---|---|---|---|---|---|---|
Member Work |
|
Lustre HPE ClusterStor |
700 |
50 TB |
No |
90 days |
N/A |
Yes |
Project Work |
|
Lustre HPE ClusterStor |
770 |
50 TB |
No |
90 days |
N/A |
Yes |
World Work |
|
Lustre HPE ClusterStor |
775 |
50 TB |
No |
90 days |
N/A |
Yes |
Warning
Proprietary/Sensitive/Controlled Information Notice
Portions of data and/or software used in your project may require extra protections due to requirements for proprietary, sensitive, or controlled information. As Riker is a node-shared resource, it is imperative that filenames, application names, job names, environment variables, batch job scripts, or any other unencrypted text must never contain proprietary, sensitive, or controlled information.
If you have HIPAA or ITAR data, you will need to use our SPI resources. More information about SPI can be found here.
If you have security-related questions, contact us via email at: security-admins@ccs.ornl.gov. Other questions can be sent to help@olcf.ornl.gov
Programming Environment
OLCF provides Riker users many pre-installed software packages and scientific libraries. To facilitate this, environment management tools are used to handle necessary changes to the shell.
Environment Modules (Lmod)
Environment modules are provided through Lmod, a Lua-based module system for
dynamically altering shell environments. By managing changes to the shell’s
environment variables (such as PATH, LD_LIBRARY_PATH, and
PKG_CONFIG_PATH), Lmod allows you to alter the software available in your
shell environment without the risk of creating package and version combinations
that cannot coexist in a single environment.
General Usage
The interface to Lmod is provided by the module command:
Command |
Description |
|---|---|
|
Shows a terse list of the currently loaded modules |
|
Shows a table of the currently available modules |
|
Shows help information about |
|
Shows the environment changes made by the |
|
Searches all possible modules according to |
|
Loads the given |
|
Adds |
|
Removes |
|
Unloads all modules |
|
Resets loaded modules to system defaults |
|
Reloads all currently loaded modules |
Searching for Modules
Modules with dependencies are only available when the underlying dependencies,
such as compiler families, are loaded. Thus, module avail will only display
modules that are compatible with the current state of the environment. To
search the entire hierarchy across all possible dependencies, the spider
sub-command can be used as summarized in the following table.
Command |
Description |
|---|---|
|
Shows the entire possible graph of modules |
|
Searches for modules named |
|
Searches for a specific version of |
|
Searches for modulefiles containing |
Compiling
This section covers how to compile for different programming models using the different compilers available on Riker.
Compilers
AOCC, CUDA, Intel, GCC, and LLVM compilers are provided through modules on Riker. The system GCC (version 11.5.0) compiler is also located in
/usr/bin. The table below lists details about each of the module-provided compilers.
Vendor |
Compiler Module |
Language |
Compiler |
|---|---|---|---|
AMD |
aocc |
C |
|
C++ |
|
||
Fortran |
|
||
NVIDIA |
cudanvhpvc |
C |
|
C++ |
|
||
Fortran |
|
||
Intel |
oneapi |
C |
|
C++ |
|
||
Fortran |
|
||
GCC |
gcc |
C |
|
C++ |
|
||
Fortran |
|
||
LLVM |
llvm |
C |
|
C++ |
|
||
Fortran |
|
MPI
The MPI implementation available on Riker is MPICH.
Implementation |
Module |
Compiler |
Header Files & Linking |
|---|---|---|---|
MPICH |
mpich/5.0.1mpich/5.0.1-gpu |
|
|
|
-I$(MPICH_DIR)/include-L$(MPICH_DIR)/lib -lmpi |
GPU-Aware MPI
To use GPU-aware MPI, users must load specific modules, set some environment variables, and include appropriate headers and libraries. The following modules and environment variables must be set:
# Load CUDA13 before GPU-Enabled MPI
module load cuda/13.3.0
module load mpich/5.0.1-gpu

# Export this variable
export MPIR_CVAR_ENABLE_GPU=1
In addition, the following header files and libraries must be included:
For mpicc / mpicxx:
-I${CUDA_PATH}/include
-L${CUDA_PATH}/lib64 -lcudart
For nvcc:
-I${MPICH_DIR}/include
-L${MPICH_DIR}/lib -lmpi
where the include path implies that #include <cuda.h> and #include <cuda_runtime_api.h> is included in the source file.
OpenMP
This section shows how to compile with OpenMP using the different compilers covered above.
Vendor |
Module |
Language |
Compiler |
OpenMP flag (CPU thread) |
|---|---|---|---|---|
AMD |
|
C
C++
|
clangclang++ |
|
Fortran |
|
-homp-fopenmp (alias) |
||
NVIDIA |
|
C
C++
Fortran
|
nvccnvc++nvfortan |
|
Intel |
|
C
C++
Fortran
|
icxicpxifx |
|
GCC |
|
C
C++
Fortran
|
$GCC_PATH/bin/gcc$GCC_PATH/bin/g++$GCC_PATH/bin/gfortran |
|
LLVM |
|
C
C++
|
clangclang++ |
|
Fortran |
|
-homp-fopenmp (alias) |
Running Jobs
This section describes how to run programs on the Riker compute nodes, including a brief overview of Slurm and also how to map processes and threads to CPU cores and GPUs.
Slurm Workload Manager
Slurm is the workload manager used to interact with the compute nodes on Riker. In the following subsections, the most commonly used Slurm commands for submitting, running, and monitoring jobs will be covered, but users are encouraged to visit the official documentation and man pages for more information.
Batch Scheduler and Job Launcher
Slurm provides 3 ways of submitting and launching jobs on Riker’s compute nodes: batch scripts, interactive, and single-command. The Slurm commands associated with these methods are shown in the table below and examples of their use can be found in the related subsections.
|
Used to submit a batch script to allocate a Slurm job allocation. The script contains options preceded with
#SBATCH.(see Batch Scripts section below)
|
|
Used to allocate an interactive Slurm job allocation, where one or more job steps (i.e.,
srun commands) can then be launched on the allocated resources (i.e., nodes).(see Interactive Jobs section below)
|
|
Used to run a parallel job (job step) on the resources allocated with
sbatch or salloc.If necessary,
srun will first create a resource allocation in which to run the parallel job(s).(see Single Command section below)
|
General information for Node-sharing on Riker
Riker is a node-shared Slurm cluster: multiple users may run on the same physical node at the same time, as long as their resource requests do not overlap. Node sharing on Riker is facilitated through Slurm allocations of CPU cores, memory, and (on GPU nodes) GPUs, with additional site policies that reserve CPU cores for GPU work on GPU nodes.
When constructing a job on Riker, please be aware of the two-phase resource allocation steps within Slurm.
Phase |
Location |
Description |
|
|---|---|---|---|
Allocation |
Login |
Request resources with |
|
Delegation |
Compute |
Launch work with |
|
Riker enforces memory as a per-core share. CPU cores and memory are coupled on all nodes. Users can request cores or memory, but the system ties them together as equal shares and will round accordingly.
If a job requires all the resources on a node, users can use the --exclusive flag to disable node-sharing functionality and give the job sole access to the nodes in that allocation.
Sharing Batch (CPU) nodes
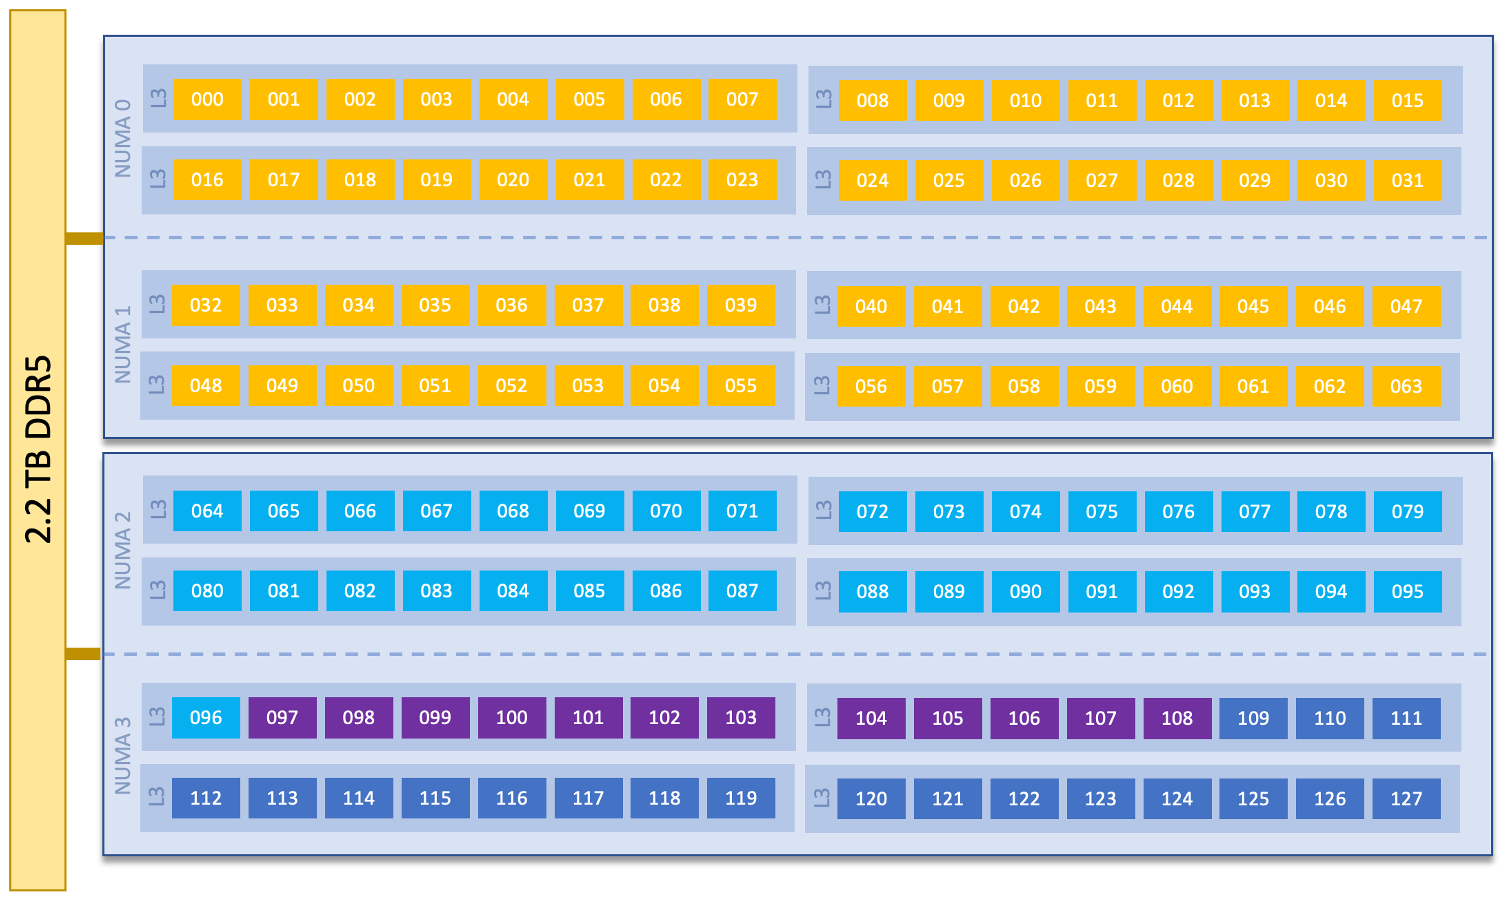
Each Batch node has 128 Cores that can be allocated on a single-core basis and come with an equal share of memory (~17GB per core).
Users can allocate using -c for cores or --mem for memory. Your request will round accordingly.
Example: Let us assume there are two users already running on a batch riker node. Yellow User has 64 cores allocated, and Blue User has 33 cores allocated. The following job script would result in the Purple User slotting into that same node filling in more of the unused cores proportional to their memory request. The remaining cores and memory are left unallocated for a fourth user to potentially allocate.
 1#!/bin/bash
 2## ALLOCATION TIME RESOURCE REQUESTS ##
 3#SBATCH -A <project_id>
 4#SBATCH -J <job_name>
 5#SBATCH -o %x-%j.out
 6#SBATCH -t 00:05:00
 7#SBATCH -p batch
 8#SBATCH -N 1
 9#SBATCH --mem=200G
10
11## RUNTIME RESOURCE DELEGATION ##
12srun -n6 --cpus-per-task=2 ./a.out
Sharing GPU nodes
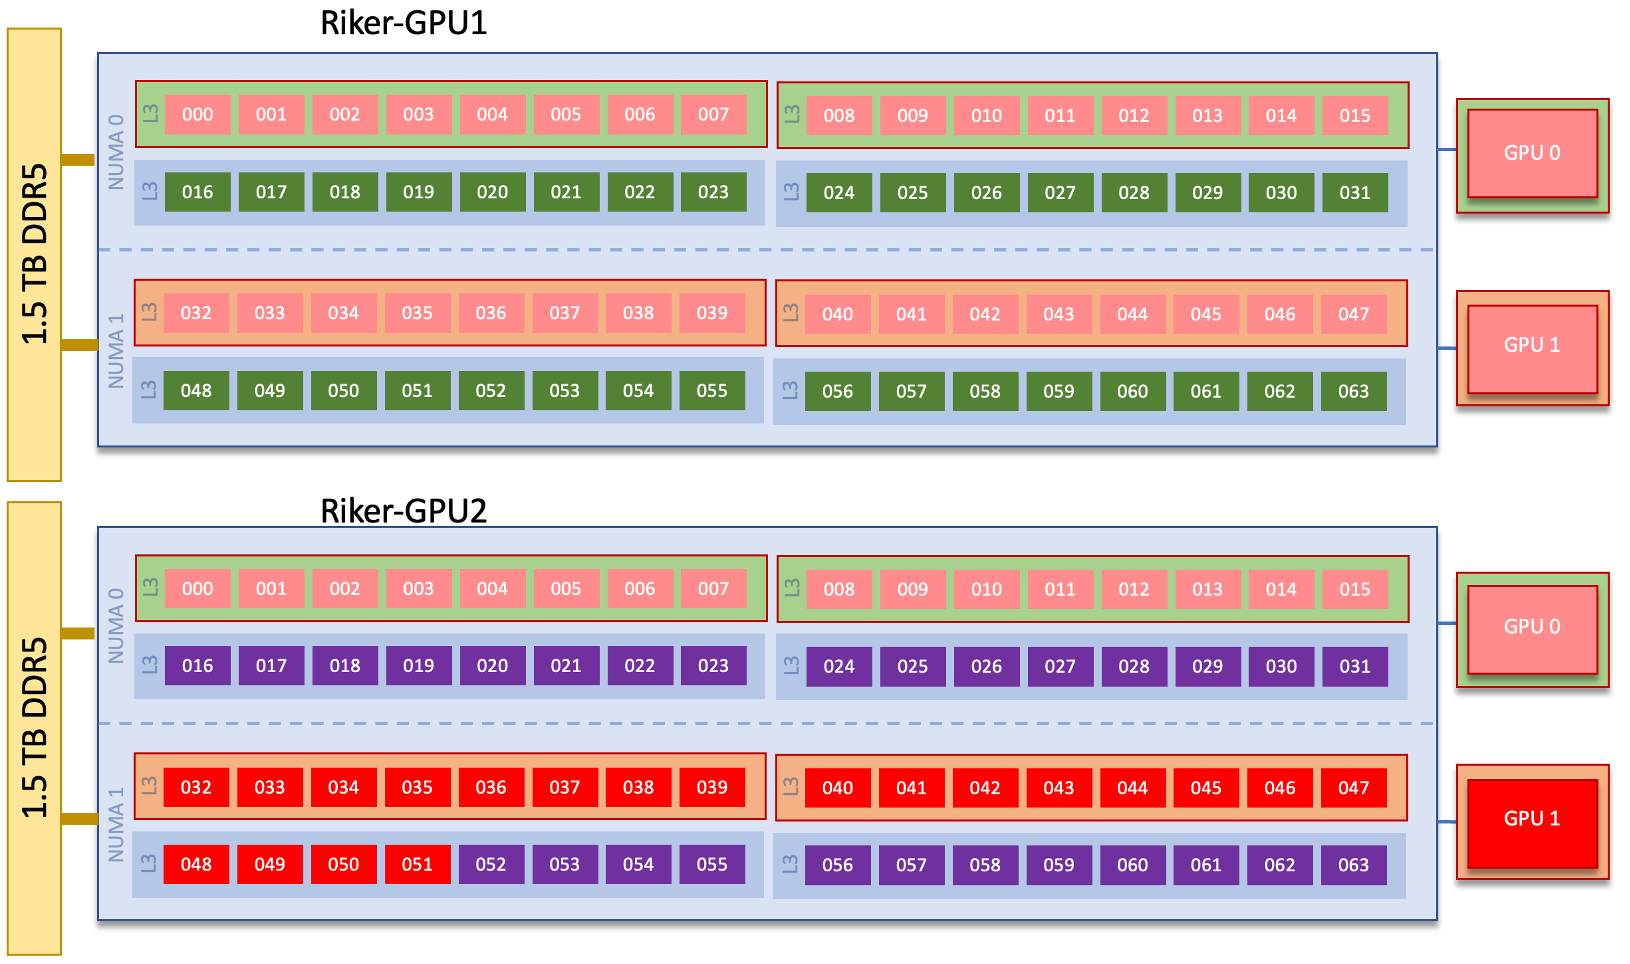
Each GPU node has 64 Cores that can be allocated on a single-core basis and come with an equal share of memory (~24GB per core); however, 32 Cores (16 per GPU) are reserved for the GPUs and can only allocated if you also allocate the bound GPU.
The reserved cores are automatic allocated when a GPU is requested --gpus. All other cores on the GPU nodes operate as “Flex / Shared” cores that can be allocated
by GPU-enabled workloads & CPU-Only workloads allowing users to fill unused CPUs on GPU nodes or GPU jobs to increase beyond the default 16 Cores.
Example: Let us assume there are three users already running on two riker-gpu nodes. Pink User has 3 GPUs allocated across riker-gpu1 and riker-gpu2, Green User allocated the remaining 32 cores on riker-gpu1 for a CPU-Only workload, and Purple User allocated 28 cores on riker-gpu2 for a CPU-Only workload. The following job script would result in the Red user slotting into the second GPU on riker-gpu2, flexing to 20 cores instead of the default 16 cores to consume the rest of the resources on riker-gpu2.
 1#!/bin/bash
 2## ALLOCATION TIME RESOURCE REQUESTS ##
 3#SBATCH -A <project_id>
 4#SBATCH -J <job_name>
 5#SBATCH -o %x-%j.out
 6#SBATCH -t 00:05:00
 7#SBATCH -p gpu
 8#SBATCH -N 1
 9#SBATCH --gpus=1
10#SBATCH --cpus-per-gpu=20
11
12## RUNTIME RESOURCE DELEGATION ##
13srun -n1 --cpus-per-task=20 --gpus-per-task=1 ./a.out
Note
Riker should support the majority of Slurm job structures. If you find that your job structure does not work as expected, please reach out to help@olcf.ornl.gov.
Queues on Riker
The compute nodes on Riker are separated into two partitions the “batch partition” and the “GPU partition” as described in the Riker Nodes section. The scheduling policies for the individual partitions are as follows:
Batch Partition Policy (default)
Jobs that do not specify a partition will run in the 128 node batch partition:
Bin |
Node Count |
Duration |
Policy |
|---|---|---|---|
A |
1 - 8 Nodes |
0 - 48 hr |
max 4 jobs running and 4 jobs eligible per user in bins A, B, and C |
B |
9 - 64 Nodes |
0 - 36 hr |
|
C |
65 - 128 Nodes |
0 - 3 hr |
GPU Partition Policy
To access the 8 node GPU Partition batch job submissions should request -p
gpu
Bin |
Node Count |
Duration |
Policy |
|---|---|---|---|
A |
1 - 2 Nodes |
0 - 48 hrs |
max 1 job running per user |
B |
3 - 8 Nodes |
0 - 6 hrs |
Note
The queue structure was designed based on user feedback and analysis of batch jobs over the recent years; however, we understand that the structure may not meet the needs of all users. If this structure limits your use of the system, please let us know. We want Riker to be a useful OLCF resource and will work with you providing exceptions or even changing the queue structure if necessary.
If your jobs require resources outside these queue policies such as higher priority or longer walltimes, please contact help@olcf.ornl.gov.
Slurm Compute Node Partitions
Riker’s compute nodes are separated into 2 Slurm partitions (queues): 1 for CPU jobs and 1 for GPU. Please see the tables below for details.
PARTITION |
NODELIST |
|---|---|
batch |
riker[1-128] |
gpu |
riker-gpu[1-8] |
Batch Node Scripts
A batch script can be used to submit a job to run on the compute nodes at a later time. In this case, stdout and stderr will be written to a file(s) that can be opened after the job completes. Here is an example of a simple batch script:
 1#!/bin/bash
 2## ALLOCATION TIME RESOURCE REQUESTS ##
 3#SBATCH -A <project_id>
 4#SBATCH -J <job_name>
 5#SBATCH -o %x-%j.out
 6#SBATCH -t 00:05:00
 7#SBATCH -p batch
 8#SBATCH -N #
 9#SBATCH -c #
10
11## RUNTIME RESOURCE DELEGATION ##
12srun -n4 --ntasks-per-node=2 ./a.out
The Slurm submission options are preceded by #SBATCH, making them appear as
comments to a shell (since comments begin with #). Slurm will look for
submission options from the first line through the first non-comment line.
Options encountered after the first non-comment line will not be read by Slurm.
In the example script, the lines are:
Line |
Description |
|---|---|
1 |
[Optional] shell interpreter line |
2 |
OLCF project to charge |
3 |
Job name |
4 |
stdout file name ( |
5 |
Walltime requested ( |
6 |
Batch queue |
7 |
Number of compute nodes requested |
8 |
Number of cores requested on each node Because we didn’t specify |
9 |
Blank line |
10 |
|
GPU Node Scripts
A batch script can be used to submit a job to run on the compute nodes at a later time. In this case, stdout and stderr will be written to a file(s) that can be opened after the job completes. Here is an example of a simple batch script:
 1#!/bin/bash
 2## ALLOCATION TIME RESOURCE REQUESTS ##
 3#SBATCH -A <project_id>
 4#SBATCH -J <job_name>
 5#SBATCH -o %x-%j.out
 6#SBATCH -t 00:05:00
 7#SBATCH -p gpu
 8#SBATCH -N 1
 9#SBATCH --gpus=1
10#SBATCH -c 16
11
12## RUNTIME RESOURCE DELEGATION ##
13srun -n8 --cpus-per-task=2 --gpus-per-task=1 ./a.out
The Slurm submission options are preceded by #SBATCH, making them appear as
comments to a shell (since comments begin with #). Slurm will look for
submission options from the first line through the first non-comment line.
Options encountered after the first non-comment line will not be read by Slurm.
In the example script, the lines are:
Line |
Description |
|---|---|
1 |
[Optional] shell interpreter line |
2 |
OLCF project to charge |
3 |
Job name |
4 |
stdout file name ( |
5 |
Walltime requested ( |
6 |
Batch queue |
7 |
Number of compute nodes requested |
8 |
Total number of GPUs requested in the job |
9 |
Number of CPUs requested on each node (Minimum of 16 per GPU) Because we didn’t specify |
10 |
Blank line |
11 |
|
Interactive Jobs
To request an interactive job where multiple job steps (i.e., multiple srun
commands) can be launched on the allocated compute node(s), the salloc
command can be used:
$ salloc -A <project_id> -p <partition> -t 00:10:00  -N 2 -c 4
salloc: Granted job allocation 4258
salloc: Waiting for resource configuration
salloc: Nodes riker[35-36] are ready for job

$ srun -n 4 --ntasks-per-node=2 ./a.out
<output printed to terminal>

$ srun -n 2 --ntasks-per-node=1 ./a.out
<output printed to terminal>
Here, salloc is used to request an allocation of compute nodes for
5 minutes. Once the resources become available, the user is granted access to
the compute nodes (riker35 and riker36 in this case) and can launch job
steps on them using srun.
Single Command (non-interactive)
$ srun -A <project_id> -t 00:05:00 -p <partition> -N 2 -n 4 -c 4 --ntasks-per-node=2 ./a.out
<output printed to terminal>
The job name and output options have been removed since stdout/stderr are typically desired in the terminal window in this usage mode.
Common Slurm Submission Options
The table below summarizes commonly-used Slurm job submission options:
|
Project ID to charge |
|
Name of job |
|
Partition / batch queue |
|
Wall clock time < |
|
Number of compute nodes |
|
Number of cores per task. When |
|
Amount of memory per node |
|
Standard output file name |
|
Standard error file name |
|
Reserve the entire node. |
For more information about these and/or other options, please see the
sbatch man page.
Other Common Slurm Commands
The table below summarizes commonly-used Slurm commands:
|
Used to view partition and node information.
E.g., to view user-defined details about the batch queue:
sinfo -p batch -o "%15N %10D %10P %10a %10c %10z" |
|
Used to view job and job step information for jobs in the scheduling queue.
E.g., to see all jobs from a specific user:
squeue -l -u <user_id> |
|
Used to view accounting data for jobs and job steps in the job accounting log (currently in the queue or recently completed).
E.g., to see a list of specified information about all jobs submitted/run by a users since 1 PM on January 4, 2021:
sacct -u <username> -S 2021-01-04T13:00:00 -o "jobid%5,jobname%25,user%15,nodelist%20" -X |
|
Used to signal or cancel jobs or job steps.
E.g., to cancel a job:
scancel <jobid> |
|
Used to view or modify job configuration.
E.g., to place a job on hold:
scontrol hold <jobid> |
Process and Thread Mapping
This section describes how to map processes (e.g., MPI ranks) and process threads (e.g., OpenMP threads) to the CPUs and GPUs on Riker. The Riker Nodes diagram will be helpful when reading this section to understand which hardware threads your processes and threads run on.
CPU Mapping
In this sub-section, a simple MPI+OpenMP “Hello, World” program
(hello_mpi_omp) will be used to
clarify the mappings. Slurm’s Interactive Jobs method was used to request an
allocation of 1 compute node for these examples:
salloc -A <project_id> -p batch -t 00:30:00 -N 1 -c 4
The srun options used in this section are (see man srun for more information):
|
Request that |
2 MPI ranks - each with 2 OpenMP threads
In this example, the intent is to launch 2 MPI ranks, each of which spawn 2 OpenMP threads, and have all of the 4 OpenMP threads run on different physical CPU cores.
To set the number of OpenMP threads spawned per MPI rank, the
OMP_NUM_THREADS environment variable can be used. To set the number
of MPI ranks launched, the srun flag -n can be used.
$ export OMP_NUM_THREADS=2
$ srun -n2 -c2 ./hello_mpi_omp | sort

MPI 000 - OMP 000 - HWT 000 - Node riker35
MPI 000 - OMP 001 - HWT 001 - Node riker35
MPI 001 - OMP 000 - HWT 003 - Node riker35
MPI 001 - OMP 001 - HWT 002 - Node riker35
The output shows that each OpenMP thread ran on its own physical CPU core.
Note
There are many different ways users might choose to perform these mappings,
so users are encouraged to clone the hello_mpi_omp program and test
whether or not processes and threads are running where intended.
GPU Mapping
In this sub-section, an MPI+OpenMP+CUDA “Hello, World” program, hello_jobstep.cpp, will be used to clarify the GPU mappings.
Modules to load:
1module load gcc
2module load cuda
3module load mpich
hello_jobstep.cpp
#ifndef _GNU_SOURCE
#define _GNU_SOURCE
#endif

#include <cstdlib>
#include <cstdio>
#include <cstring>
#include <string>
#include <vector>
#include <sstream>
#include <iomanip>

#include <mpi.h>
#include <omp.h>
#include <sched.h>

#include <cuda_runtime_api.h>

#define cudaErrorCheck(call)                                                    \
do {                                                                            \
    cudaError_t cudaErr = (call);                                               \
    if (cudaErr != cudaSuccess) {                                               \
        fprintf(stderr, "CUDA Error - %s:%d: '%s'\n",                           \
                __FILE__, __LINE__, cudaGetErrorString(cudaErr));               \
        fflush(stderr);                                                         \
        MPI_Abort(MPI_COMM_WORLD, EXIT_FAILURE);                                \
        std::abort();                                                           \
    }                                                                           \
} while (0)

static void report_layout(
    int rank,
    const char *node_name,
    const std::string &visible_gpu_ids,
    const std::string &runtime_gpu_ids,
    const std::string &bus_ids,
    bool have_gpu_info,
    bool report_all_threads)
{
    const int max_threads = omp_get_max_threads();
    std::vector<std::string> thread_lines(max_threads);
    int actual_threads = 0;

#pragma omp parallel default(none)                                              \
    shared(rank, node_name, visible_gpu_ids, runtime_gpu_ids, bus_ids,          \
           have_gpu_info, report_all_threads, thread_lines, actual_threads)
    {
        const int thread_id = omp_get_thread_num();
        const int hwthread = sched_getcpu();

        if (report_all_threads || thread_id == 0) {
            std::ostringstream line;

            line << std::setfill('0')
                 << "MPI " << std::setw(3) << rank
                 << " - OMP " << std::setw(3) << thread_id
                 << " - HWT " << std::setw(3) << hwthread
                 << std::setfill(' ')
                 << " - Node " << node_name;

            if (have_gpu_info) {
                line << " - RT_GPU_ID " << runtime_gpu_ids
                     << " - GPU_ID " << visible_gpu_ids
                     << " - Bus_ID " << bus_ids;
            }

            line << '\n';
            thread_lines[thread_id] = line.str();
        }

#pragma omp single
        {
            actual_threads = omp_get_num_threads();
        }
    }

    std::string output;

    if (report_all_threads) {
        for (int thread_id = 0; thread_id < actual_threads; ++thread_id) {
            output += thread_lines[thread_id];
        }
    } else {
        output = thread_lines[0];
    }

    fwrite(output.data(), 1, output.size(), stdout);
    fflush(stdout);
}

int main(int argc, char *argv[])
{
    MPI_Init(&argc, &argv);

    int size = 0;
    int rank = 0;

    MPI_Comm_size(MPI_COMM_WORLD, &size);
    MPI_Comm_rank(MPI_COMM_WORLD, &rank);

    char node_name[MPI_MAX_PROCESSOR_NAME + 1] = {};
    int result_length = 0;

    MPI_Get_processor_name(node_name, &result_length);

    if (result_length >= MPI_MAX_PROCESSOR_NAME) {
        node_name[MPI_MAX_PROCESSOR_NAME] = '\0';
    } else {
        node_name[result_length] = '\0';
    }

    // Short node name: truncate at first '.'
    char *dot = std::strchr(node_name, '.');
    if (dot != nullptr) {
        *dot = '\0';
    }

    const char *cuda_visible_devices = std::getenv("CUDA_VISIBLE_DEVICES");
    const std::string visible_gpu_ids =
        (cuda_visible_devices == nullptr) ? "N/A" : cuda_visible_devices;

    int num_devices = 0;
    cudaError_t count_status = cudaGetDeviceCount(&num_devices);

    if (count_status == cudaErrorNoDevice) {
        num_devices = 0;
    } else {
        cudaErrorCheck(count_status);
    }

    const bool report_all_threads = true;

    if (num_devices == 0) {
        report_layout(
            rank,
            node_name,
            visible_gpu_ids,
            "",
            "",
            false,
            report_all_threads);
    } else {
        std::string runtime_gpu_ids;
        std::string bus_ids;

        for (int device = 0; device < num_devices; ++device) {
            char bus_id[64] = {};

            cudaErrorCheck(
                cudaDeviceGetPCIBusId(
                    bus_id,
                    static_cast<int>(sizeof(bus_id)),
                    device));

            if (device > 0) {
                runtime_gpu_ids += ",";
                bus_ids += ",";
            }

            runtime_gpu_ids += std::to_string(device);

            // Extract bus field from domain:bus:device.function
            // Example: "0000:81:00.0" -> "81"
            std::string full_bus_id(bus_id);
            std::size_t first_colon = full_bus_id.find(':');
            std::size_t second_colon = full_bus_id.find(':', first_colon + 1);

            if (first_colon != std::string::npos &&
                second_colon != std::string::npos) {
                bus_ids += full_bus_id.substr(
                    first_colon + 1,
                    second_colon - first_colon - 1);
            } else {
                bus_ids += full_bus_id;
            }
        }

        report_layout(
            rank,
            node_name,
            visible_gpu_ids,
            runtime_gpu_ids,
            bus_ids,
            true,
            report_all_threads);
    }

    MPI_Finalize();
    return EXIT_SUCCESS;
}
Example Makefile for hello_jobstep.cpp:
 1COMP   = nvcc
 2
 3CFLAGS = -arch=sm_89 -Xcompiler -fopenmp
 4
 5INCLUDES  = -I${MPICH_DIR}/include
 6LIBRARIES = -L${MPICH_DIR}/lib -lmpi
 7
 8hello_jobstep: hello_jobstep.o
 9        ${COMP} ${CFLAGS} ${LIBRARIES} hello_jobstep.o -o hello_jobstep
10
11hello_jobstep.o: hello_jobstep.cpp
12        ${COMP} ${CFLAGS} ${INCLUDES} -c hello_jobstep.cpp
13
14.PHONY: clean
15
16clean:
17        rm -f hello_jobstep *.o
 1COMP   = mpicxx
 2
 3CFLAGS = -fopenmp
 4
 5INCLUDES  = -I${CUDA_PATH}/include
 6LIBRARIES = -L${CUDA_PATH}/lib64 -lcudart
 7
 8hello_jobstep: hello_jobstep.o
 9        ${COMP} ${CFLAGS} ${LIBRARIES} hello_jobstep.o -o hello_jobstep
10
11hello_jobstep.o: hello_jobstep.cpp
12        ${COMP} ${CFLAGS} ${INCLUDES} -c hello_jobstep.cpp
13
14.PHONY: clean
15
16clean:
17        rm -f hello_jobstep *.o
Again, Slurm’s Interactive Jobs method was used to request an allocation of 2 compute node for these examples:
salloc -A <project_id> -p gpu -t 00:30:00 -N 2 --exclusive
The CPU mapping part of this example is very similar to the example used above in the CPU Mapping sub-section, so the focus here will be on the GPU mapping part.
The following srun options will be used in the examples below. See man srun for a complete list of options and more information.
|
Specify the number of GPUs required for the job on each task to be spawned in the job’s resource allocation. |
|
Bind tasks to specific GPUs by setting GPU masks on tasks (or ranks) as specified where
<list> is <gpu_id_for_task_0>,<gpu_id_for_task_1>,....If the number of tasks (or ranks) exceeds the number of elements in this list,
elements in the list will be reused as needed starting from the beginning of the list.
To simplify support for large task counts, the lists may follow a map with an asterisk
and repetition count. (For example
map_gpu:0*4,1*4) |
|
Request that there are ntasks tasks invoked for every GPU. |
|
Requests |
Note
In general, GPU mapping can be accomplished in different ways. For example, an
application might map MPI ranks to GPUs programmatically within the code using,
say, cudaSetDevice. In this case, since all GPUs on a node are available to
all MPI ranks on that node by default, there might not be a need to map to GPUs
using Slurm (just do it in the code). However, in another application, there
might be a reason to make only a subset of GPUs available to the MPI ranks on a node.
A. 1 MPI rank per GPU
In the following examples, each MPI rank will be mapped to a single GPU.
Example: 2 MPI ranks - each with 1 GPU (single-node)
This example launches 2 MPI ranks (-n2), each with 32 physical CPU cores (-c32).
In addition, each MPI rank should have access to only 1 GPU.
Here, the -c32 highlights that the GPU nodes have 32 cores in each of its two NUMA domains (see the Riker Nodes section).
To accomplish the GPU mapping, the following srun option will be used:
--gpus-per-taskspecifies the number of GPUs required for the job on each task
Note
To further clarify, --gpus-per-task does not actually bind GPUs to MPI ranks – it allocates GPUs to the job step.
The default GPU layout is what actually maps a specific GPU to each rank. (see the Riker Nodes section).
$ export OMP_NUM_THREADS=1
$ srun -N1 -n2 -c32 --gpus-per-task=1 ./hello_jobstep | sort

MPI 000 - OMP 000 - HWT 029 - Node riker-gpu2 - RT_GPU_ID 0 - GPU_ID 0 - Bus_ID 81
MPI 001 - OMP 000 - HWT 063 - Node riker-gpu2 - RT_GPU_ID 0 - GPU_ID 0 - Bus_ID C1
The output contains different IDs associated with the GPUs so it is important to first describe these IDs before moving on.
GPU_IDis the node-level (or global) GPU ID read fromCUDA_VISIBLE_DEVICES. If this environment variable is not set (either by the user or by Slurm), the value ofGPU_IDwill be set toN/A.RT_GPU_IDis the CUDA runtime GPU ID (as reported from, saycudaGetDevice), which can be thought of as each MPI rank’s local GPU ID numbering (with zero-based indexing).Bus_IDis the physical hardware identifier for a given GPU.
So in the output above, each MPI rank has access to 1 unique GPU - but all MPI ranks show a CUDA runtime GPU ID of “0”. The reason is that each MPI rank only “sees” one GPU visible and so the CUDA runtime labels it as “0”. The GPU’s bus ID is included to definitively show that different GPUs are being used.
So the job step (i.e., srun command) used above gave the desired output.
Each rank has access to a unique GPU.
The --gpus-per-task=1 allocated 1 GPU for each MPI rank, and the default binding bound each GPU to the respective task.
Example: 4 MPI ranks - each with 1 GPU (multi-node)
This example will extend Example 1 to run on 2 nodes.
As the output shows, it is a very straightforward exercise of changing the number of nodes to 2 (-N2) and the number of MPI ranks to 4 (-n4).
$ export OMP_NUM_THREADS=1
$ srun -N2 -n4 -c32 --gpus-per-task=1 ./hello_jobstep | sort

MPI 000 - OMP 000 - HWT 024 - Node riker-gpu2 - RT_GPU_ID 0 - GPU_ID 0 - Bus_ID 81
MPI 001 - OMP 000 - HWT 063 - Node riker-gpu2 - RT_GPU_ID 0 - GPU_ID 0 - Bus_ID C1
MPI 002 - OMP 000 - HWT 002 - Node riker-gpu3 - RT_GPU_ID 0 - GPU_ID 0 - Bus_ID 81
MPI 003 - OMP 000 - HWT 046 - Node riker-gpu3 - RT_GPU_ID 0 - GPU_ID 0 - Bus_ID C1
B. Multiple GPUs per MPI rank
In the following example, each MPI rank will see multiple GPUs.
Example: 2 MPI ranks - where each rank sees both GPUs
To accomplish the GPU mapping, the following srun option will be used:
--gres=gpu:xrequestsxnumber of GPUs as generic resources (GRES) from each allocated node, reserving those GPUs for the job or job step. It controls GPU resource allocation at the node level, independent of how tasks are later bound to or allowed to see those GPUs.
$ export OMP_NUM_THREADS=1
$ srun -N1 -n2 --gres=gpu:2 ./hello_jobstep | sort

MPI 000 - OMP 000 - HWT 000 - Node riker-gpu2 - RT_GPU_ID 0,1 - GPU_ID 0,1 - Bus_ID 81,C1
MPI 001 - OMP 000 - HWT 042 - Node riker-gpu2 - RT_GPU_ID 0,1 - GPU_ID 0,1 - Bus_ID 81,C1
Through --gres=gpu:2, each MPI rank now has the ability to see both GPUs on a given node.
C. Multiple MPI ranks to a single GPU
In the following examples, 2 MPI ranks will be mapped to 1 GPU.
Example: 4 MPI ranks - where 2 ranks share a GPU (single-node)
This example launches 4 MPI ranks (-n4), each with 8 physical CPU cores (-c8) and 1 OpenMP thread (OMP_NUM_THREADS=1).
The MPI ranks will be assigned to GPUs so that each of the 2 GPUs on the node are shared by 2 MPI ranks.
Here, the -c8 highlights that the GPU nodes have 8 cores in each of its L3 regions (see the Riker Nodes section).
To accomplish this GPU mapping, the following srun options will be used:
--ntasks-per-gpuspecifies the number of MPI ranks that will share access to a GPU.--gpu-bind=map_gpu:<list>Bind tasks to specific GPUs by setting GPU masks on tasks (or ranks) as specified where<list>is<gpu_id_for_task_0>,<gpu_id_for_task_1>,...
$ export OMP_NUM_THREADS=1
$ srun -N1 -n4 -c8  --ntasks-per-gpu=2 --gpu-bind=map_gpu:0,1 ./hello_jobstep | sort

MPI 000 - OMP 000 - HWT 007 - Node riker-gpu2 - RT_GPU_ID 0 - GPU_ID 0 - Bus_ID 81
MPI 001 - OMP 000 - HWT 033 - Node riker-gpu2 - RT_GPU_ID 0 - GPU_ID 0 - Bus_ID C1
MPI 002 - OMP 000 - HWT 008 - Node riker-gpu2 - RT_GPU_ID 0 - GPU_ID 0 - Bus_ID 81
MPI 003 - OMP 000 - HWT 040 - Node riker-gpu2 - RT_GPU_ID 0 - GPU_ID 0 - Bus_ID C1
Although we were using 4 tasks, only 2 GPUs were needed in the --gpu-bind list.
This is because Slurm divides the total number of tasks by --ntasks-per-gpu to establish a pattern – so, in this case, only 2 list entries were necessary.
Example: 8 MPI ranks - where 2 ranks share a GPU (multi-node)
This example will extend the previous example to run on 2 nodes.
As the output shows, it is a very straightforward exercise of changing the number of nodes to 2 (-N2) and the number of MPI ranks to 8 (-n8).
$ export OMP_NUM_THREADS=1
$ srun -N2 -n8 -c8  --ntasks-per-gpu=2 --gpu-bind=map_gpu:0,1 ./hello_jobstep | sort

MPI 000 - OMP 000 - HWT 004 - Node riker-gpu2 - RT_GPU_ID 0 - GPU_ID 0 - Bus_ID 81
MPI 001 - OMP 000 - HWT 032 - Node riker-gpu2 - RT_GPU_ID 0 - GPU_ID 0 - Bus_ID C1
MPI 002 - OMP 000 - HWT 008 - Node riker-gpu2 - RT_GPU_ID 0 - GPU_ID 0 - Bus_ID 81
MPI 003 - OMP 000 - HWT 047 - Node riker-gpu2 - RT_GPU_ID 0 - GPU_ID 0 - Bus_ID C1
MPI 004 - OMP 000 - HWT 000 - Node riker-gpu3 - RT_GPU_ID 0 - GPU_ID 0 - Bus_ID 81
MPI 005 - OMP 000 - HWT 032 - Node riker-gpu3 - RT_GPU_ID 0 - GPU_ID 0 - Bus_ID C1
MPI 006 - OMP 000 - HWT 009 - Node riker-gpu3 - RT_GPU_ID 0 - GPU_ID 0 - Bus_ID 81
MPI 007 - OMP 000 - HWT 047 - Node riker-gpu3 - RT_GPU_ID 0 - GPU_ID 0 - Bus_ID C1
Although we were using 8 tasks, only 2 GPUs were needed in the --gpu-bind list because Slurm operates the pattern on a per-node basis.
Note
There are many different ways users might choose to perform these mappings, so users are encouraged to clone the hello_jobstep program and test whether or not processes and threads are running where intended.
Job Accounting on Riker
Jobs on Riker are scheduled in partial-node increments. The OLCF charges based on what a job makes unavailable to other users, so users are encouraged to only use what their job requires. Allocations on Riker are separate from those on Frontier and other OLCF resources.
The node-hour charge for each job will be calculated as follows:
node-hours = ({weight for resource} * {Resource used}) * ( batch job endtime - batch job starttime )
Where we take a weighted percentage of the node resources used and multiply it by the number of hours the resources were unavailable to other users.
batch job starttime is the time the job moves into a running state, and batch job endtime is the time the job exits a running state.
Resources are weighted differently depending on the partition/queue; however, the weights are overall configured to be X percentage of a node (as opposed to charging A for a core on the batch partition and B for a core on the GPU partition).
The weight calculation on the batch partition are as follows:
node-hours = ({0.0078125} * {Number of Cores}) * ( batch job endtime - batch job starttime )
The weight calculation for the GPU partition are as follows:
node-hours = ({0.003125} * {Number of Cores} + {0.4} * {Number of GPUs}) * ( batch job endtime - batch job starttime )
Visualization tools
Information regarding using common visualization tools like ParaView, VisIt, VMD, and VNC lives in the Software Section.
Container Usage
Riker provides Apptainer v1.2.5 installed for building and running containers. See documentation on how to write Apptainer definition files here . You can also pull images from a registry like Docker Hub, and Apptainer will automatically convert those images to its SIF format.
Note
The container docs will continue to evolve and change as we identify better practices and more user friendly methods for using containers on Riker to best suit the needs of the users. If something you’re trying no longer works, be sure to come back and check the docs to see if anything has changed.
Build and Run Workflow
As an example, let’s build and run a very simple container image to demonstrate the workflow.
Building a Simple Image
Create a directory called
simplecontaineron home or Orion andcdinto it.Create an Apptainer definition file named
simple.defwith the following contents. .. code-block:Bootstrap: docker From: rockylinux:9 %post dnf install -y wget sudo git gzip gcc openssh hostname
Build the container image with
apptainer build simple.sif simple.def.Apptainer builds the container image in the SIF file format. Unlike Podman, Apptainer gives you a single file for your image that you can later run as your container.
Running a Simple Container in a Batch Job
As a simple example, we will run hostname with the Apptainer container.
Create a file submit.sl with the contents below. .. code-block:
#!/bin/bash
#SBATCH -A stf007
#SBATCH -p batch
#SBATCH -J logs/simple_container_job
#SBATCH -o %x_%j.out
#SBATCH -e %x_%j.out
#SBATCH -t 00:10:00
#SBATCH -N 2
#SBATCH -c 1
#SBATCH --mem=18GB

srun  -N2 --ntasks-per-node=1 apptainer exec  simple.sif hostname
Submit the job with
sbatch submit.sl. This should produce an output that looks like:riker35 riker36
Note that if you are running multiple tasks per node, for example with
srun -N1 --tasks-per-node=2 apptainer exec simple.sif hostname, Apptainer is running
an instance of the runtime for each task i.e. the same running container is NOT shared
between multiple tasks running on the same node.
Building an MPI Image and Running an MPI application
This and the following examples will make use of the olcf_container_examples repository :
git clone https://github.com/olcf/olcf_container_examples
Clone that repository and navigate to the riker/docs_examples/mpi_example directory. The example container includes MPICH and the OSU micro benchmarks to show MPI functionality.
Build the container with
apptainer build mpicontainer.sif mpicontainer.def.Submit the job with
sbatch submit.sbatch. You should get an output like the below# OSU MPI Allgather Latency Test v7.5.2 # Datatype: MPI_CHAR. # Size Avg Latency(us) 1 10.18 2 10.13 4 10.19 8 10.62 16 10.60 32 11.01 64 12.05 128 12.53 256 13.85 512 15.77 1024 17.28 2048 21.78 4096 31.29 8192 40.06 16384 49.16 32768 156.31 65536 174.87 131072 217.61 262144 317.03 524288 569.82 1048576 1111.72
Note that the
submit.sbatchscript includes setting up some additional environment variables. These are necessary for an MPI application in a container to work correctly on Riker.Also note that the MPICH version being installed in the container matches the MPICH version on Riker. It is good practice to match the MPICH version with what is available on Riker for your own container.
Building and Running a simple single GPU program in a Container
Nvidia’s NGC registry distributes containers with CUDA and different applications built to run on
Nvidia GPUs. For this example, we will grab the Rocky Linux 9 CUDA 13.3.1 container image with
apptainer pull or apptainer build.
Clone the olcf_container_examples repository the navigate to the
riker/docs_examples/gpu_exampledirectory.This has a simple vector addition example that runs on a single GPU.
Pull the CUDA 13.3 container image.
apptainer build rockylinuxcuda133.sif docker://nvcr.io/nvidia/cuda:13.3.1-devel-rockylinux9
Submit the job with
sbatch submit.sbatch.This submit script will build the vector addition example and run it on a single node.
The
--nvflag is required forapptainer execin your submit scripts to be able to access the GPUs on the node.
If successful, you will see an output like this
COMPLETE!
real    0m0.812s
user    0m0.002s
sys     0m0.005s
Building and Running a GPU+MPI Program in a Container
Clone the olcf_container_examples repository and navigate to the
riker/docs_examples/gpu_and_mpi_exampledirectory.This directory has an Apptainer definition file that will use an Nvidia CUDA container as a base and install MPICH. It also has a submit script that will build and run the
hello_jobstepprogram from earlier in this documentation page, that will list out the MPI processes and the cores and GPUs that each process has access to.
Build the Apptainer image with
apptainer build rockylinuxcuda133.sif rockylinuxcuda133.def.Submit the job with
sbatch submit.sbatch. The job will buildhello_jobstepwithin the container’s environment and then run it across two GPUs on two nodes.If successful, you should see an output that looks like this
mpicxx -fopenmp -I/usr/local/cuda/include -c hello_jobstep.cpp
mpicxx -fopenmp -L/usr/local/cuda/lib64 -lcudart hello_jobstep.o -o hello_jobstep
MPI 000 - OMP 000 - HWT 015 - Node riker-gpu1 - RT_GPU_ID 0 - GPU_ID 0 - Bus_ID 81
MPI 001 - OMP 000 - HWT 015 - Node riker-gpu2 - RT_GPU_ID 0 - GPU_ID 0 - Bus_ID 81

real    0m1.301s
user    0m0.002s
sys     0m0.007s
Getting Help
If you have problems or need helping running on Riker, please submit a ticket by emailing help@olcf.ornl.gov.
Known Issues
Interactive jobs hanging when allocation expires
Riker interactive jobs can sometimes encounter terminal hang when the allocation expires. Users will need to close out of their terminal and log back into Riker when this happens.
Tmux users can :kill-window, reopen the window, and log back in to regain access to their terminal as killing the terminal window will not kill the tmux window.